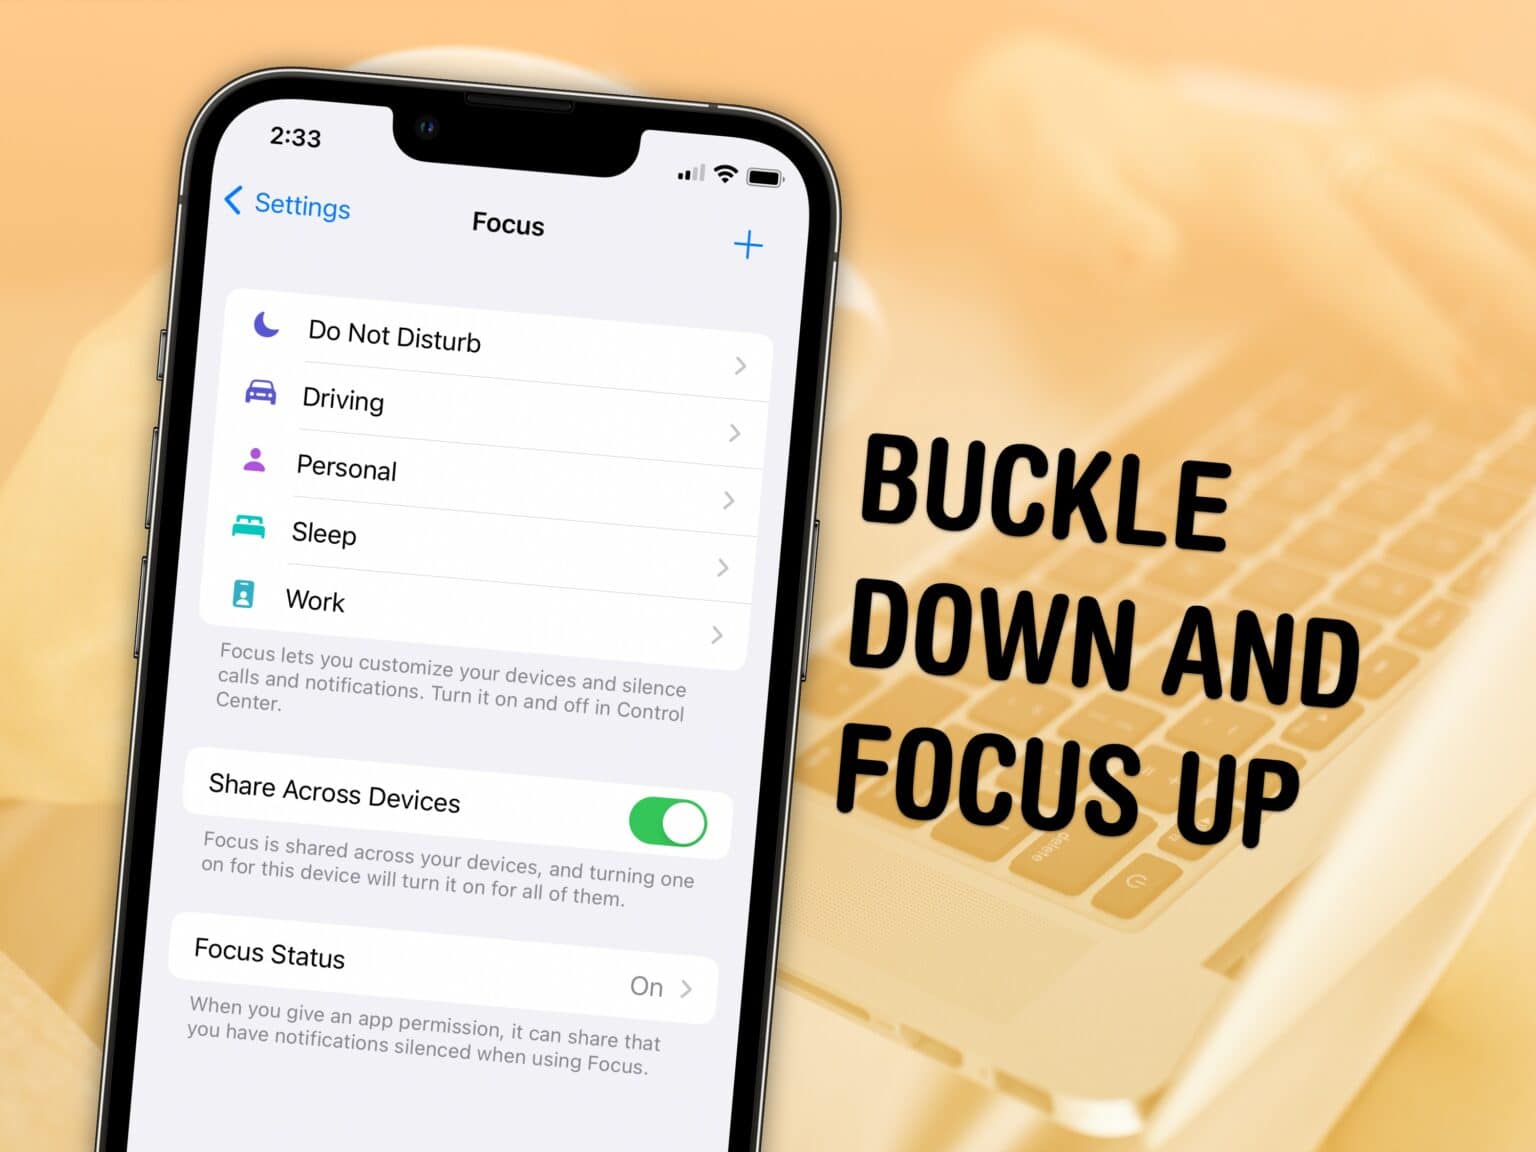
Sometimes, you need your iPhone and your Mac to be very different tools throughout the day — Focus modes are all about customizing them for everything you do.
Apple’s Focus modes are a powerful way to change how your iPhone, iPad and Mac look and feel whether you’re driving, sleeping, relaxing or working. It’s all about fully immersing yourself in whatever you’re doing. You can change all kinds of things: from who can reach you and which apps send notifications to custom lock screens, home screens and more.
Focus modes are easier to set up than ever before. Focus mode settings are a single destination where you can change how your phone looks and works.
Every Focus mode can have different rules for who can reach you and which apps can send alerts. With iOS 16, you can easily create different looks and layouts on your devices for different parts of your day.
Setting up a Focus with rich customization makes your phone more personal. Keep reading to find out how.
How to set up and use Focus modes on iPhone, iPad and Mac
This article is written for iOS 16, now available as a software update for iPhone. iOS 16 is compatible with every iPhone released in 2017 and later: the iPhone 8, X, XS, 11, 12, 13, 14 models and iPhone SE (both second and third generation).
If you’re still on iOS 15, you can check out my article on Focus modes in iOS 15 for last year’s features.
Check in Settings > General > About on iPhone and iPad or > About This Mac to see which version you’re on.
Create a new Focus
On iPhone and iPad, go to Settings > Focus.
On the Mac, go to System Settings > Focus.
There are templates for Driving, Sleep, Personal and Work. These are good starting points. Tap any one of these and you can start customizing.
Screenshot: D. Griffin Jones/Cult of Mac
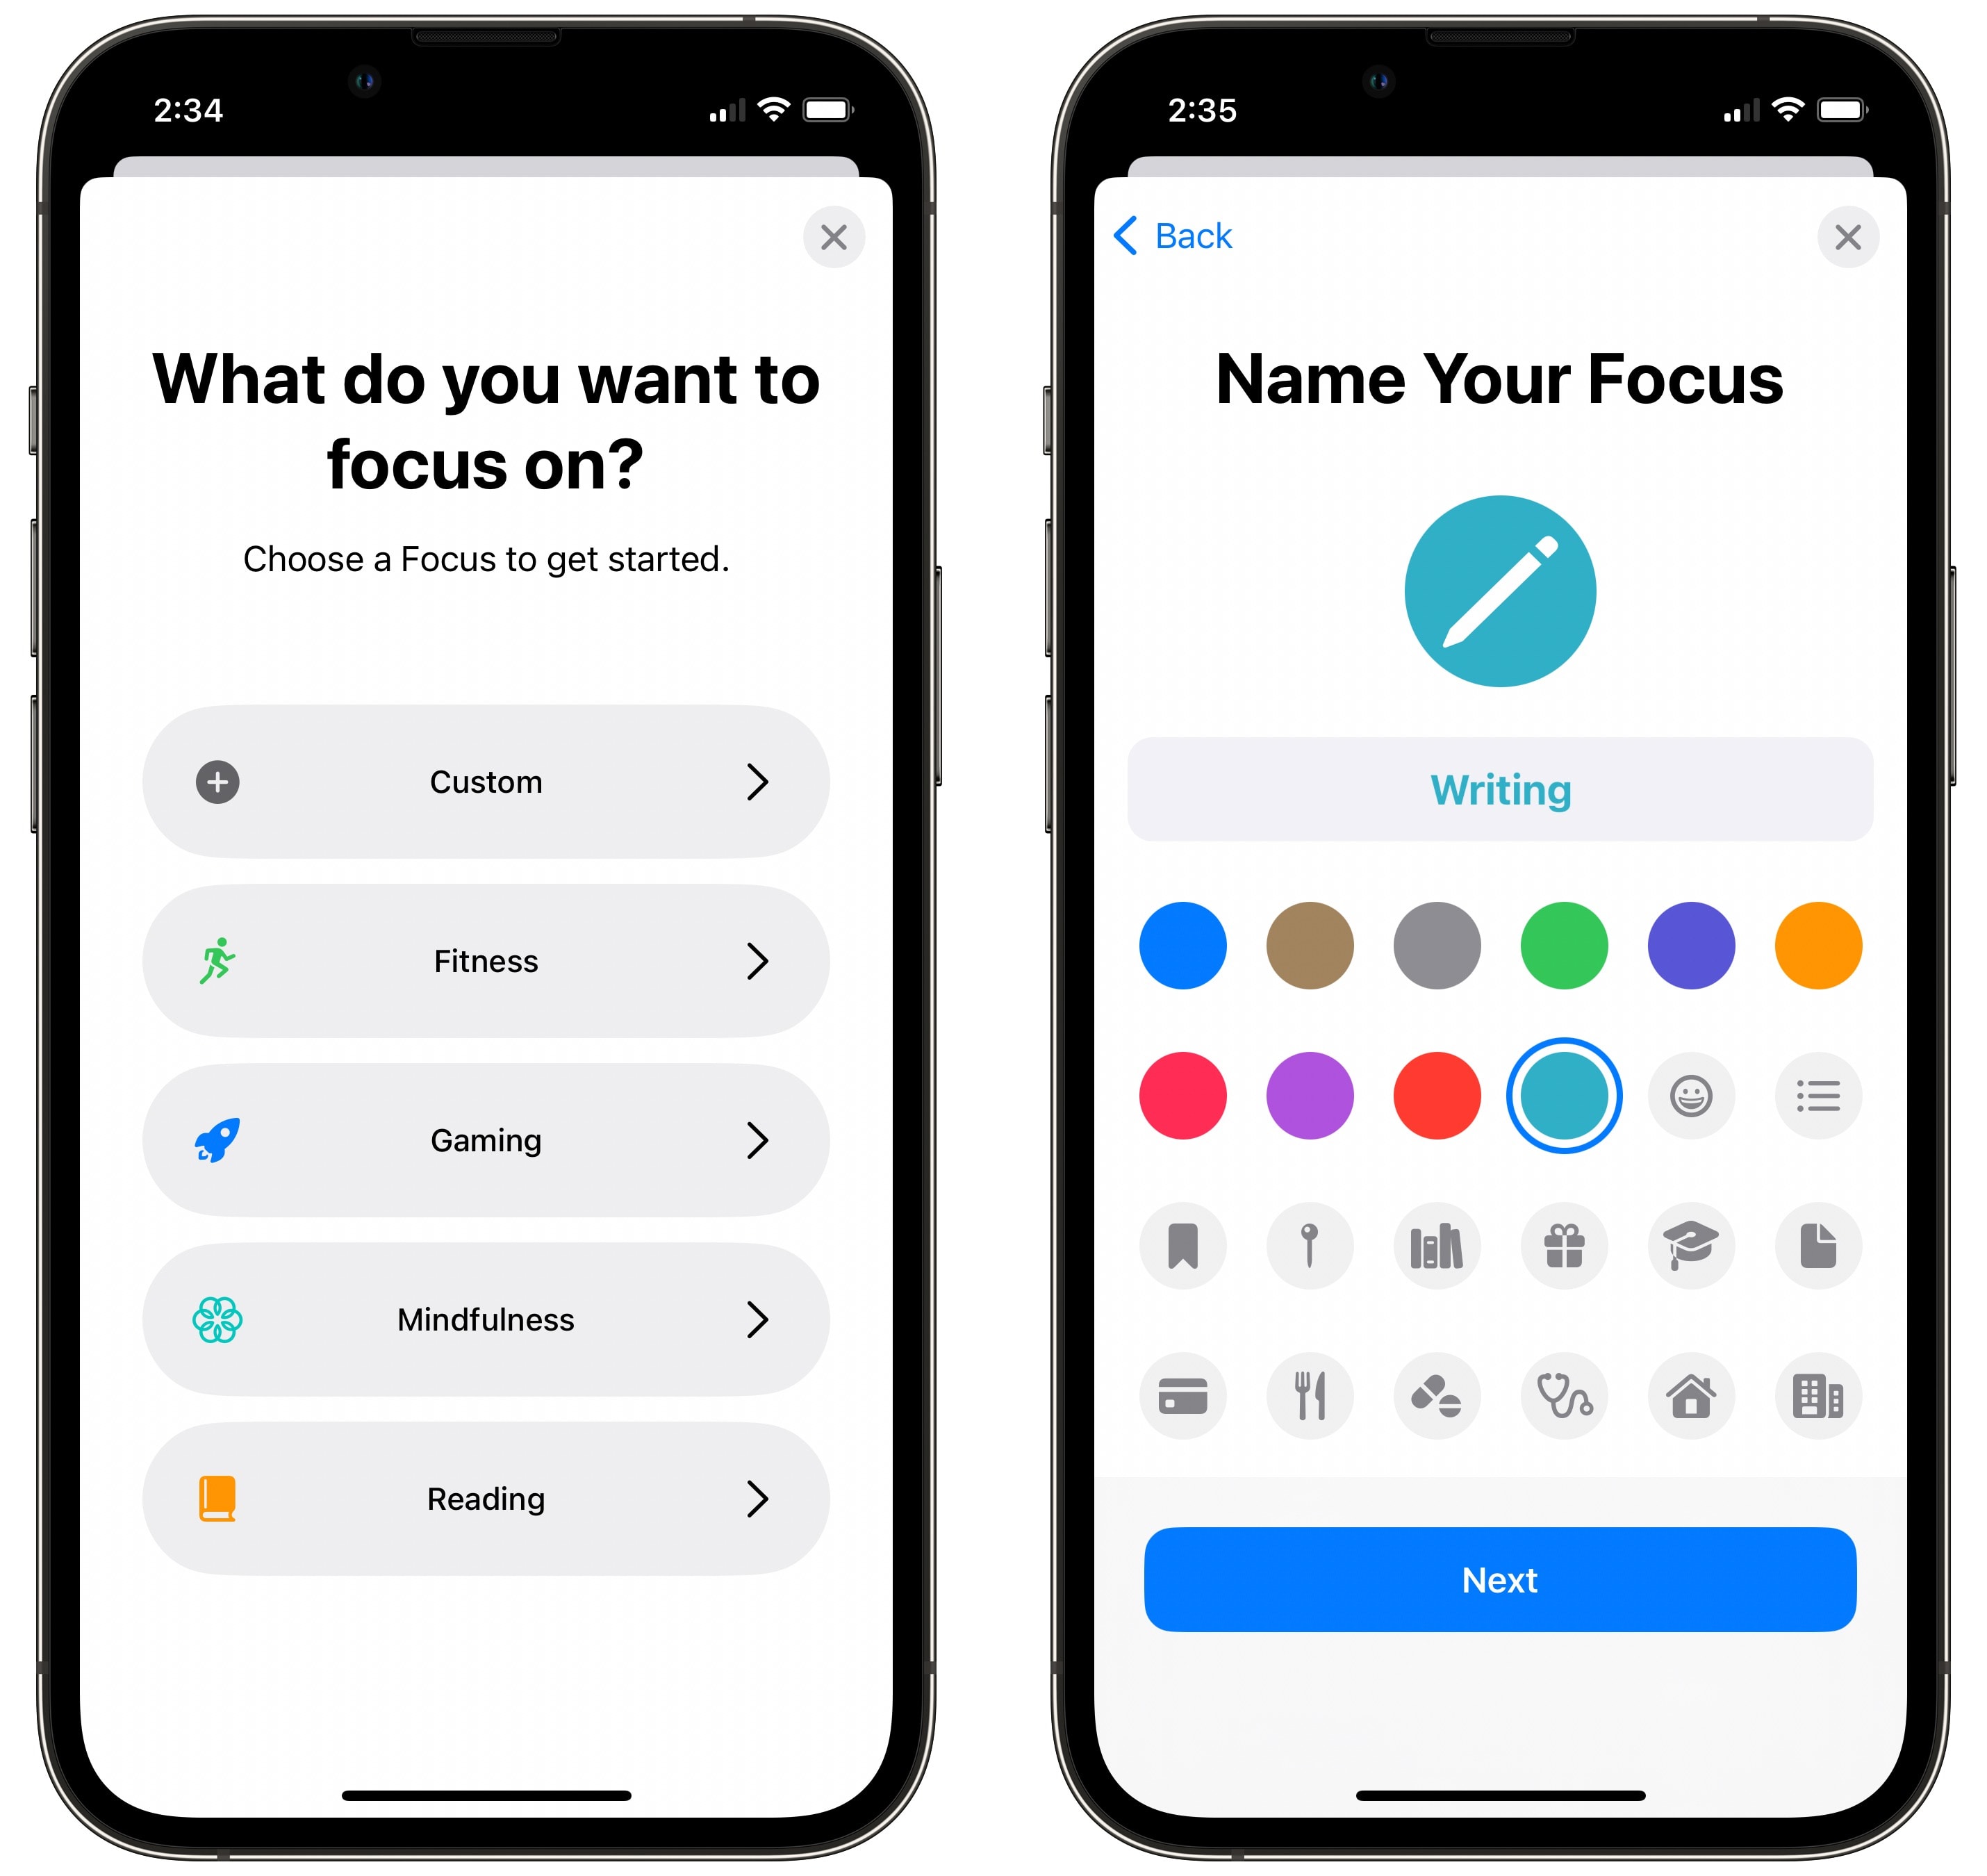
Tap + to create a new Focus mode. You have even more templates here, like Fitness, Gaming, Mindfulness and Reading. If you want something different, tap Custom. Give it a name, icon and color.
Next, you can pick who can message you or who you want to silence.
Screenshot: D. Griffin Jones/Cult of Mac
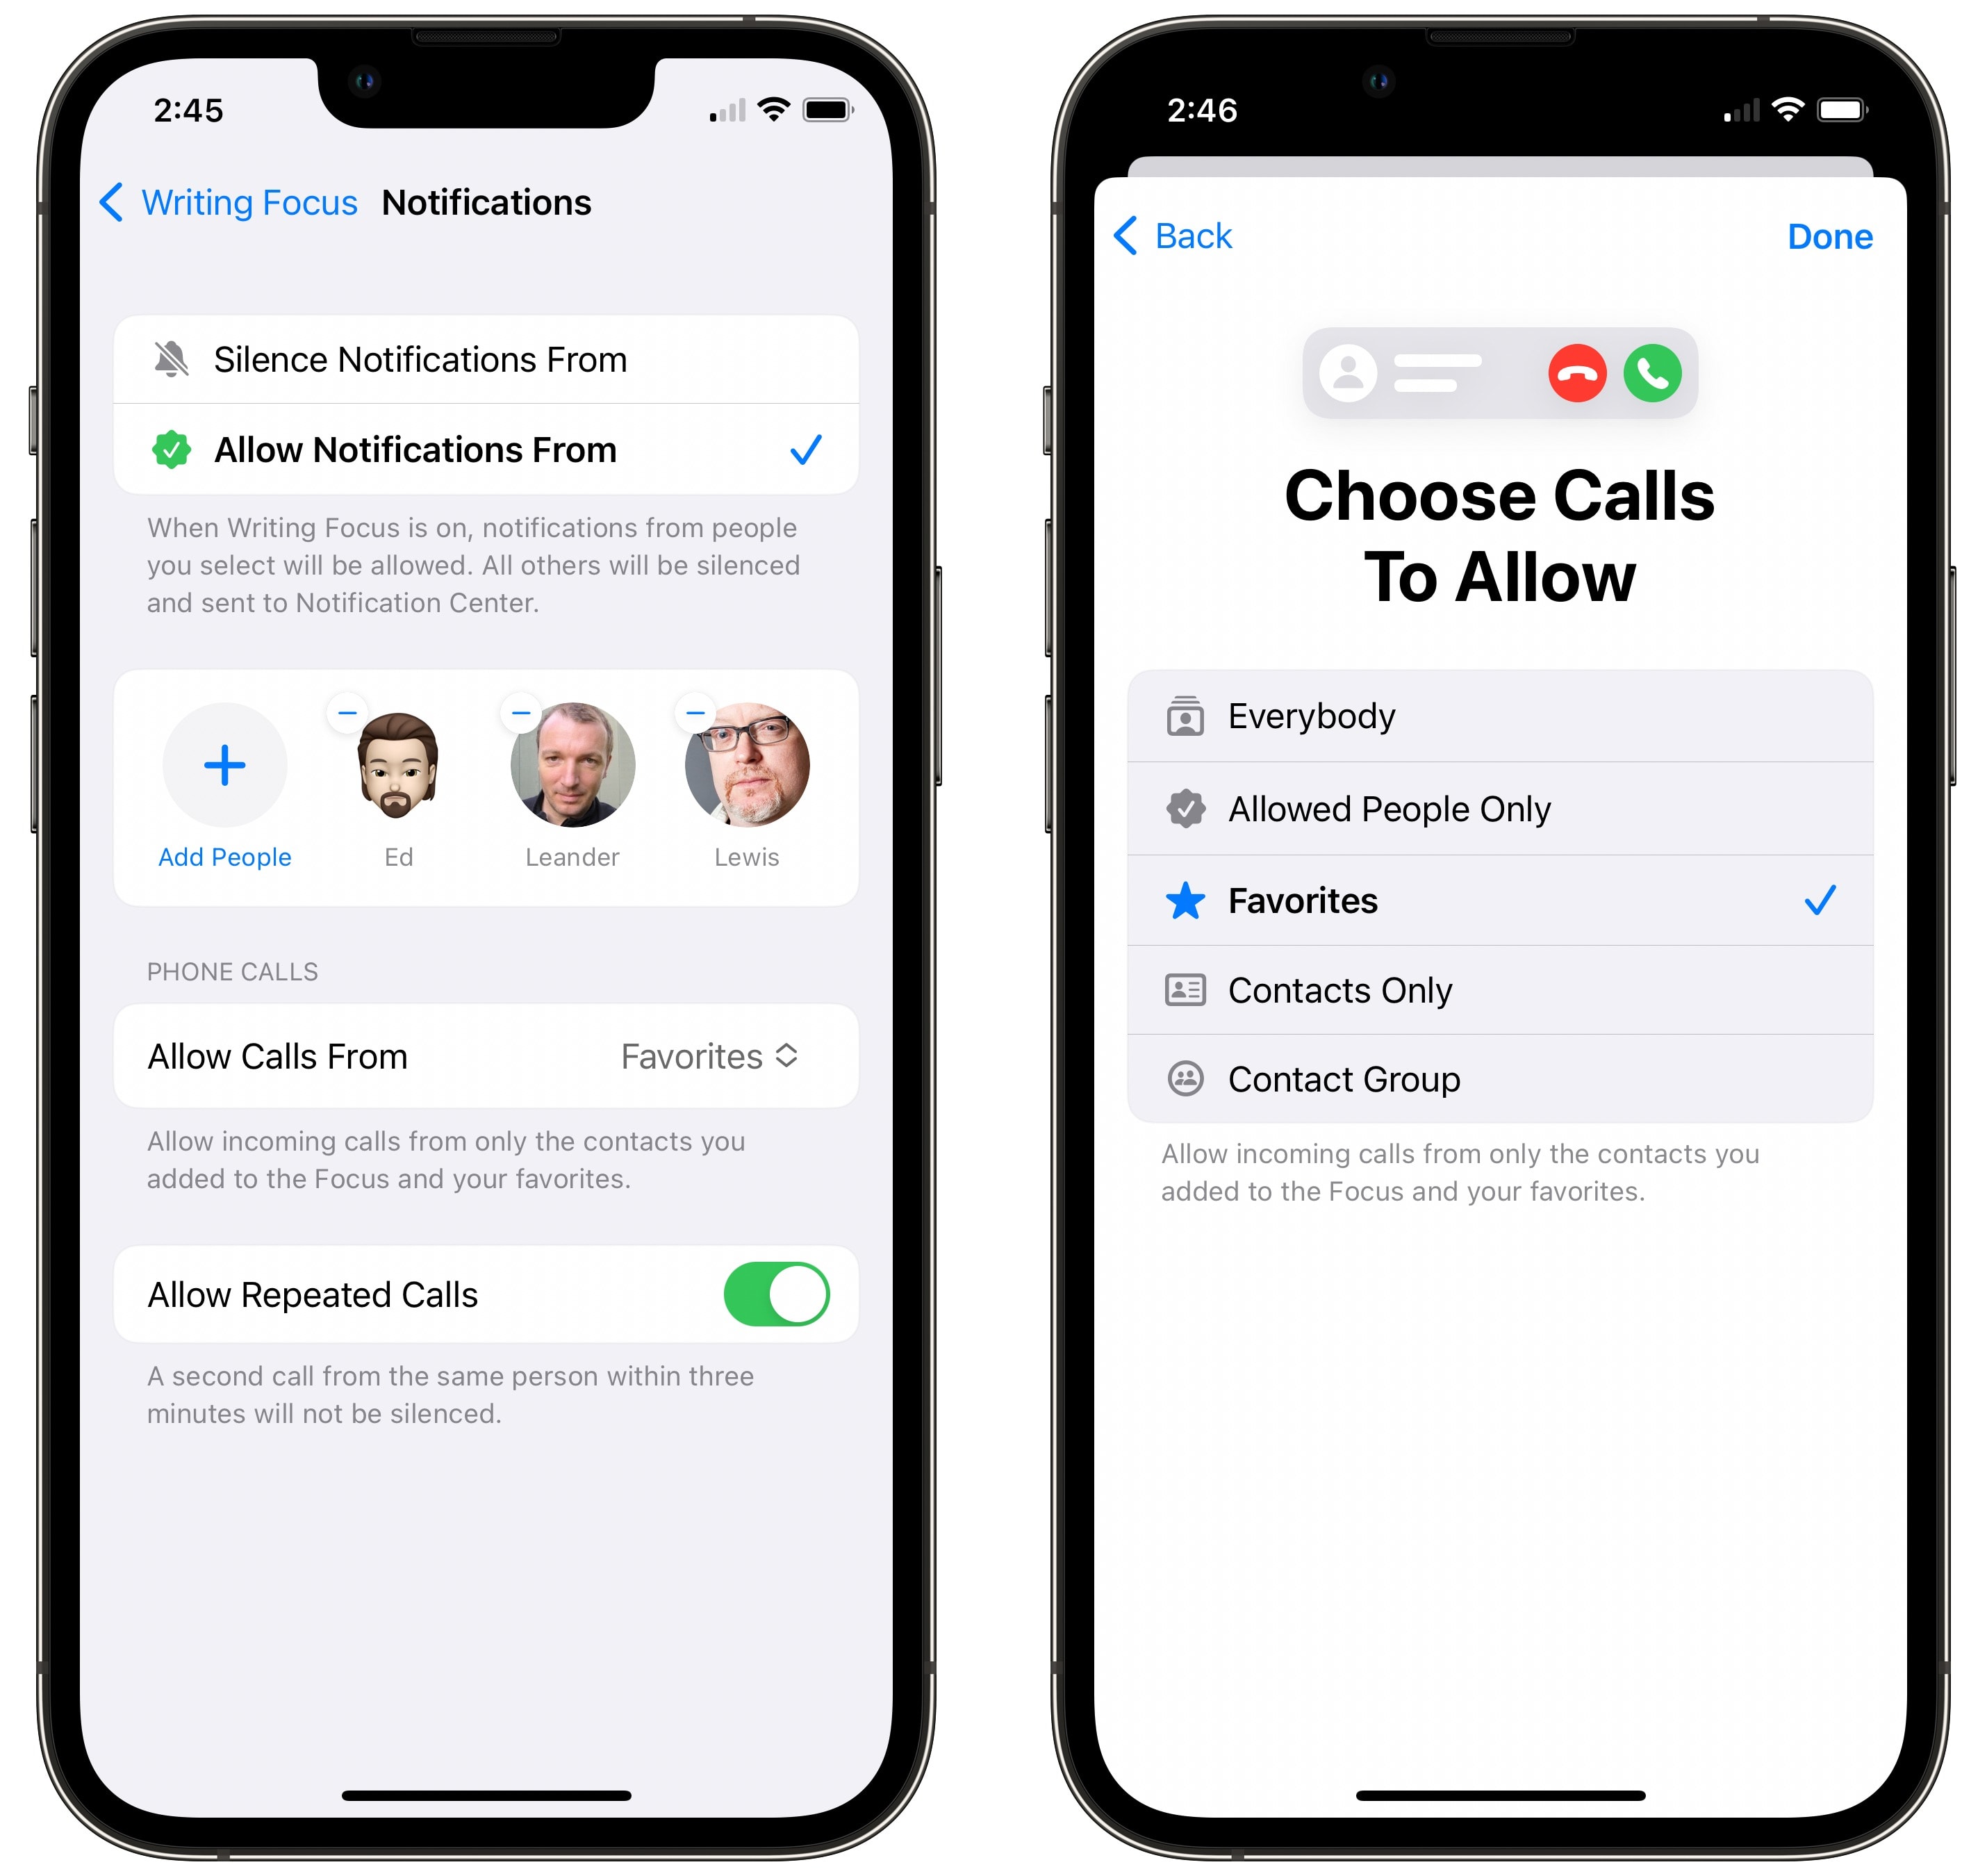
Tap Choose People to pick contacts. Allow Notifications From will let some contacts get through to you and silence everyone else; Silence Notifications From will allow everyone except the people you choose.
In this example, I created a Focus for writing. In this mode, I want to silence everyone except my contacts at Cult of Mac, so I’m allowing notifications from my colleagues and silencing everyone else. Tap Next when you’re done.
Under Choose Calls To Allow, you can set a different rule for filtering phone calls:
- Everyone, including people you don’t know. This is useful if you’re creating a Focus where you just want to silence specific apps, but you’re okay with getting calls from everyone.
- Allowed People Only will let through the people you selected on the previous screen.
- Favorites will let favorited contacts and the people you selected on the previous screen.
- Contacts Only silences unknown calls but allows everyone in your contacts.
- Contact Group lets everyone in a contact group of your choosing get through. If you have all of your work contacts in a special contact group, this one could be useful.
Tap Done when you’ve made your selection.
Decide which apps to allow
Screenshot: D. Griffin Jones/Cult of Mac
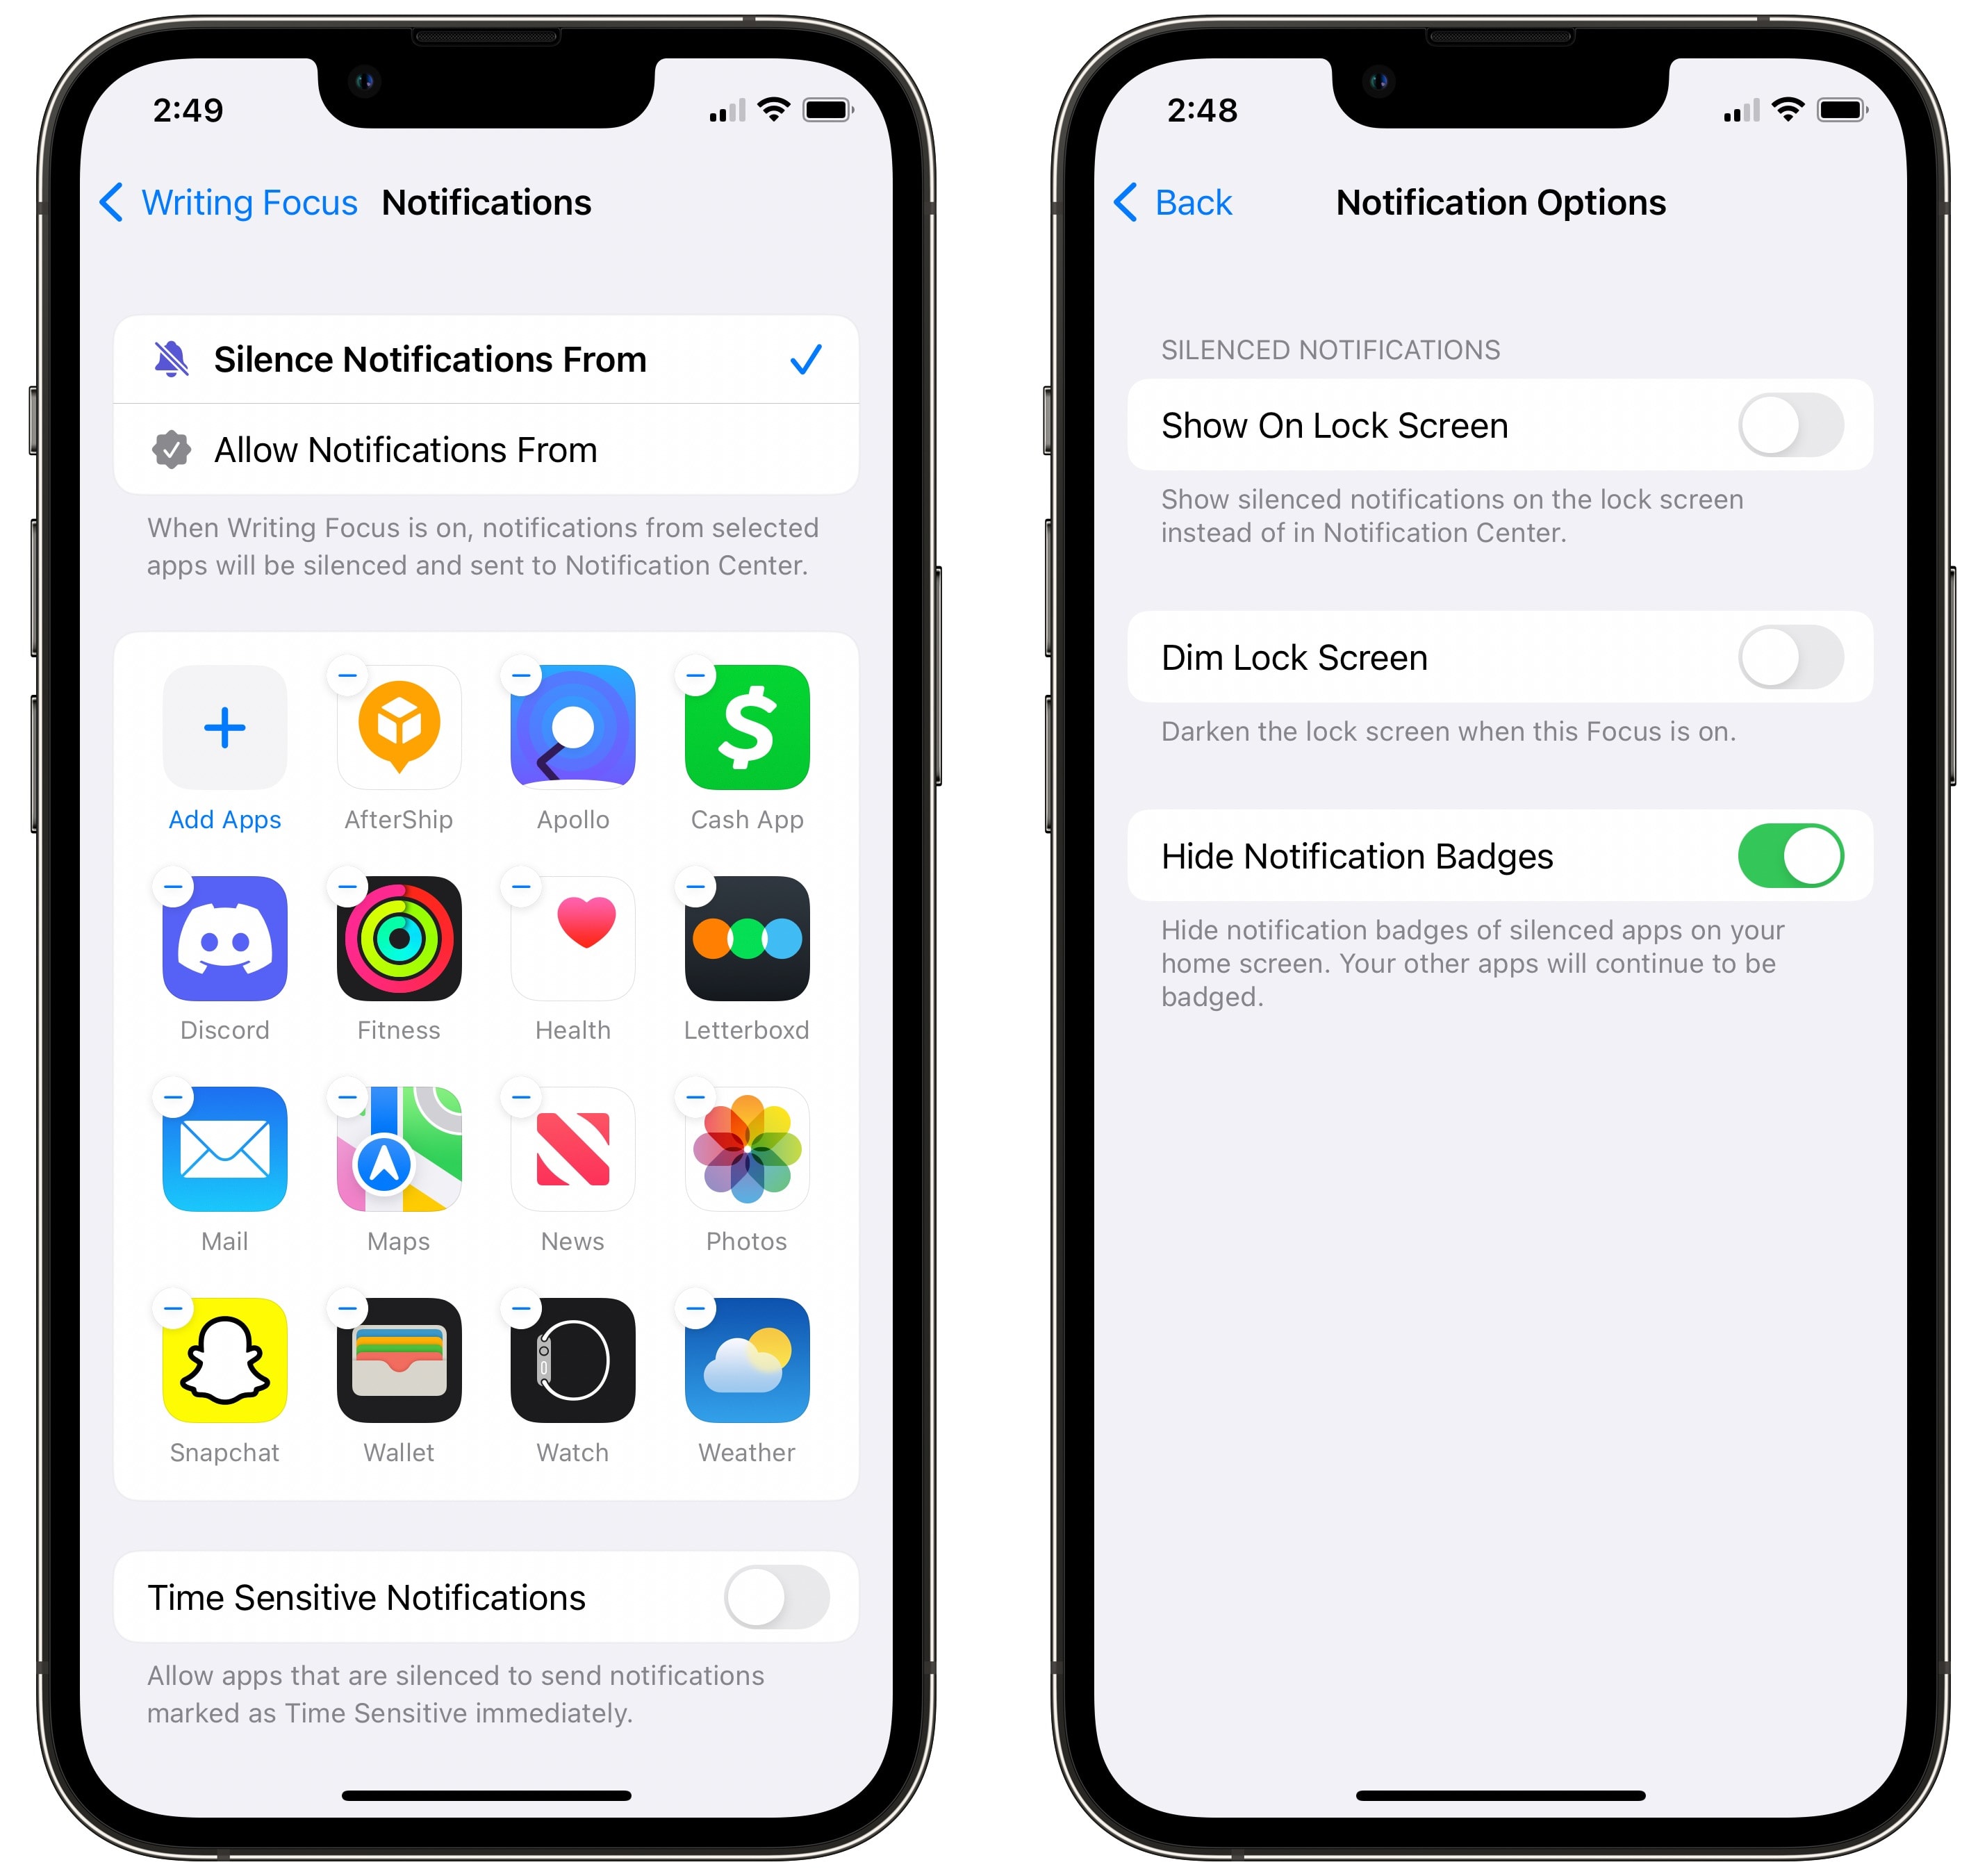
After that, pick which apps you want to let through. Tap Add Apps to add to the list or − to remove one. Just like with contacts, you can choose whether you want to silence by default and allow the apps of your choosing get through (Allow Notifications From) or allow everything else and silence the apps of your choice (Silence Notifications From).
Enable Time Sensitive Notifications to let through any app with an urgent notification.
Go back and tap Options for a few nitpicky settings. You can choose whether silenced notifications appear on your lock screen — if you still want that, enable Show On Lock Screen. If you’re worried about these notifications being too public, you can make them more subtle by enabling Dim Lock Screen. Checking Hide Notification Badges will prevent you from habitually opening all of your apps with red dots while you’re trying to stay in your groove.
For my Writing Focus and Driving Focus modes, I silenced all contacts and apps save for a few exceptions.
I have a Dungeons & Dragons Focus mode that allows everything by default but silences social media notifications and work contacts.
Choose a custom lock screen to match the mood
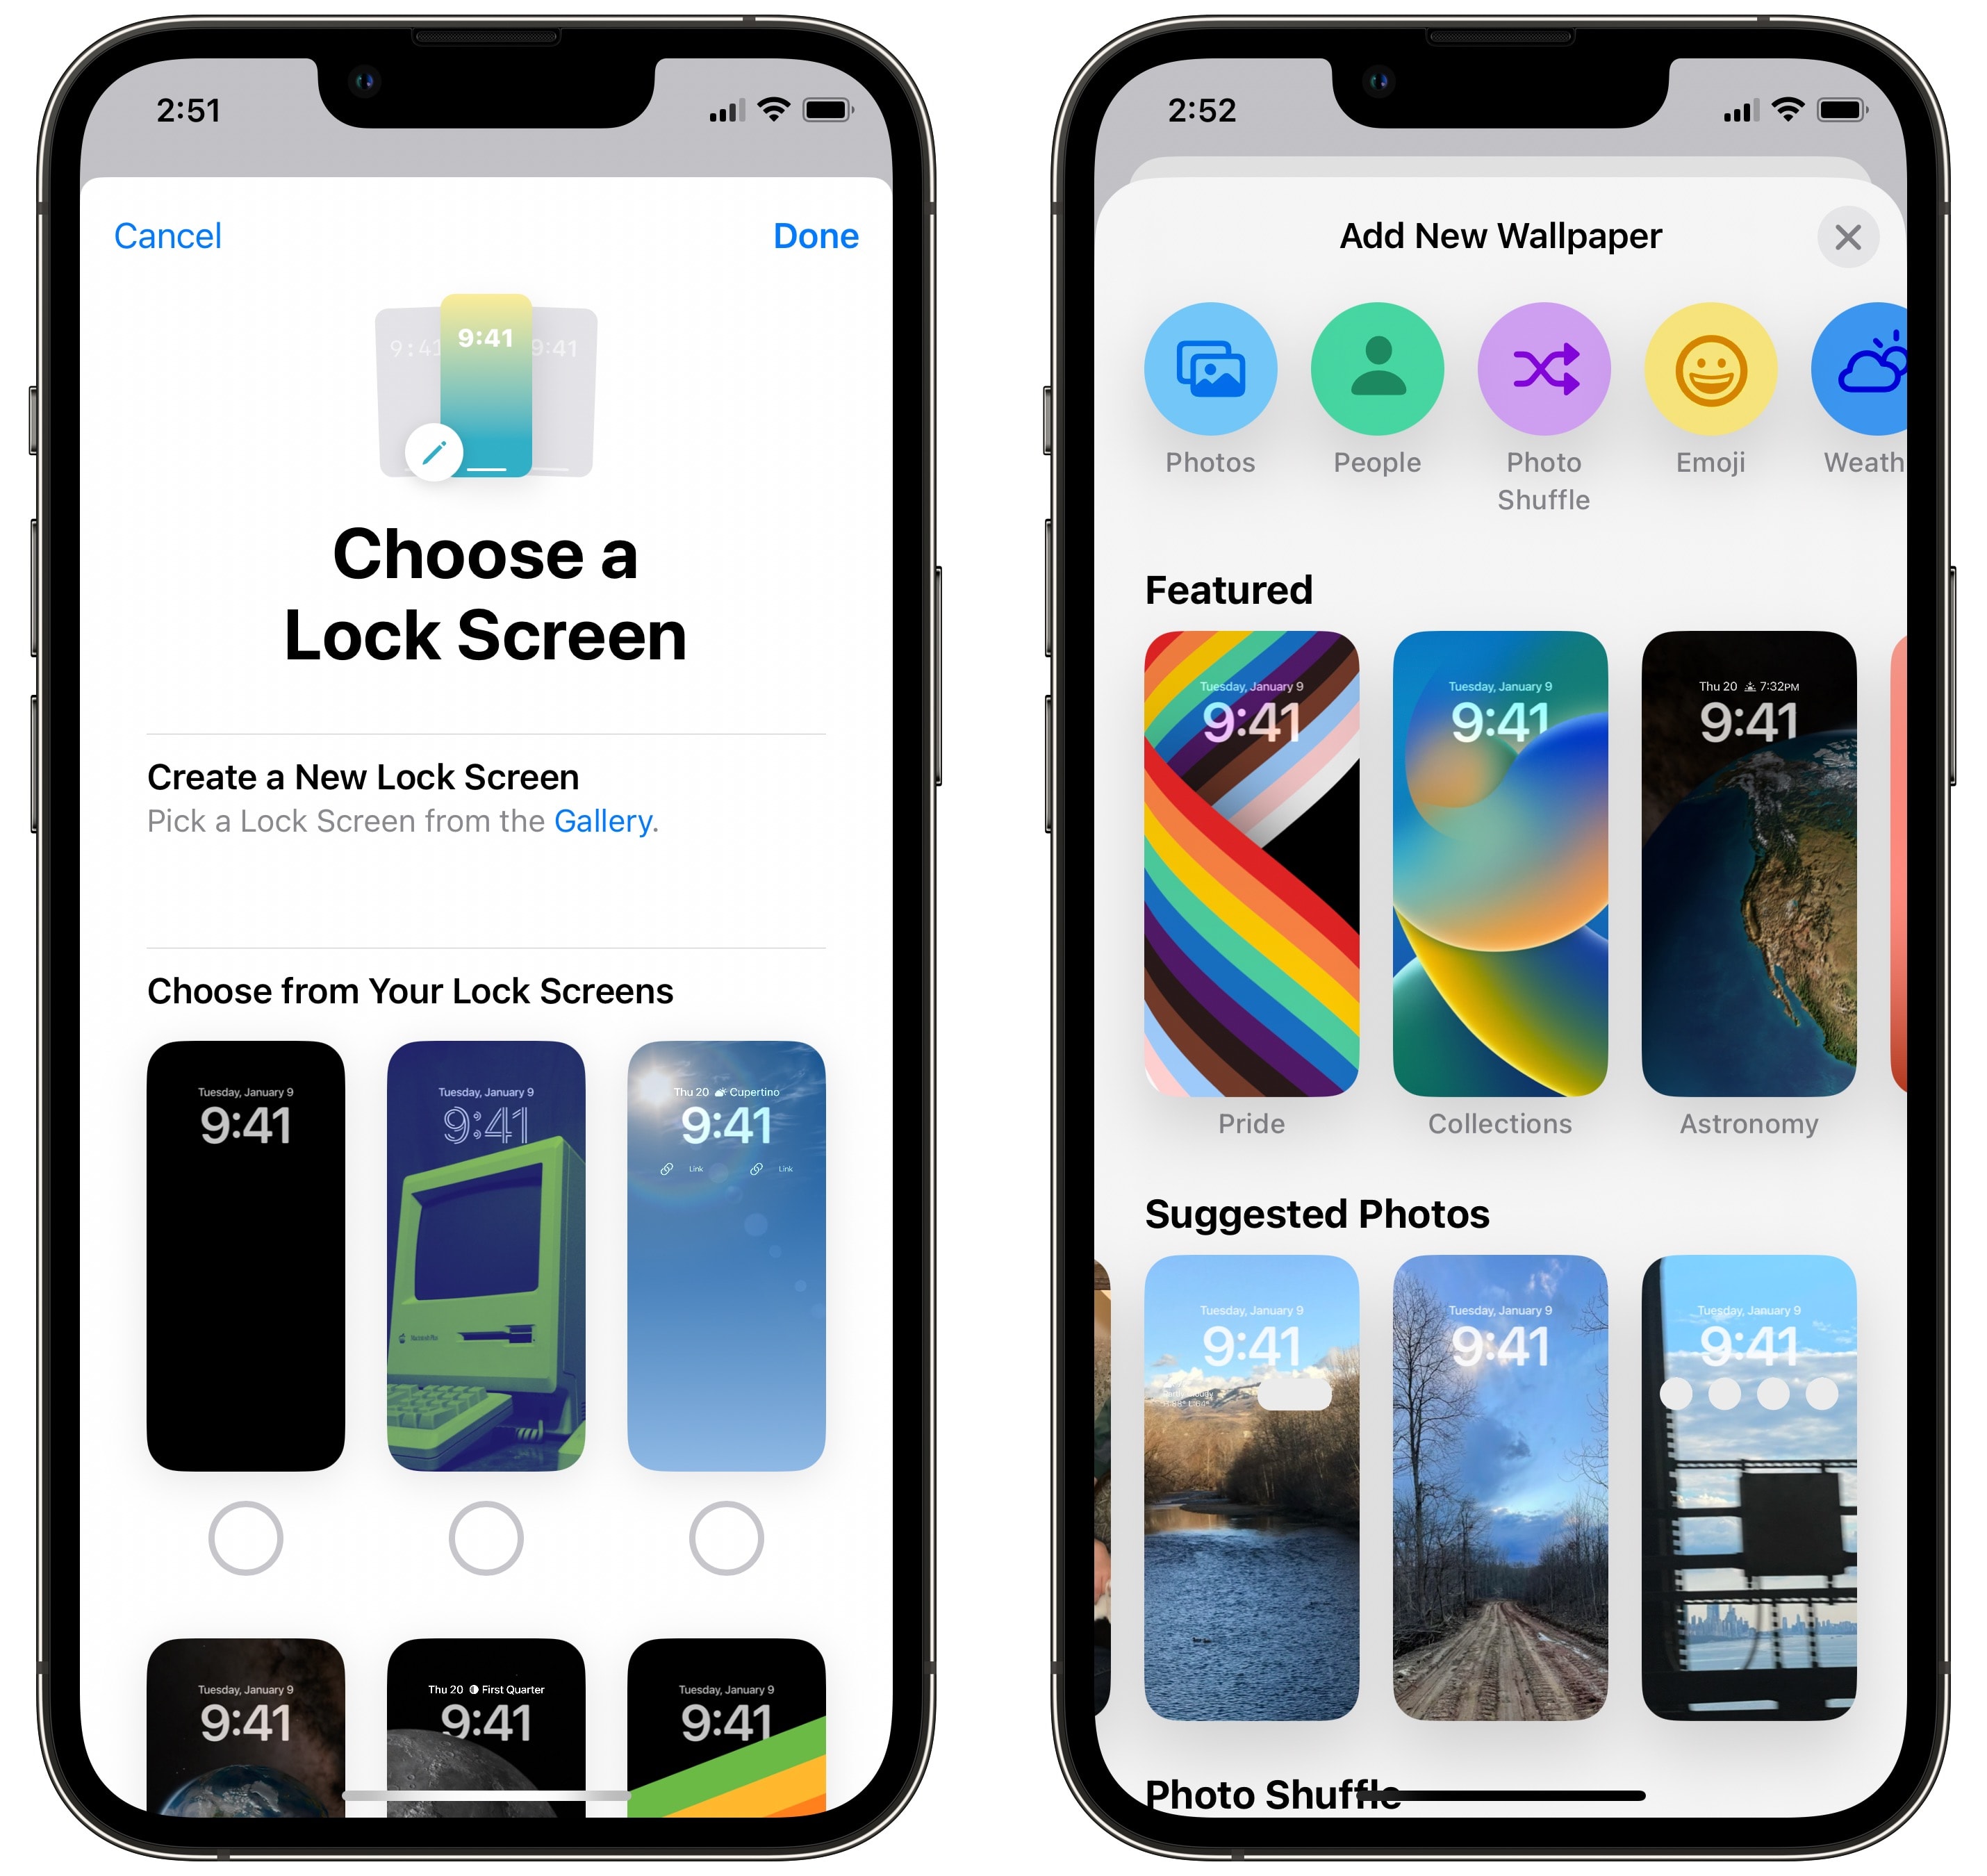
Each Focus can have a Lock Screen tied to it. You can read my deep dive on creating Lock Screens here.
Screenshot: D. Griffin Jones/Cult of Mac
Below People and Apps, you’ll see a spot where you can pick a lock screen, home screen and watch face. Tap the left icon to pick your lock screen. You can select one you’ve already made or create a new one from the Gallery.
If you’re creating a new one, you’ll be presented with the full customization options before it’s added. If you pick a pre-existing one, you can make any edits later.
Associating a lock screen with a Focus means that every time you use that lock screen, it’ll automatically activate the Focus mode — and vice versa. Swipe down from the top to show your lock screen, tap and hold, and you can set which Focus mode the lock screen is for.
Create a custom home screen optimized for what apps you use
Every Focus mode can have a different home screen associated with it, too. You can tailor your home screen with specific apps and widgets. For example, you can fill your Work Home screen with apps like Slack, Google Drive, Dropbox, ADP and more. Your Travel focus can feature apps and widgets you use for shopping and travel. Your Personal focus can feature social media and entertainment apps you use at home (or your original home screen when no Focus is set).
Custom home screens give you even more control
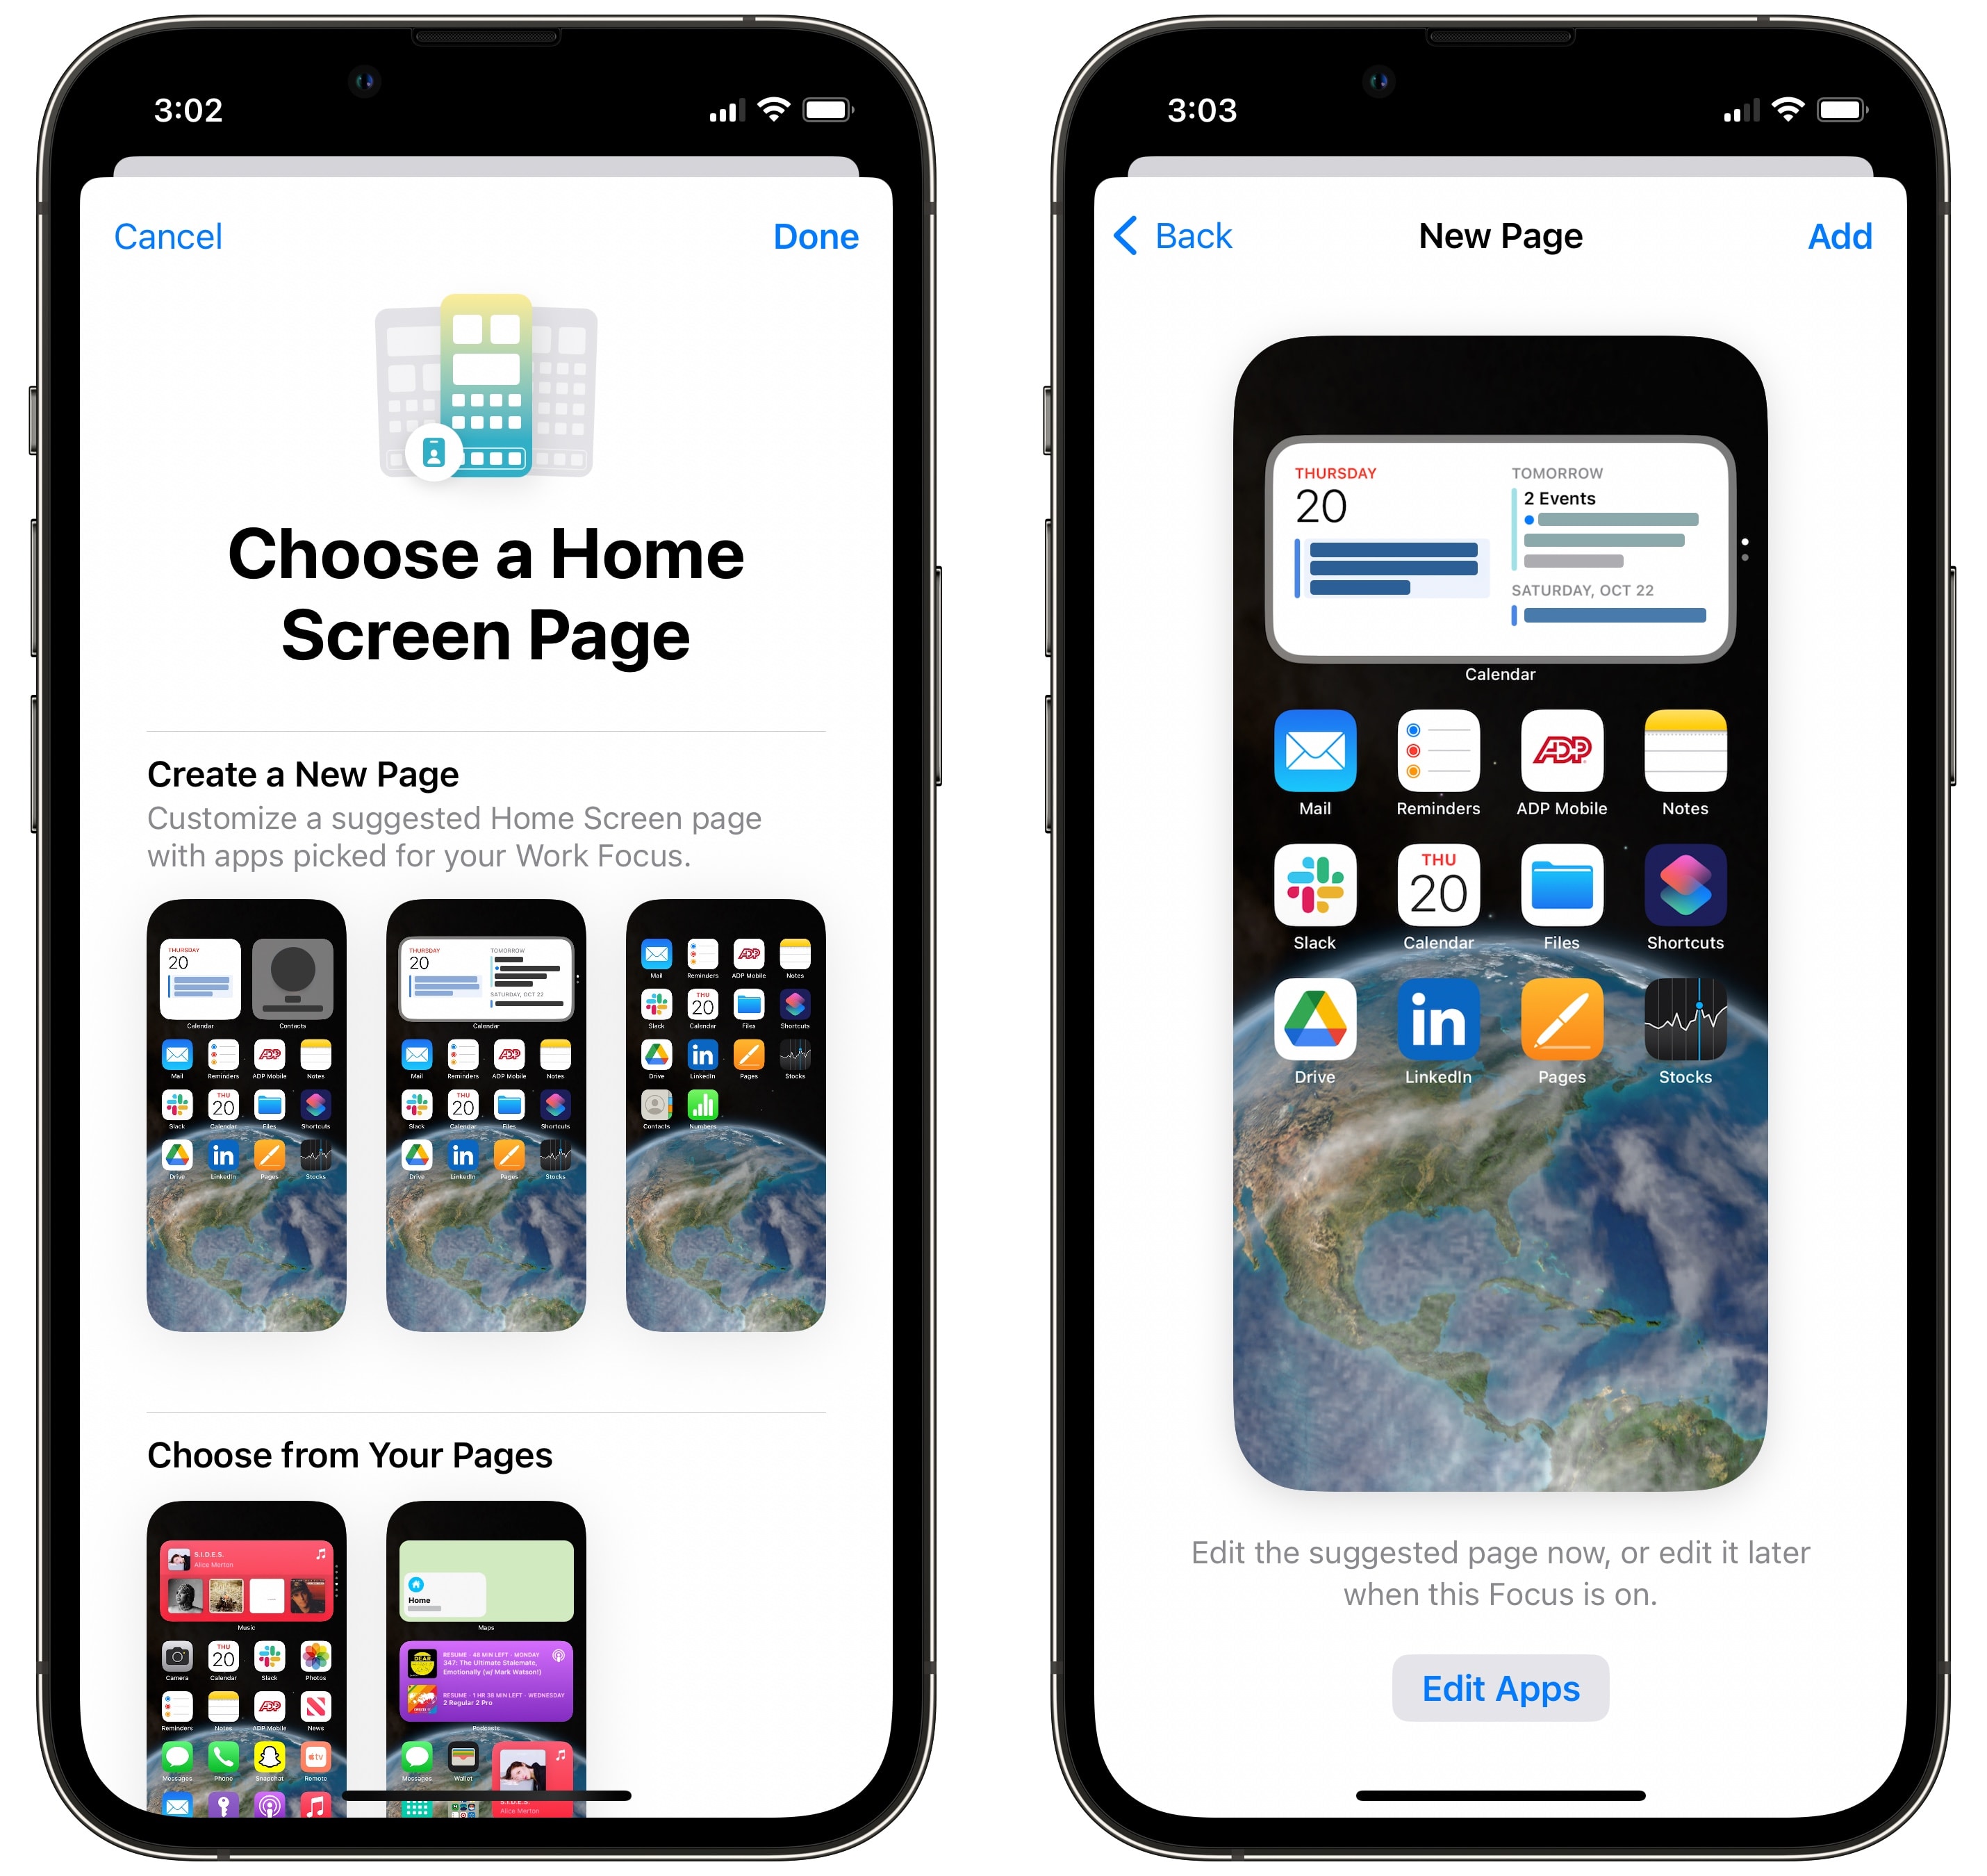
Tap Choose on the home screen icon in the middle.
Screenshot: D. Griffin Jones/Cult of Mac
On the top, it’ll show a few suggestions (unless you’re using a custom Focus mode). Tap on one and tap Edit Apps to change the selection.
On the bottom, it’ll show the pages you already have. You can check or uncheck which pages you want visible in this mode.
Whichever way you get started, you can always edit your home screen afterwards. Tap and hold on an empty spot to start editing, then swipe over to the App Library. Add apps to your new home screen by holding down on an app icon and dragging it onto the page. Add widgets by tapping the + icon in the upper left of the screen.
Screenshot: D. Griffin Jones/Cult of Mac
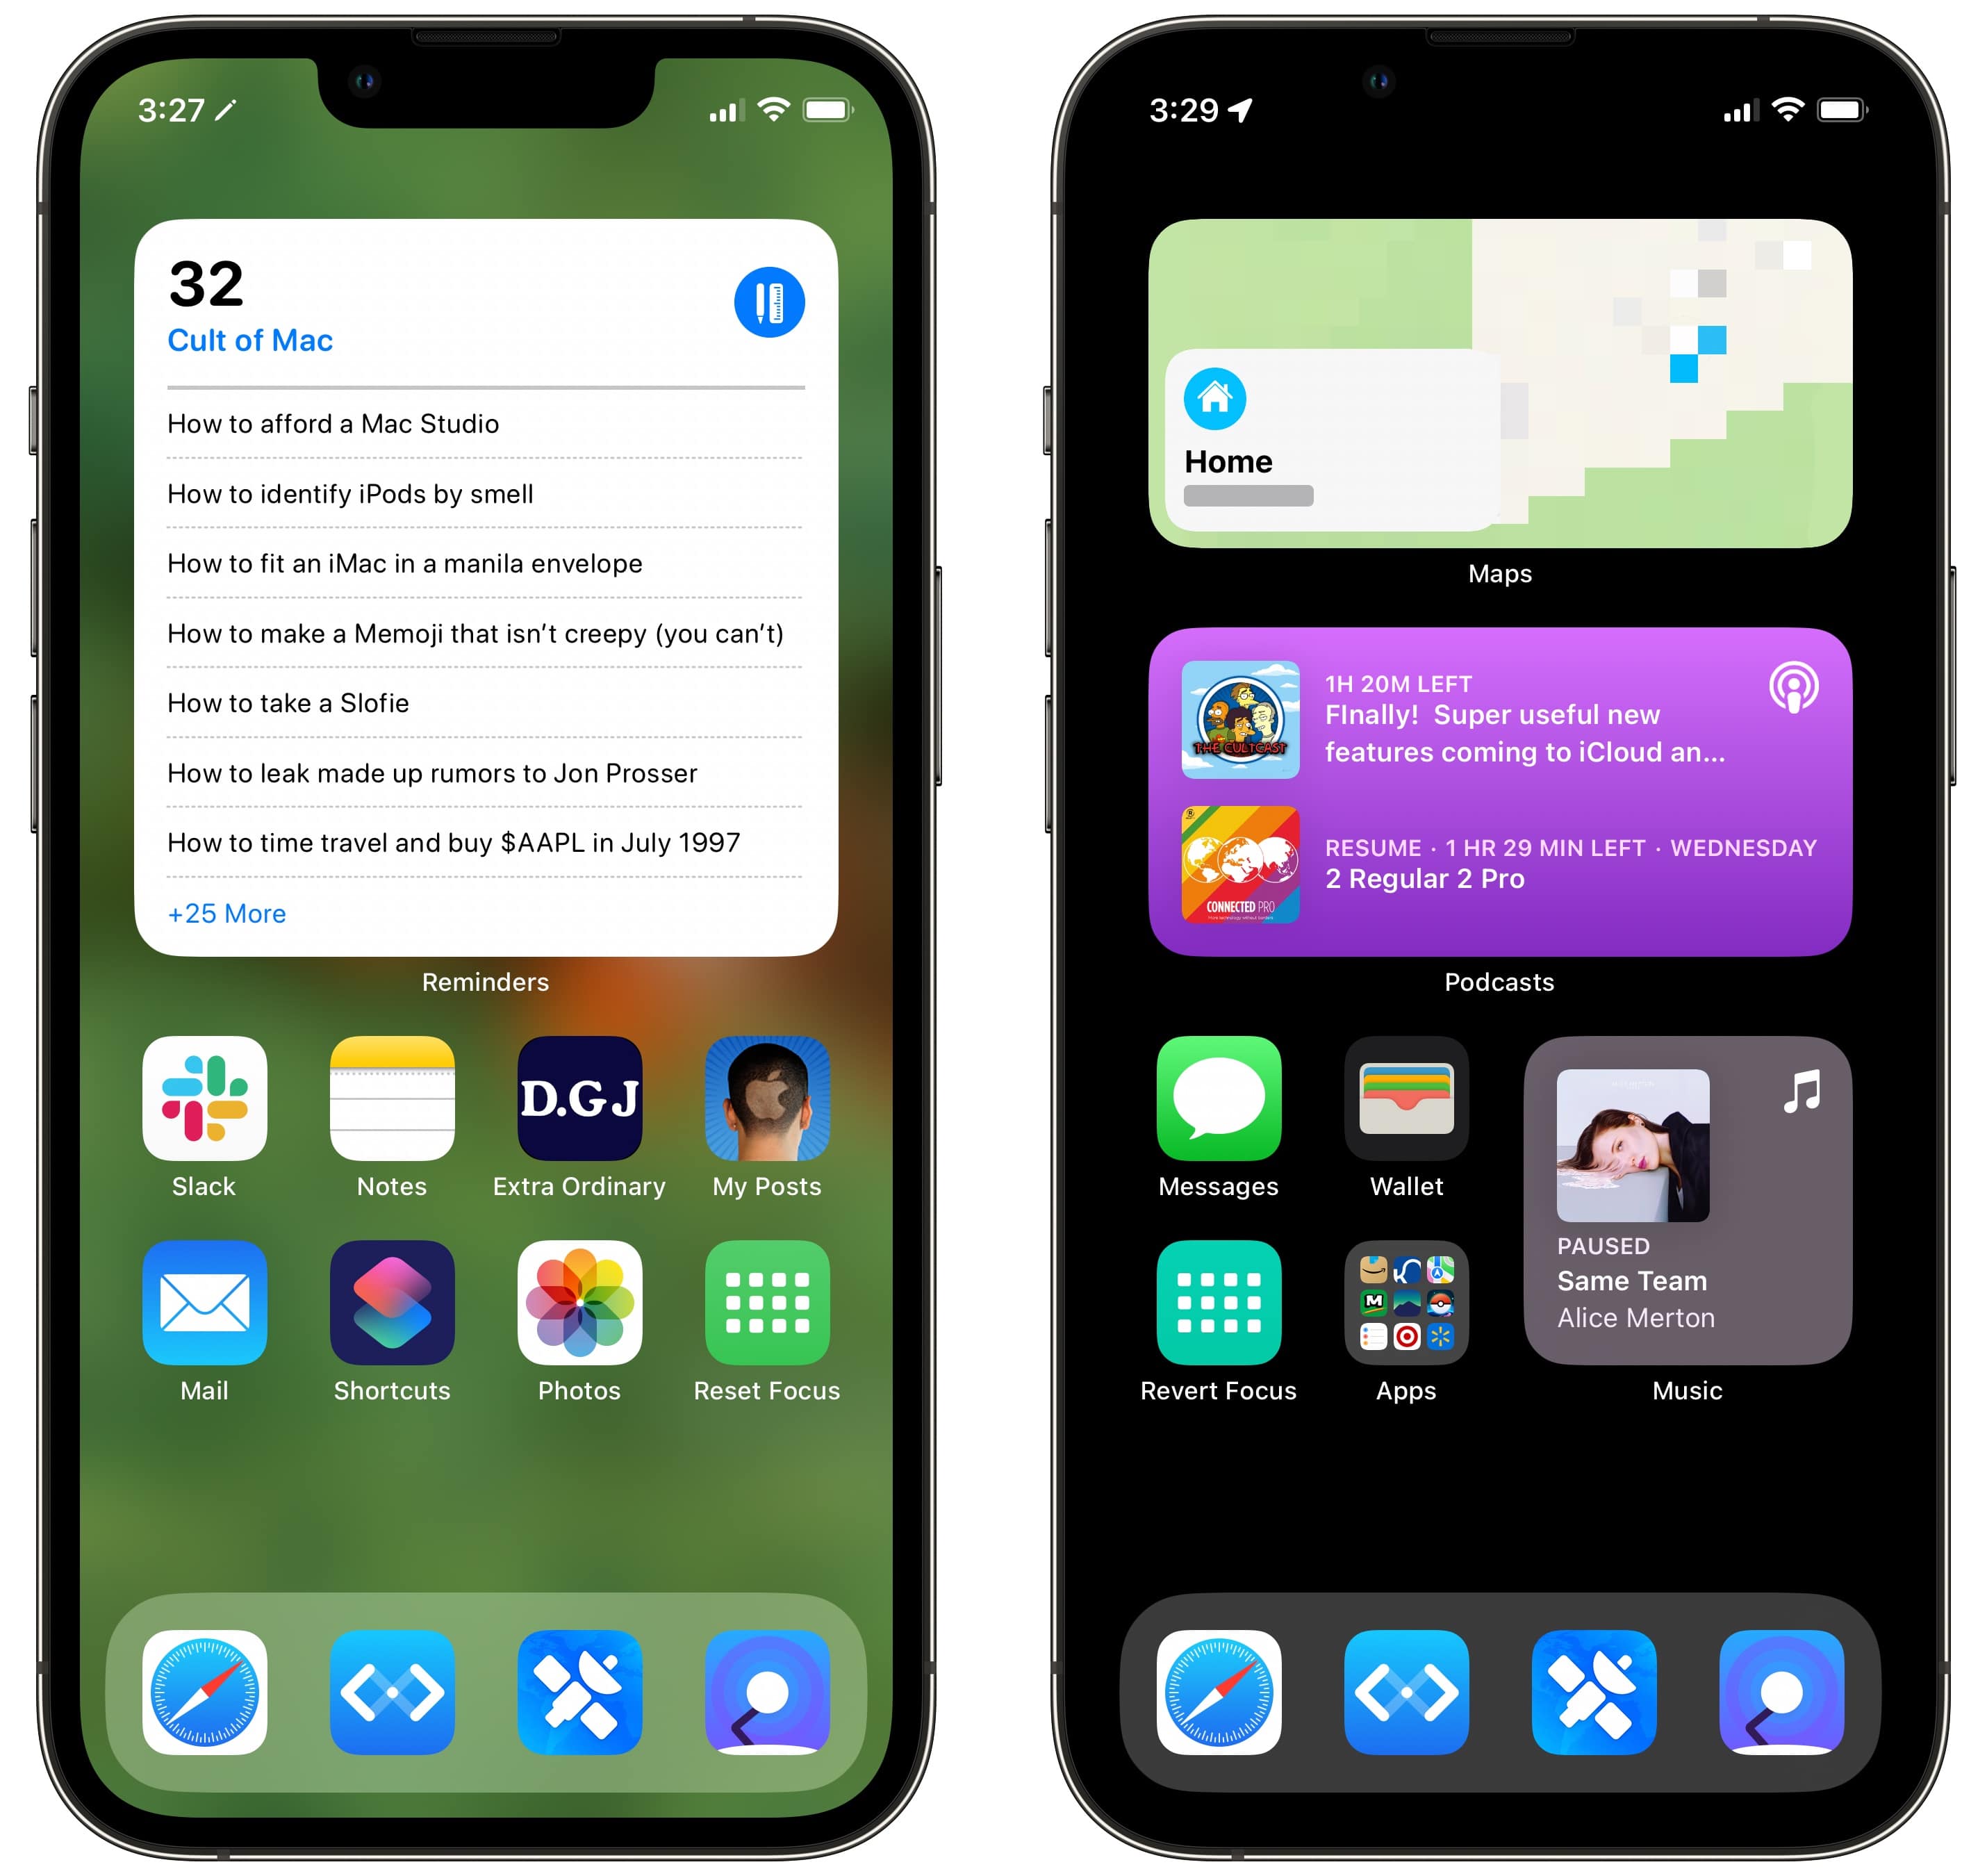
For my Writing Focus mode, I started with a big widget with my writing to-do list. I added Slack and Notes, Safari shortcuts to my website and my Cult of Mac articles, Mail, Shortcuts and Photos. “Revert Focus” is a Shortcut that turns off the Writing Focus.
For my Driving Focus mode, I have a big Maps widget on top, a Podcasts widget and a Music widget. I make sure the Messages icon is in the same place as on my regular home screen. I added the Wallet for quick access. And I have a folder with shopping apps, a shortcut to my shopping list in Reminders and my bank app for easy access.
Set a custom Watch face
Screenshot: D. Griffin Jones/Cult of Mac
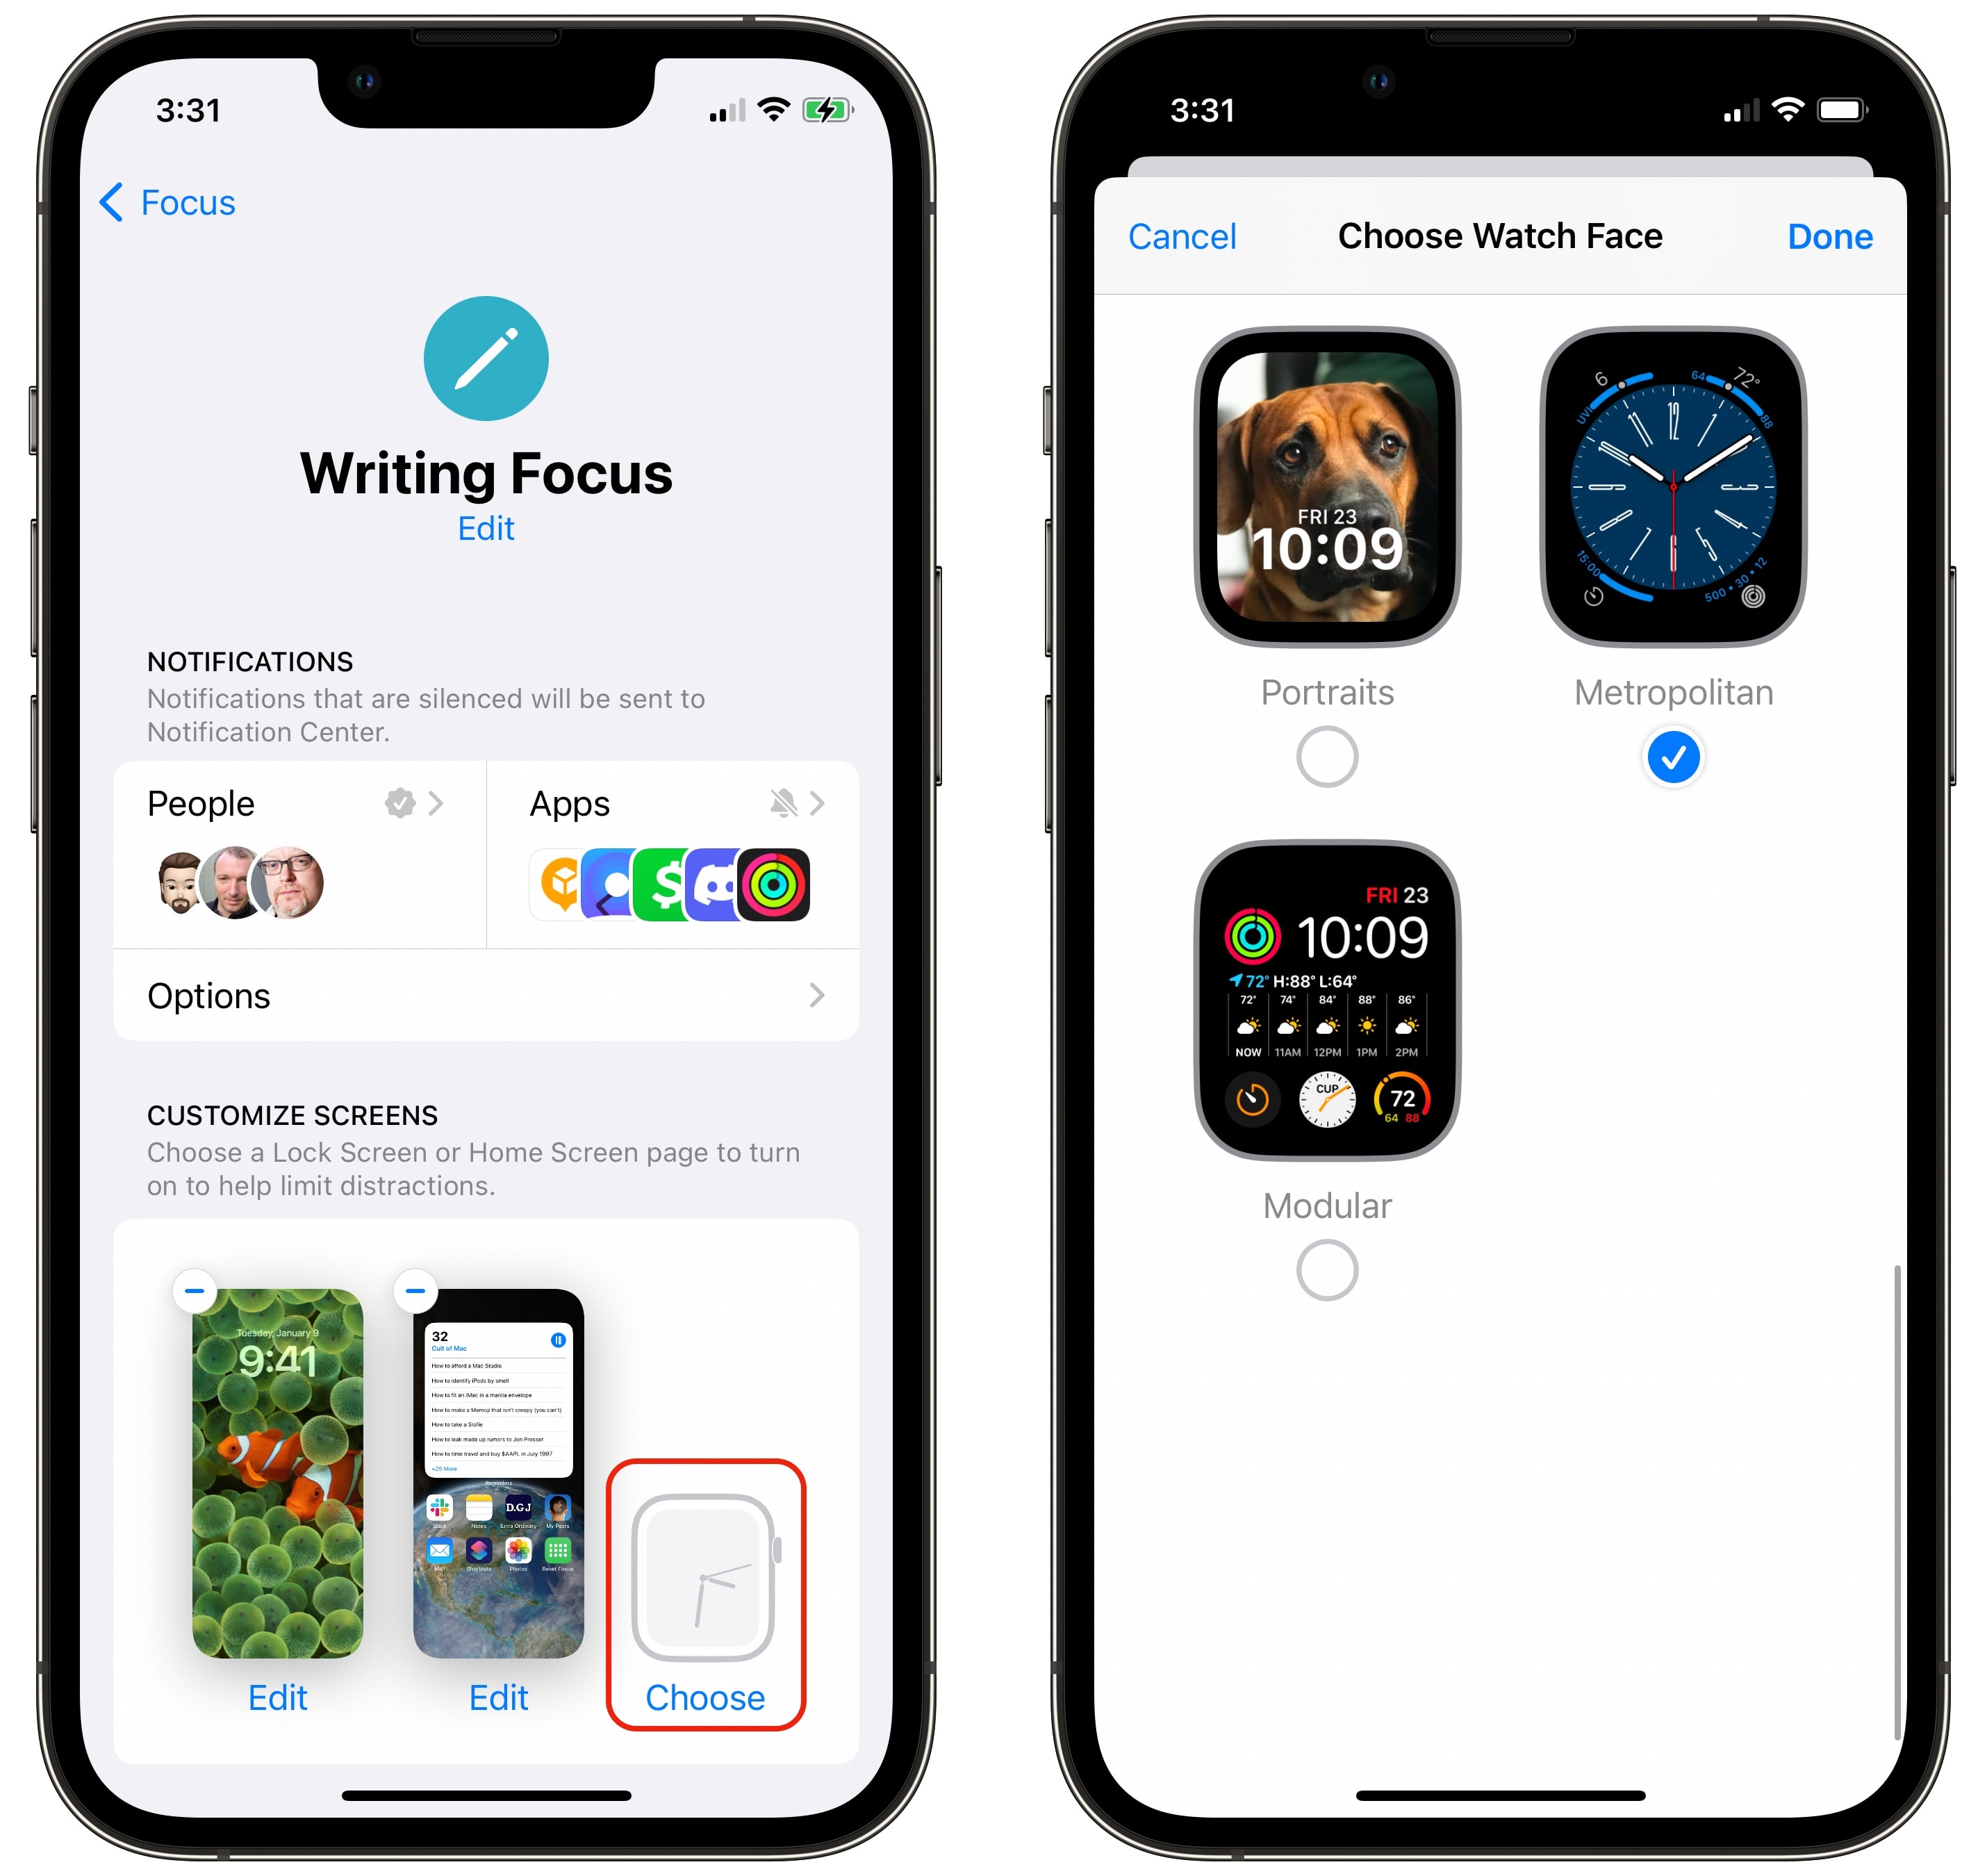
From the Focus settings, tap on the Watch icon to set a Watch face for this Focus mode. You can create watch faces using the Watch app on your phone or by tapping and holding on your watch face to start editing.
Set your Focus mode
Screenshot: D. Griffin Jones/Cult of Mac
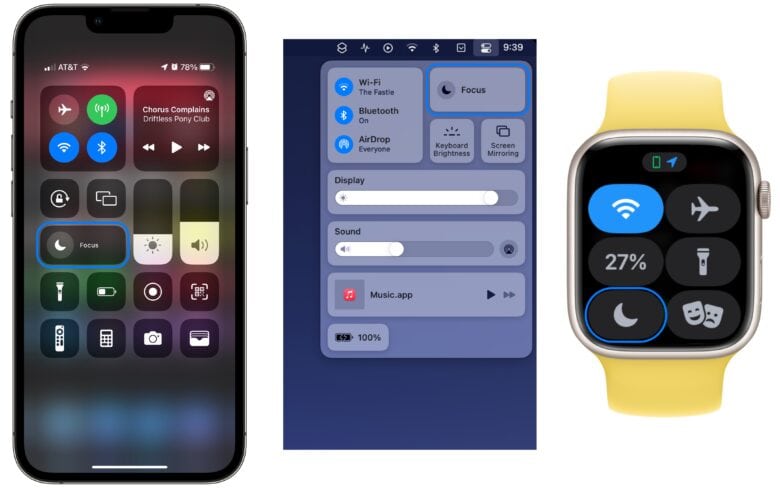
Bring up Control Center by dragging down from the top-right corner of the screen (on iPad and iPhone X, XS, XR, 11, 12, 13, 14) or by dragging up from the bottom (Apple Watch, iPhone 8 and SE). Tap the Focus button and select a Focus mode.
On a Mac, open Control Center by clicking the switch icon in the menu bar and click Focus (the icon that looks like a crescent moon). Select a Focus mode.
Pro tip: Easy access
If you want to have easy access to Focus modes from the menu bar, click and drag the Focus icon while holding Command (⌘). It will create a new menu bar item just for Focus Modes.
Automate your Focus mode with Shortcuts
Create a trigger to automatically activate a Focus
If you’re getting ready to work, you don’t want to take a lot of steps, you want to jump right in. Automations can do some of the work for you, removing friction and getting you focused faster.
Screenshot: D. Griffin Jones/Cult of Mac
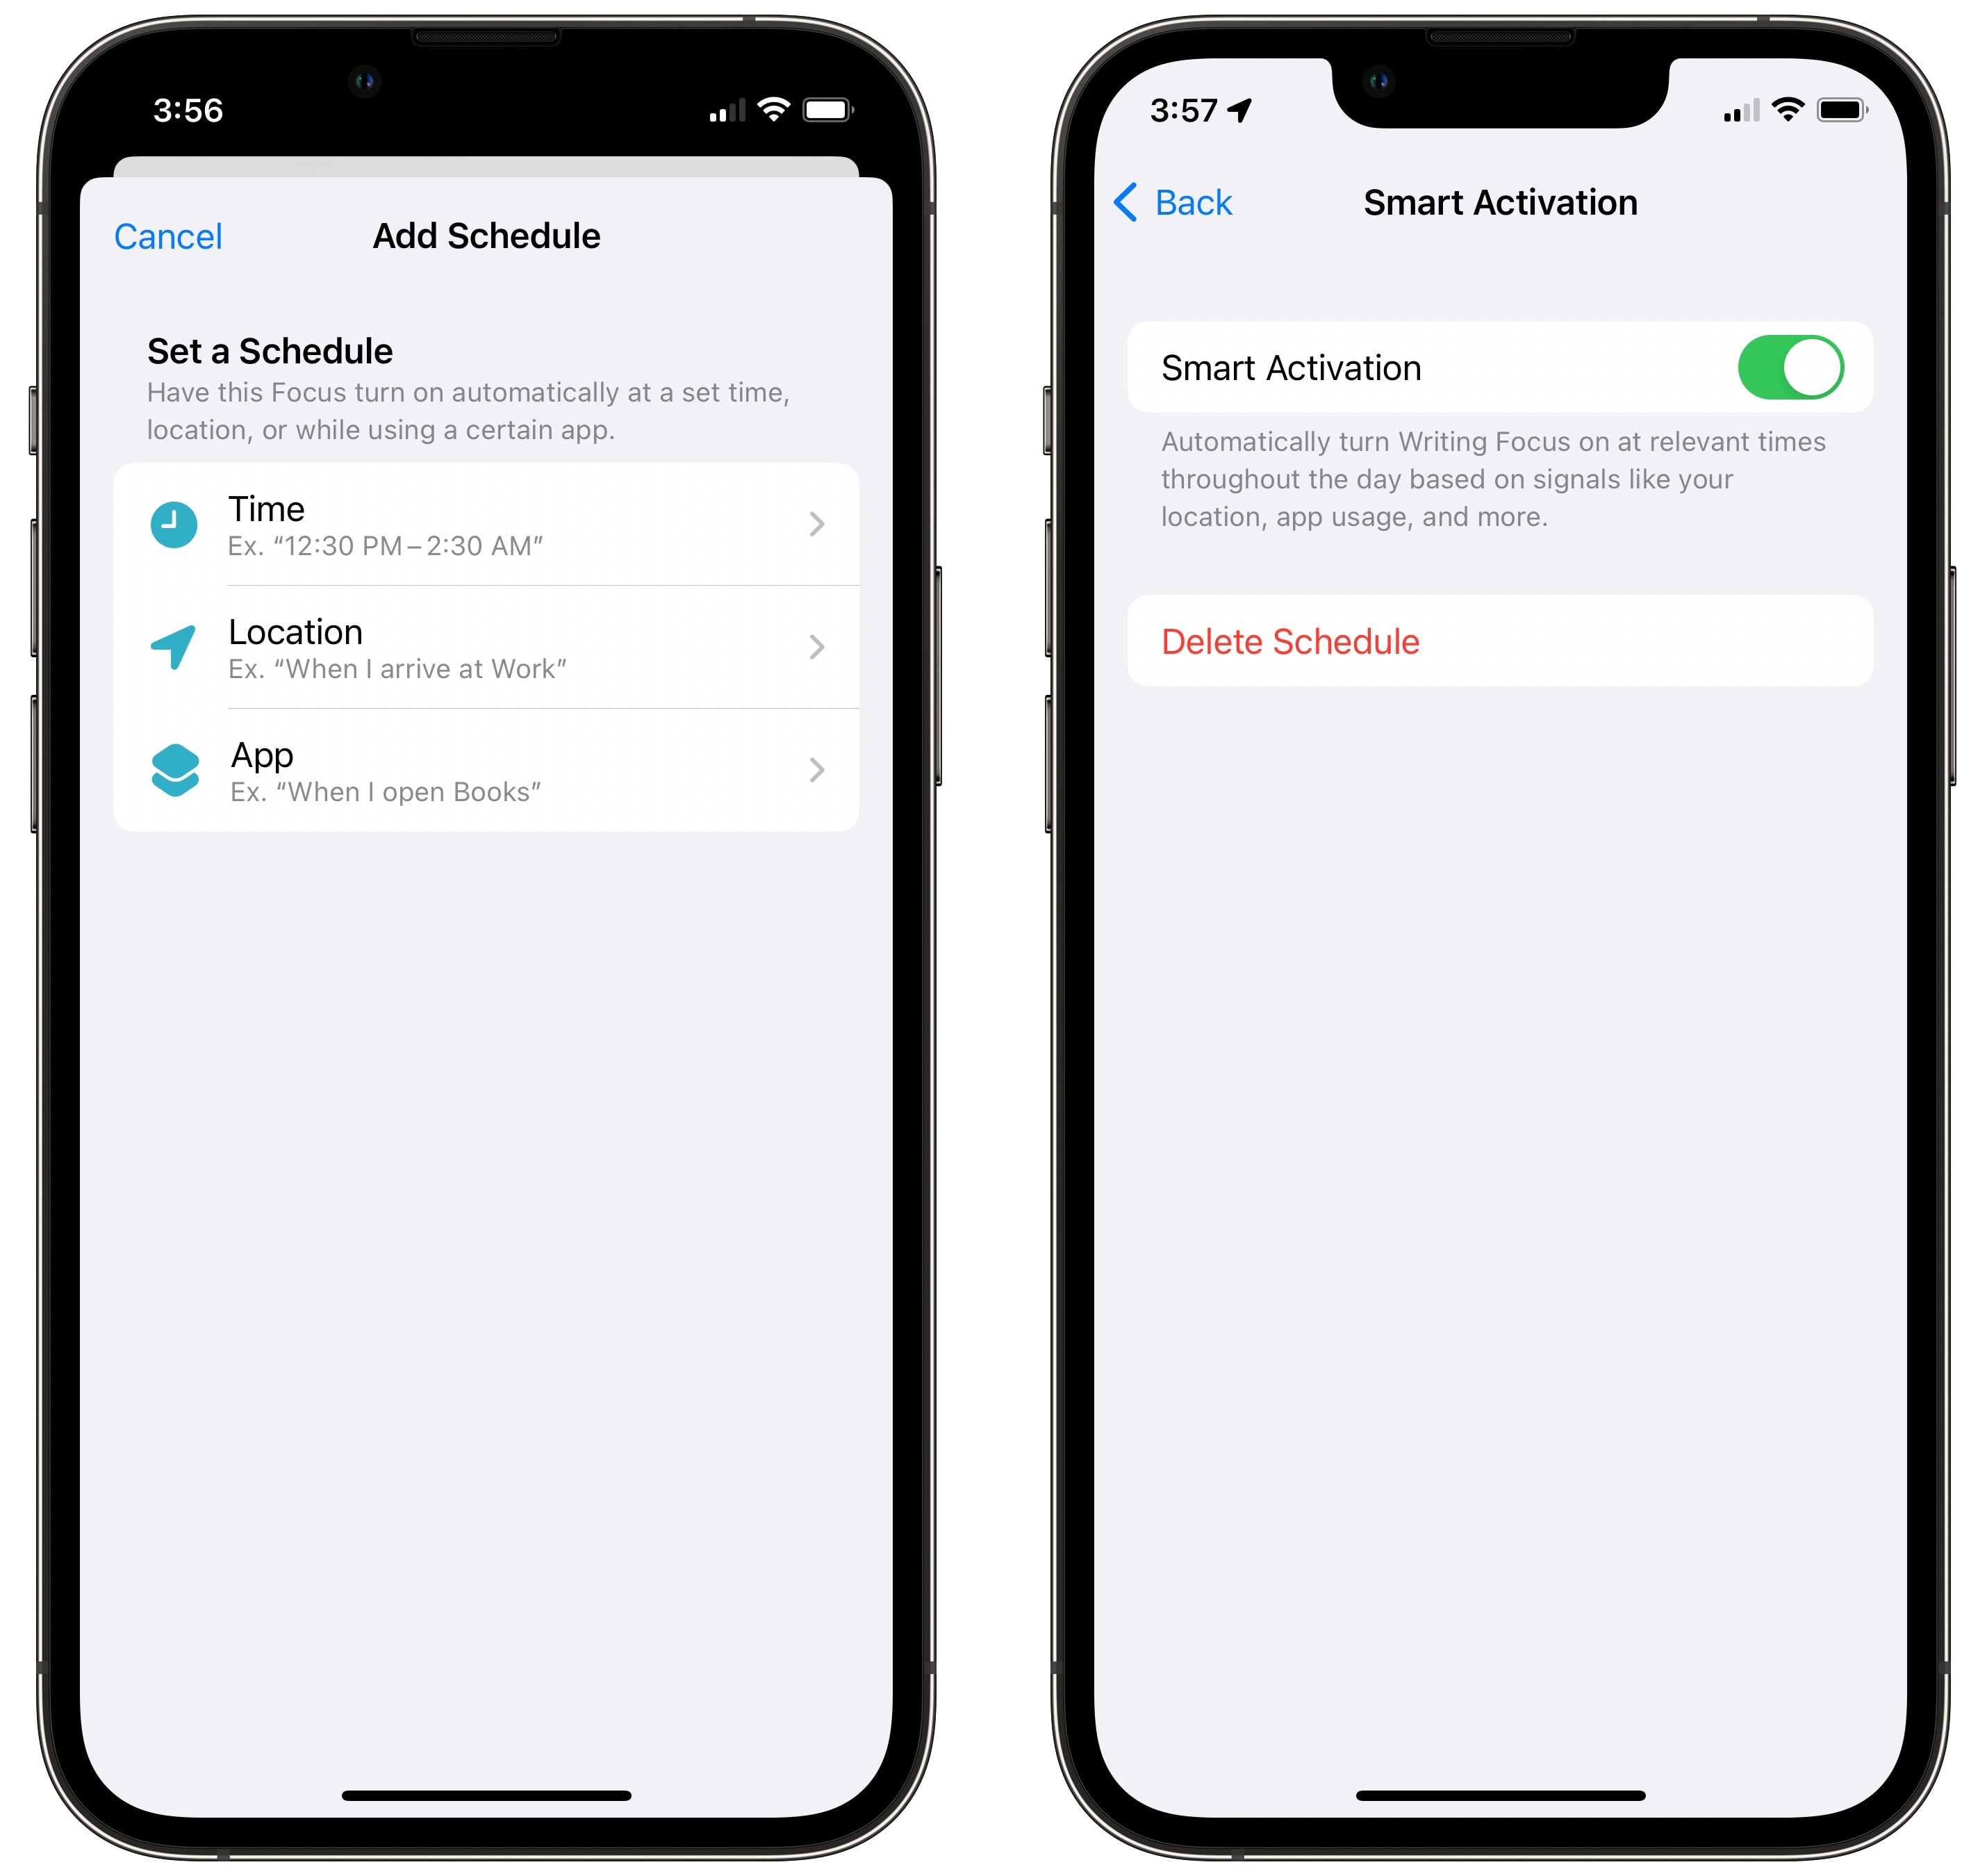
Go back to your Focus mode settings. Tap Add Schedule. Your Focus can activate on a time schedule (every weekday on time), by location (arriving or leaving a specific place) or by opening a specific app. You can also tap Smart Activation and turn it on to allow your phone to intelligently set the Focus “based on signals like your location, app usage, and more.”
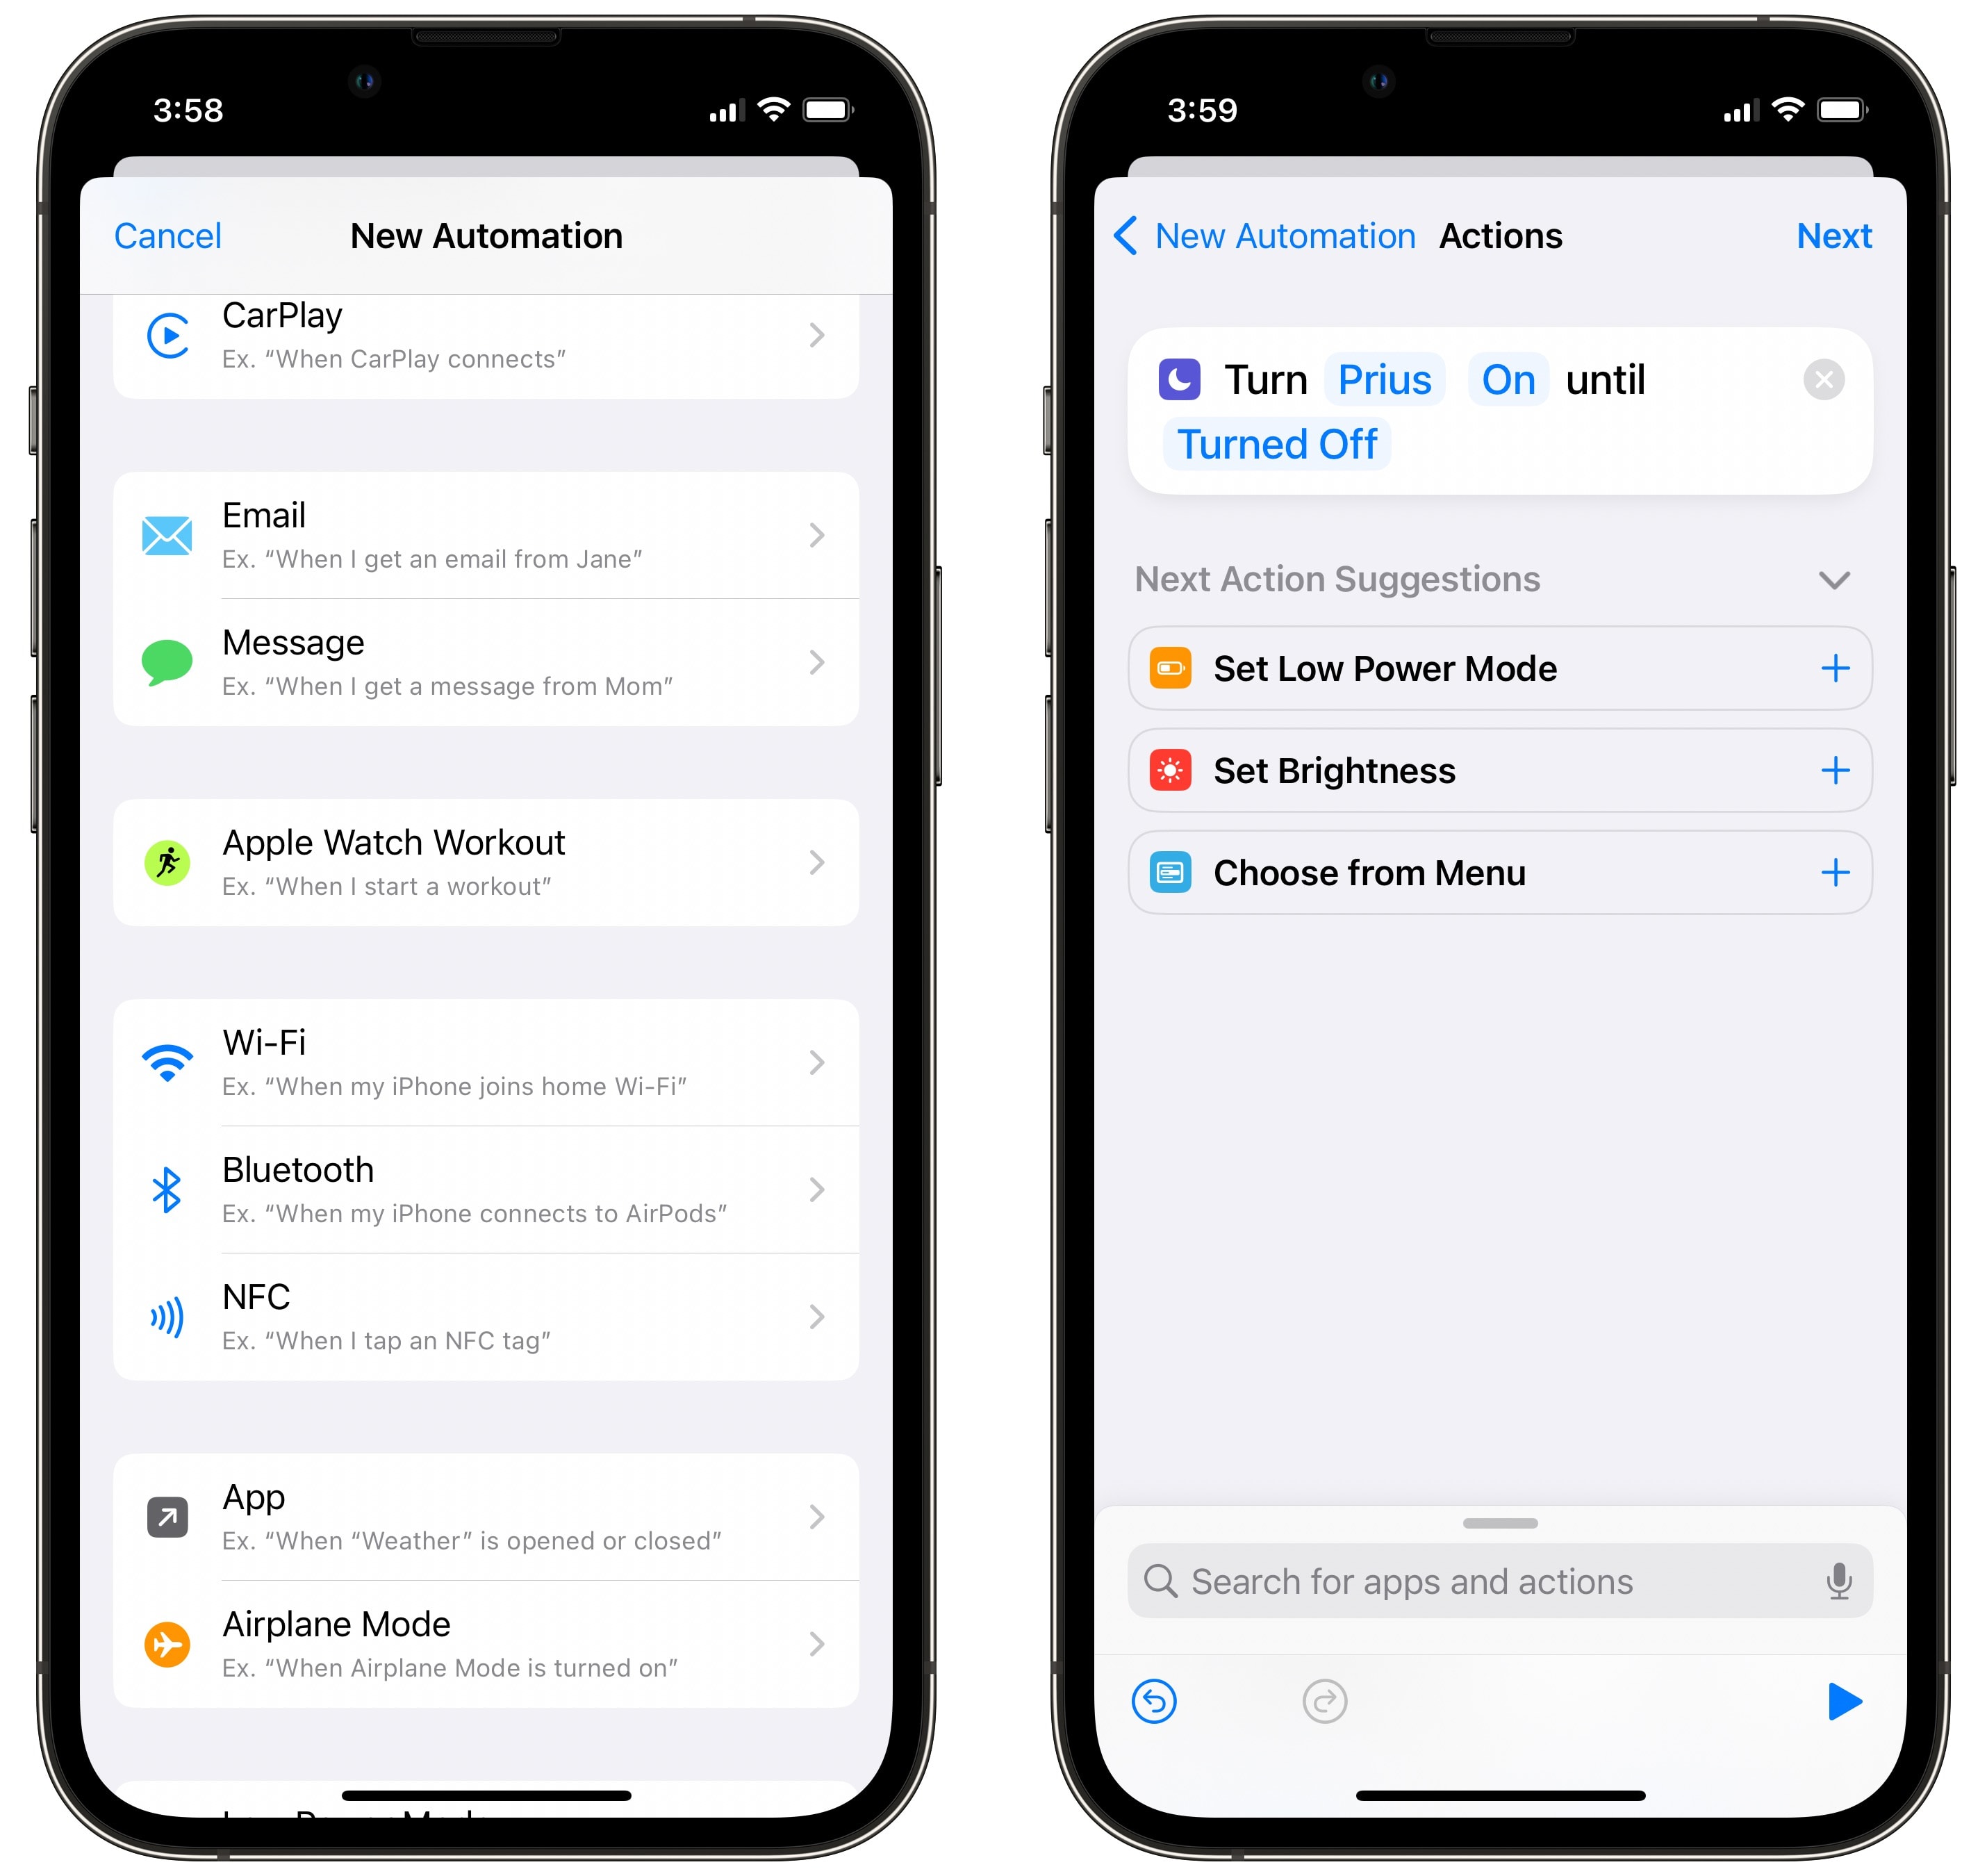
If none of those triggers are what you want, Shortcuts offers some advanced options. Open Shortcuts > Automation (tab at the bottom) and tap Create Personal Automation if you’ve never made one before (otherwise, tap +). You have a lot of options for how and when you want to launch a Focus mode.
Screenshot: D. Griffin Jones/Cult of Mac
Let’s say I want to activate my Driving focus every time my phone connects to my car’s Bluetooth system. I’ll select Bluetooth from the list of automations, choose my car, tap Done and Next. Tap Add Action and search for the Set Focus action. The default action is “Turn Do Not Disturb Off,” so I’ll tap on the highlighted words to change it to “Turn Driving On.”
You can specify when the Focus mode should end. You can set the automation to end at a specific time, if you leave a location or if a calendar event ends.
Create a ‘Reset Focus’ icon
On all of my custom Home screens, I have an icon that instantly turns off the Focus mode. It’s much faster than opening Control Center and switching back. I also made this using Shortcuts.
Screenshot: D. Griffin Jones/Cult of Mac
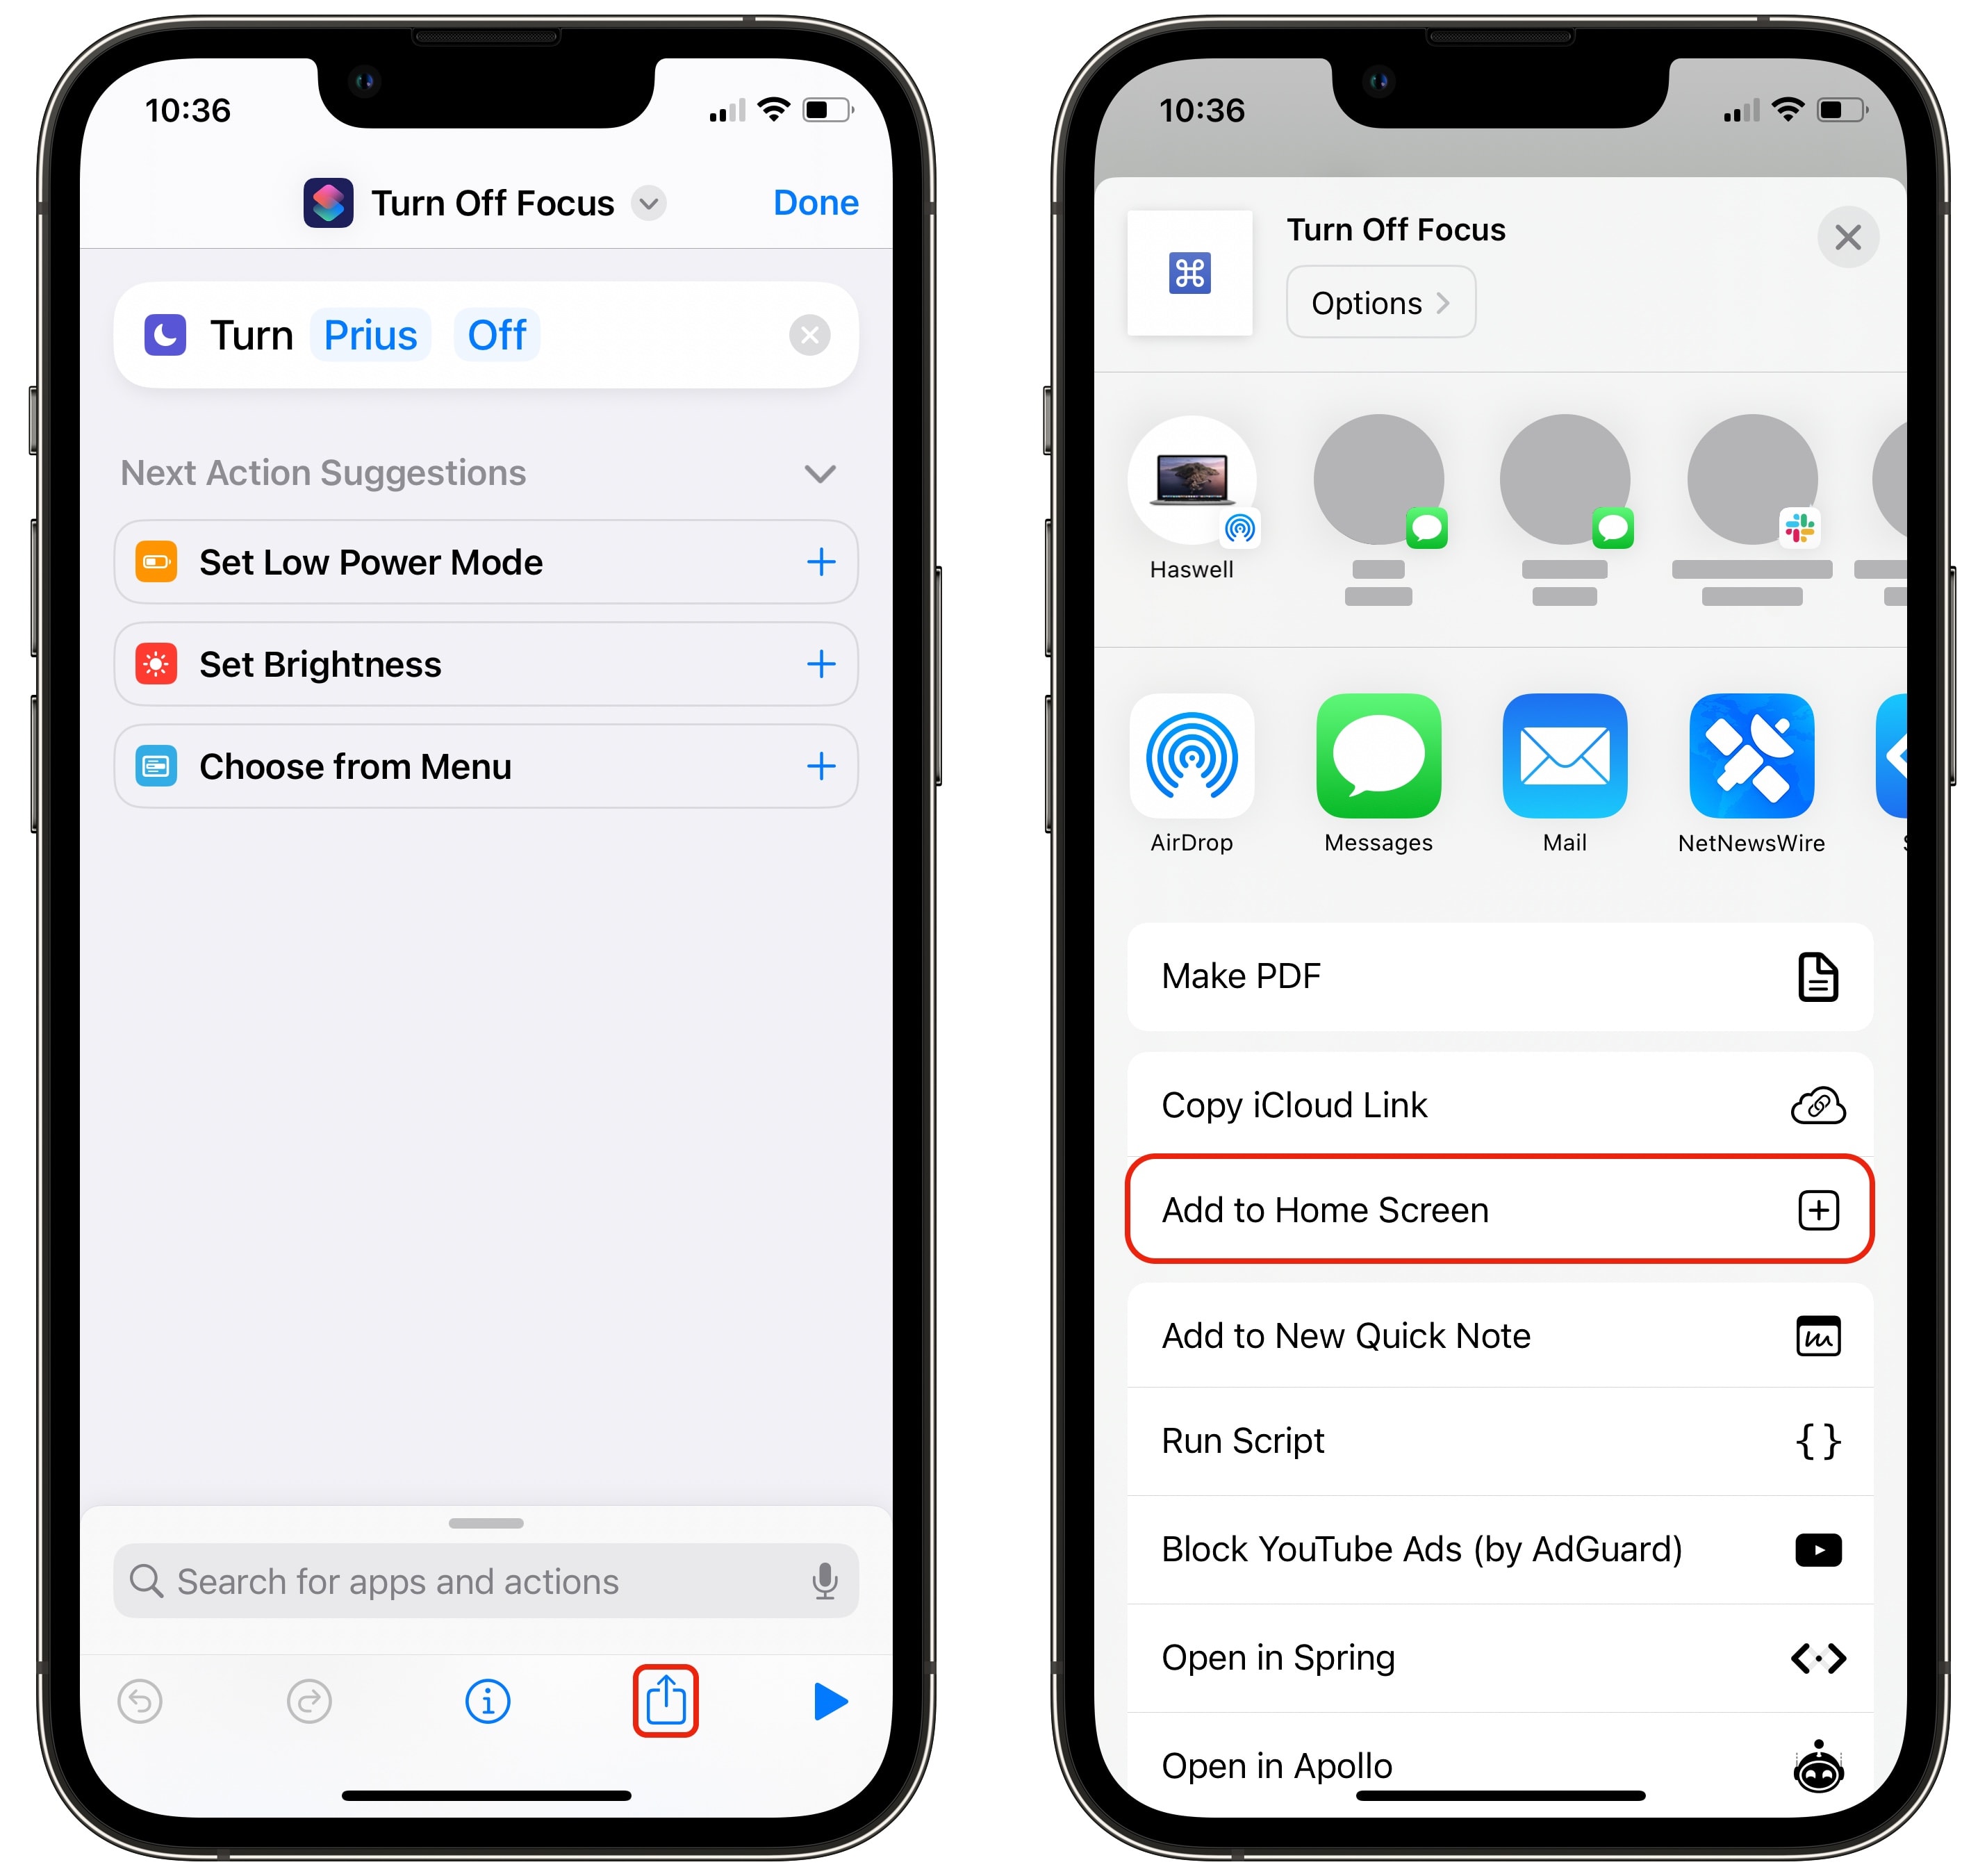
To do so, open Shortcuts and tap +. Name the shortcut something like “Reset Focus.” Tap Add Action and search for Set Focus. Then, tap Do Not Disturb and replace it with the Focus mode you created earlier. Tap on the name at the top to set the name, pick a color and icon.
Tap the Share button at the bottom and tap Add to Home Screen.
