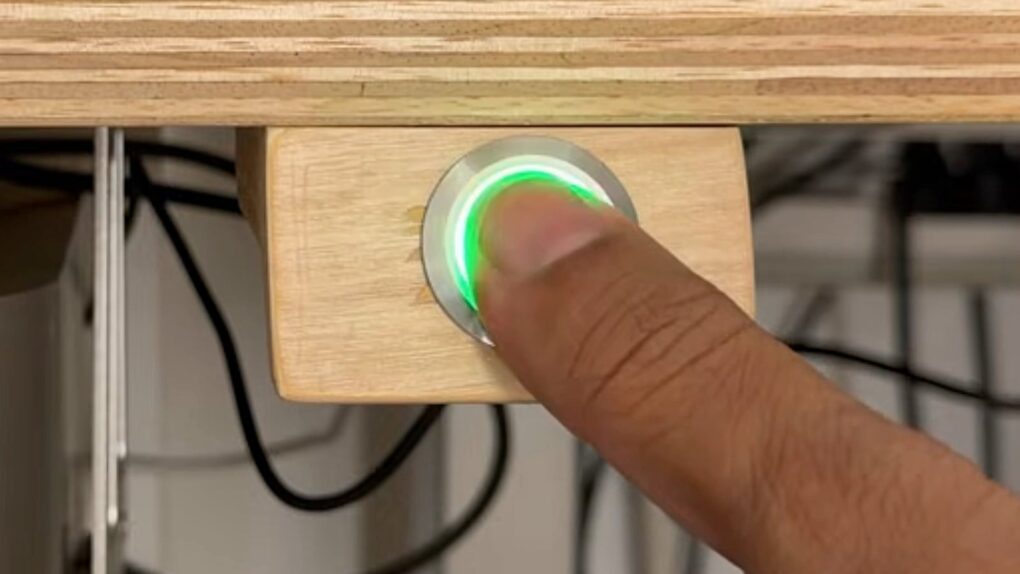
Want to add Touch ID to your Mac without giving up your favorite keyboard? A DIY Touch ID project called the Dashboard Touch shows how you can build your own fingerprint sensor for less than $35.
It’s not as secure as Apple’s own implementation, but Anil Dash’s new DIY Touch ID hack should be safe enough for most users.
Dashboard Touch is a DIY Touch ID hack
Apple’s Face ID and Touch ID biometric security systems make unlocking compatible hardware a piece of cake. They’re great for iPhones, iPads and MacBooks. Simply look at or touch your device, and voila — it’s unlocked. Then you’re ready to do whatever you need to do, computing-wise.
However, if you own a desktop Mac, you’re stuck with an Apple keyboard (either bundled with the computer or sold separately, starting at $149). If you don’t like the look or feel of an Apple keyboard, you’re out of luck unless you go the DIY route.
That’s where Dashboard Touch, the free, open-source project from tech entrepreneur Anil Dash, comes into play. With a little bit of cash and a tiny bit of effort, you can add a DIY Touch ID system to your Mac.
“I know a lot of folks that wanted to have, like me, Touch ID, but without having an Apple keyboard,” says Dash in a YouTube video about the project. “And now you can be one of them if you are handy with the soldering iron and have maybe like an hour or two to work on the project.”
The simple setup relies on a few inexpensive off-the-shelf components. Just buy a microcontroller (Dash used an Adafruit QT Py ESP32, which retails for $12.50) and a fingerprint sensor (he used a Simlug R503 clone, which Adafruit sells for $39.95, although you can find them cheaper elsewhere).
Solder those two parts together, and plug the whole thing into your Mac via a USB-C data cable. Then you run a simple setup script and register your finger or fingers. Get the required software from Dash’s dashtouch repository on GitHub.
A web interface to make configuration simple
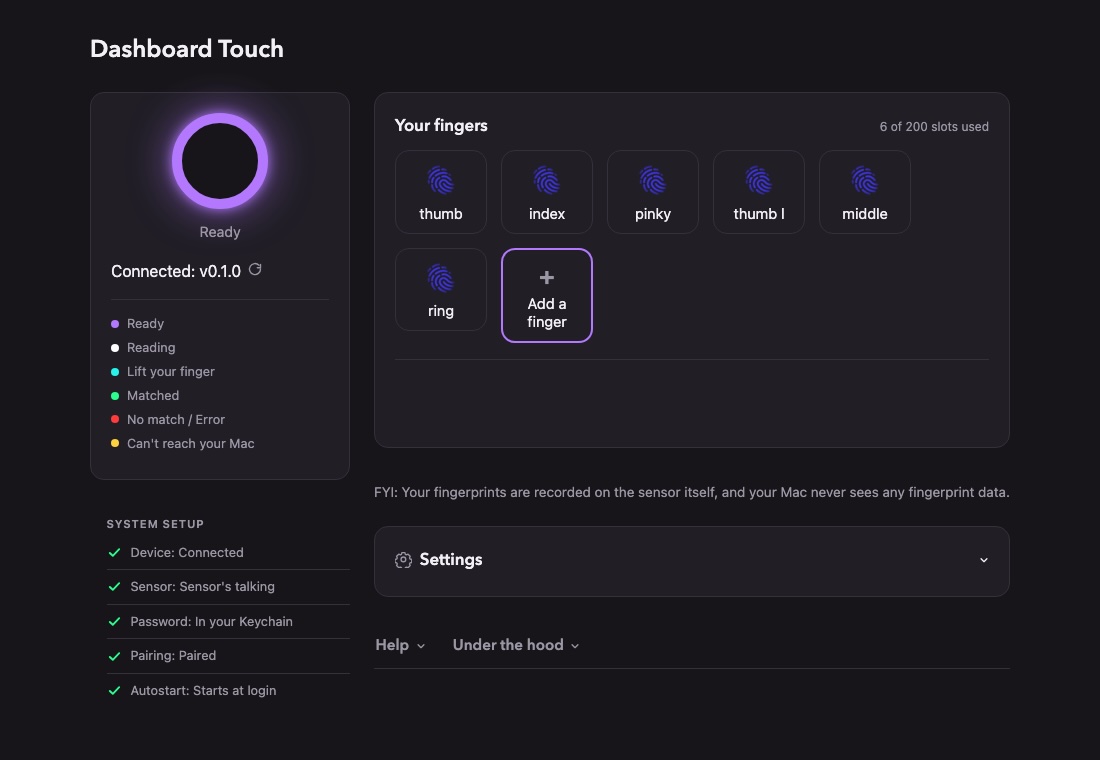
Screenshot: Anil Dash
Dash called the Dashboard Touch “an extensive refactoring of the excellent tinyTouch project by Zimeng Xiong, who recently cracked the code on how to make a useful fingerprint scanner system that’s also reasonably secure for regular Mac users.”
Dash said he built upon tinyTouch’s foundation because he wanted a “friendly web interface” that Dashboard Touch users could use to configure the DIY Touch ID system.
“When you get Dashboard Touch set up, it presents you with a nice web interface that runs right on your own Mac, letting you do things like set the color of the ring light on the fingerprint sensor, or capture your fingerprints so they’re recorded in the system,” he said Thursday in a post describing the project.
You can adjust the colors of the ring light. For instance, Dash set the default to purple for ready, white for actively reading your fingerprint, green for a matched finger, red for an unknown finger, etc.
How Dashboard Touch works
The DIY Touch ID system mimics a keyboard that enters your Mac’s password whenever needed.
“Your Mac runs as normal,” Dash wrote, “except any time the system prompts you to type in your password, you can just swipe your fingertip on the sensor and Dashboard Touch will type your password in for you. At a technical level, the device is actually literally pretending to be a keyboard.”
Dash admitted that the DIY Touch ID system isn’t the world’s most advanced security setup. But he said for most people’s private use, it’s safe enough.
Your password remains stored on your Mac. Your fingerprints are stored on your sensor, and you can erase them at any time. The system doesn’t access the internet unless you intentionally check for an updated version of the Dashboard Touch software.
“Overall, this isn’t the kind of system you should use if you’re protecting a bank vault, but if your computer is physically secure and nobody is going to have extended unsupervised access to your Dashboard Touch setup without your permission, you should be fine,” Dash wrote.
Ready to give it a try? Get the full instructions on Dash’s post about the Dashboard Touch project. And watch his video to see more about the project, including how he crafted a custom enclosure for the fingerprint sensor that mounts to his desk.

Lewis Wallace is the managing editor of Cult of Mac and author of our weekly newsletter, The Weekender. He appears weekly on the Cult of Mac podcast. You can find him on X @lewiswallace.