You use Domain Name System (DNS) servers many times every day, even if you don’t know what they are. You can’t avoid it, and whichever one you use can track where you go on the internet. That’s why you might consider switching to the free DNS servers Surfshark just launched that promise not to track you.
Here’s how to set your iPhone, iPad and Mac to use the Surfshark DNS server. It’s free!
A more private and free domain name server
We humans like names, but computers prefer numbers. It’s the job of a Domain Name Server to turn website names like cultofmac.com into an IP address. Mostly these are run by internet service providers, and setting the DNS to make a record of every site you visit is easy.
In contrast, Surfshark says its “new public DNS server ensures privacy by not logging browsing history, data transfers, or any other internet behavior.”
“This initiative reflects our dedication to the privacy community and addresses the increasing demand for trustworthy, privacy-first DNS solutions,” says Karolis Kaciulis, leading system engineer at Surfshark. “Our DNS service is designed with both stable connectivity and privacy in mind, offering a robust network that doesn’t store or track personal data, giving users a private, seamless browsing experience.”
The company promises an independent audit to confirm that it is not collecting, storing or sharing user browsing data.
To be clear, Surfshark is not the only privacy-protecting DNS server, only the newest. Cloudflare offers one called 1.1.1.1, for example.
How to switch to Surfshark’s free DNS server on iPhone and iPad

Screenshots: Ed Hardy/Cult of Mac
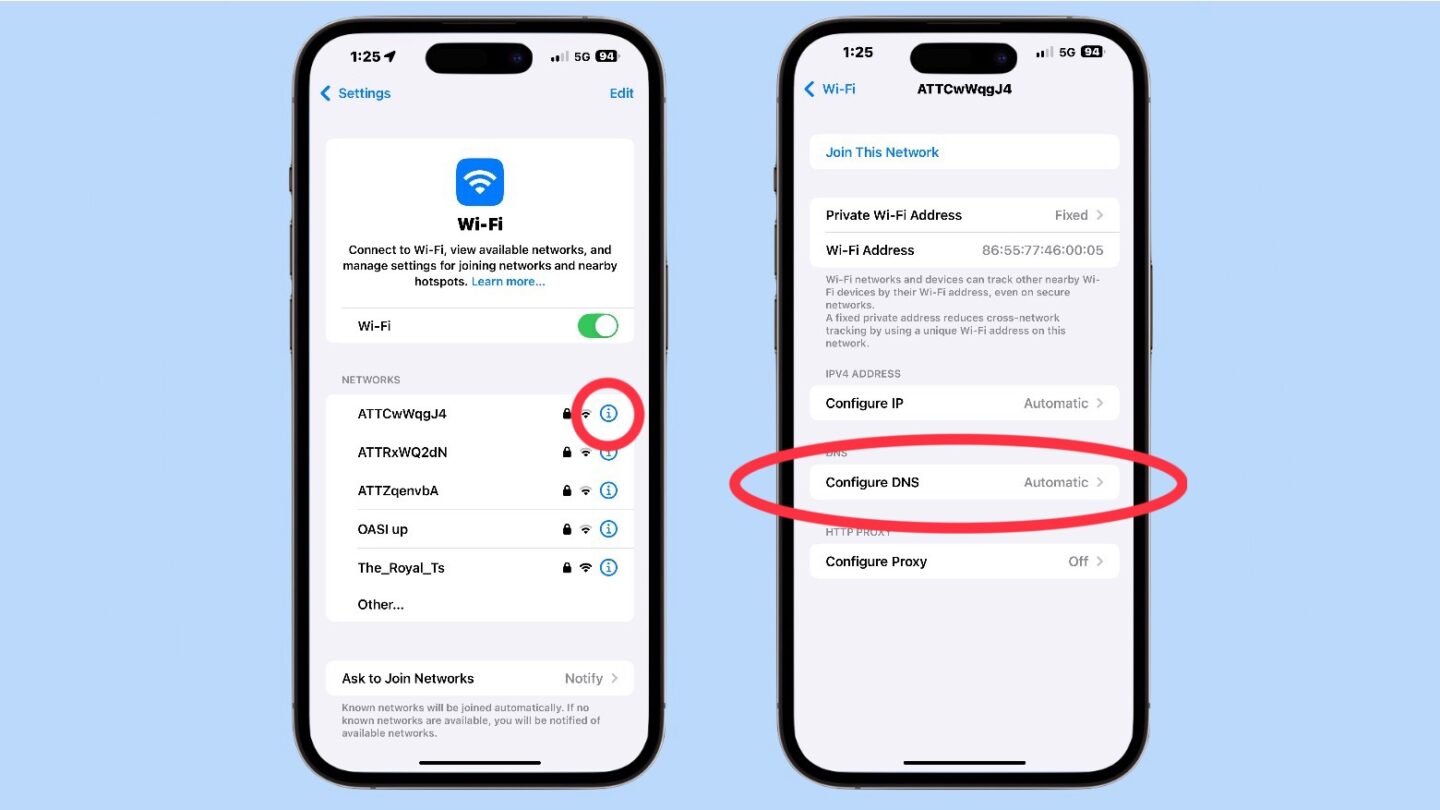
The process to change DNS servers on an iPhone and iPad is nearly identical. Start by opening the Settings app, then tap on Wi-Fi and connect to your usual wireless network. Next, tap the blue i icon next to that network.
On the resulting window, scroll down to Configure DNS and tap on it. Switch to Manual by tapping on it.

Screenshots: Ed Hardy/Cult of Mac
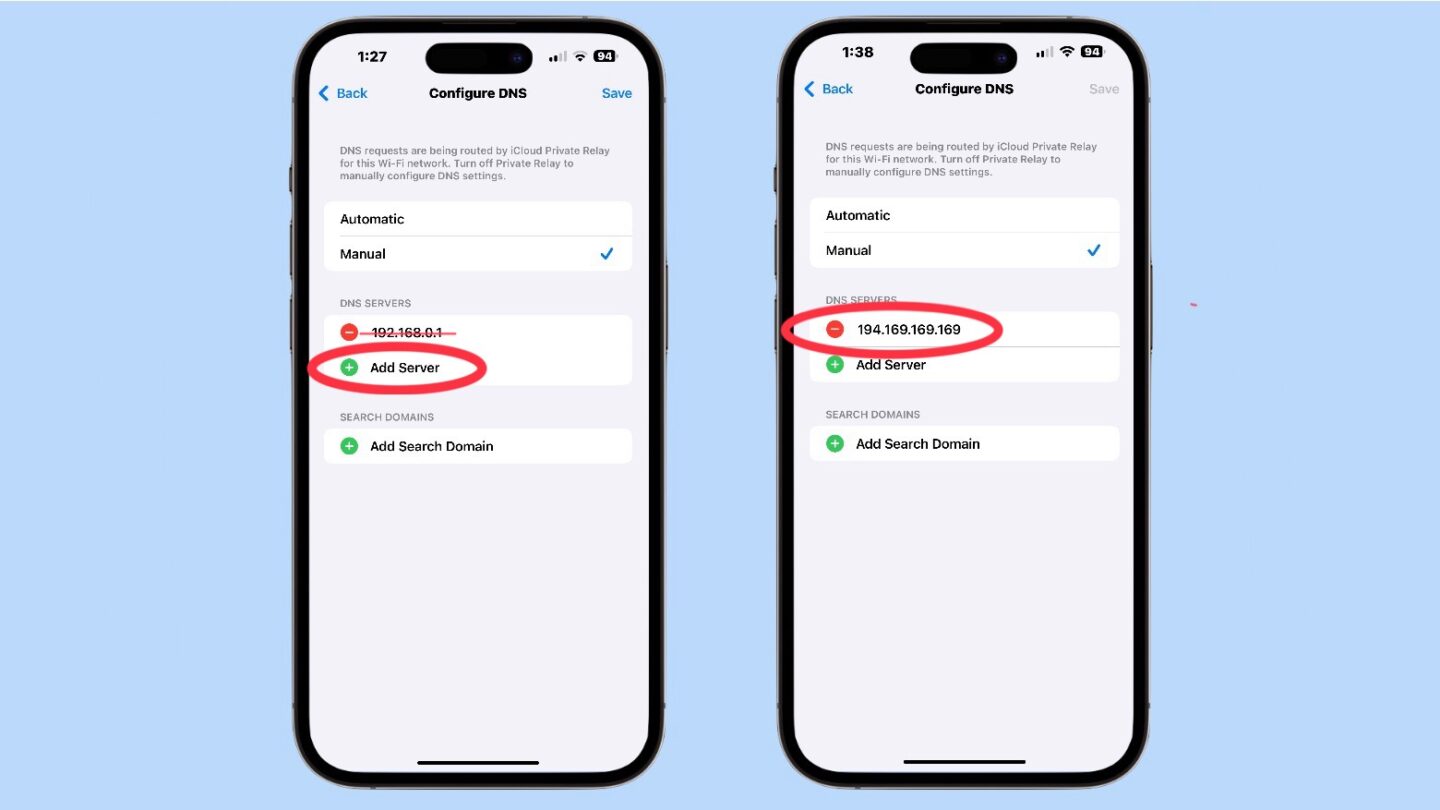
This causes a list of DNS Servers to appear. What’s shown is the one from your ISP that’s probably tracking you. Remove it from the list by tapping the red circle next to it.
Next, tap Add Server and enter 194.169.169.169. Tap Save to apply the changes.
Note that you need to make the same change on every Wi-Fi network you connect to, like the ones at your home and office.
Switch to Surfshark DNS on Mac
The process for Mac users to move to Surfshark’s free DNS servers is somewhat similar to the iPhone/iPad one. Just follow these steps:
- Click on the Apple menu and select System Settings.
- Click on Network.
- Choose your active network connection (e.g., Wi-Fi or Ethernet) and click Details.
- Go to the DNS tab.
- Click the + button to add 194.169.169.169 as IPv4 and 2a09:a707:169:: IPv6 addresses.
- Click OK and then Apply to save your changes.
Change the DNS server on your network router
Rather than on your computers, you can change the DNS server on your router instead… assuming it’s your own so you have access to the settings.
You can follow Surfshark‘s recommended instructions for changing the router’s DNS server, but the exact process varies between router models:
- Open a web browser and enter your router’s IP address (commonly 192.168.1.1 or 192.168.0.1) to access its settings.
- Enter the admin username and password (often found on the router or in its manual).
- Look for DNS settings under “Internet” or “WAN” settings.
- Input 194.169.169.169 as IPv4 and 2a09:a707:169:: as IPv6 addresses.
- Save the changes and reboot the router if necessary.
If these aren‘t helpful, do a Google search for your specific router model and “change DNS server” to find more useful instructions.


