Imagine if an almost 15-year-old image hosting company suddenly decided to deactivate all the links to the photos you had stored there. That’s exactly what happened last week, when Photobucket cut all “hot-linked” — or embedded — images, and insisted that users pony up $400 per year to get them back. That’s a big deal, because Photobucket images power much of the web. It’s not used only for posting images to forums, but to put images on Amazon store pages, and eBay listings.
Few of the folks affected by this are going to pay the ransom to get their photo links back, so the web will be littered with Photobucket placeholders reminding people of this fiasco for years to come. We can’t help with that, but we can offer a great alternative to Photobucket. Today we’ll see how to upload a photo to Dropbox and grab its direct link automatically, so you can use the image on any website you like.
Image hosting with Dropbox and Workflow
Today we’ll see ho to use Workflow on iOS to grab an image from your library, upload it to Dropbox, and copy the correct URL so that you can paste it direct into a forum or elsewhere. Once you’ve set it up, the resulting workflow is about as convenient as you could want.
Why Photobucket ditched hot-linking
Hot linking is where you store a photo in one spot, and use a link to display it on another site. Most regular websites store their own images, like here on Cult of Mac, but some, like internet forums, avoid the bandwidth and storage costs of serving images by making you host the photos elsewhere and just pasting a link into your forum post/eBay ad/etc.

Photo: Photobucket
Thus, the image hosting company pays those bandwidth and storage costs, and gets no benefit. The best way to avoid having your photos help ransom is to set up and pay for your own domain and hosting, but who wants to do that? The quick answer here is to switch. You can try IMGUR, or you can follow along today and use your existing Dropbox account. Perhaps Dropbox will change its terms in future to disallow this, but that’s a possibility you’ll face with every free site.
Image uploading with Workflow
First, you’ll need a copy of Apple’s free Workflow app. This lets you build automated workflows using drag-and-drop blocks. It’s like Automator on the Mac, only easier to use, and a million times better. Open Workflow, then click the + to make a new action. Then, before we begin, tap the little Settings wheel at the top right of the screen. Give your action a name (I used Photos To Dropbox), and choose the type of action, which determines how you will run it. I picked Today Widget, which puts the action in the widget for quick access in any app.
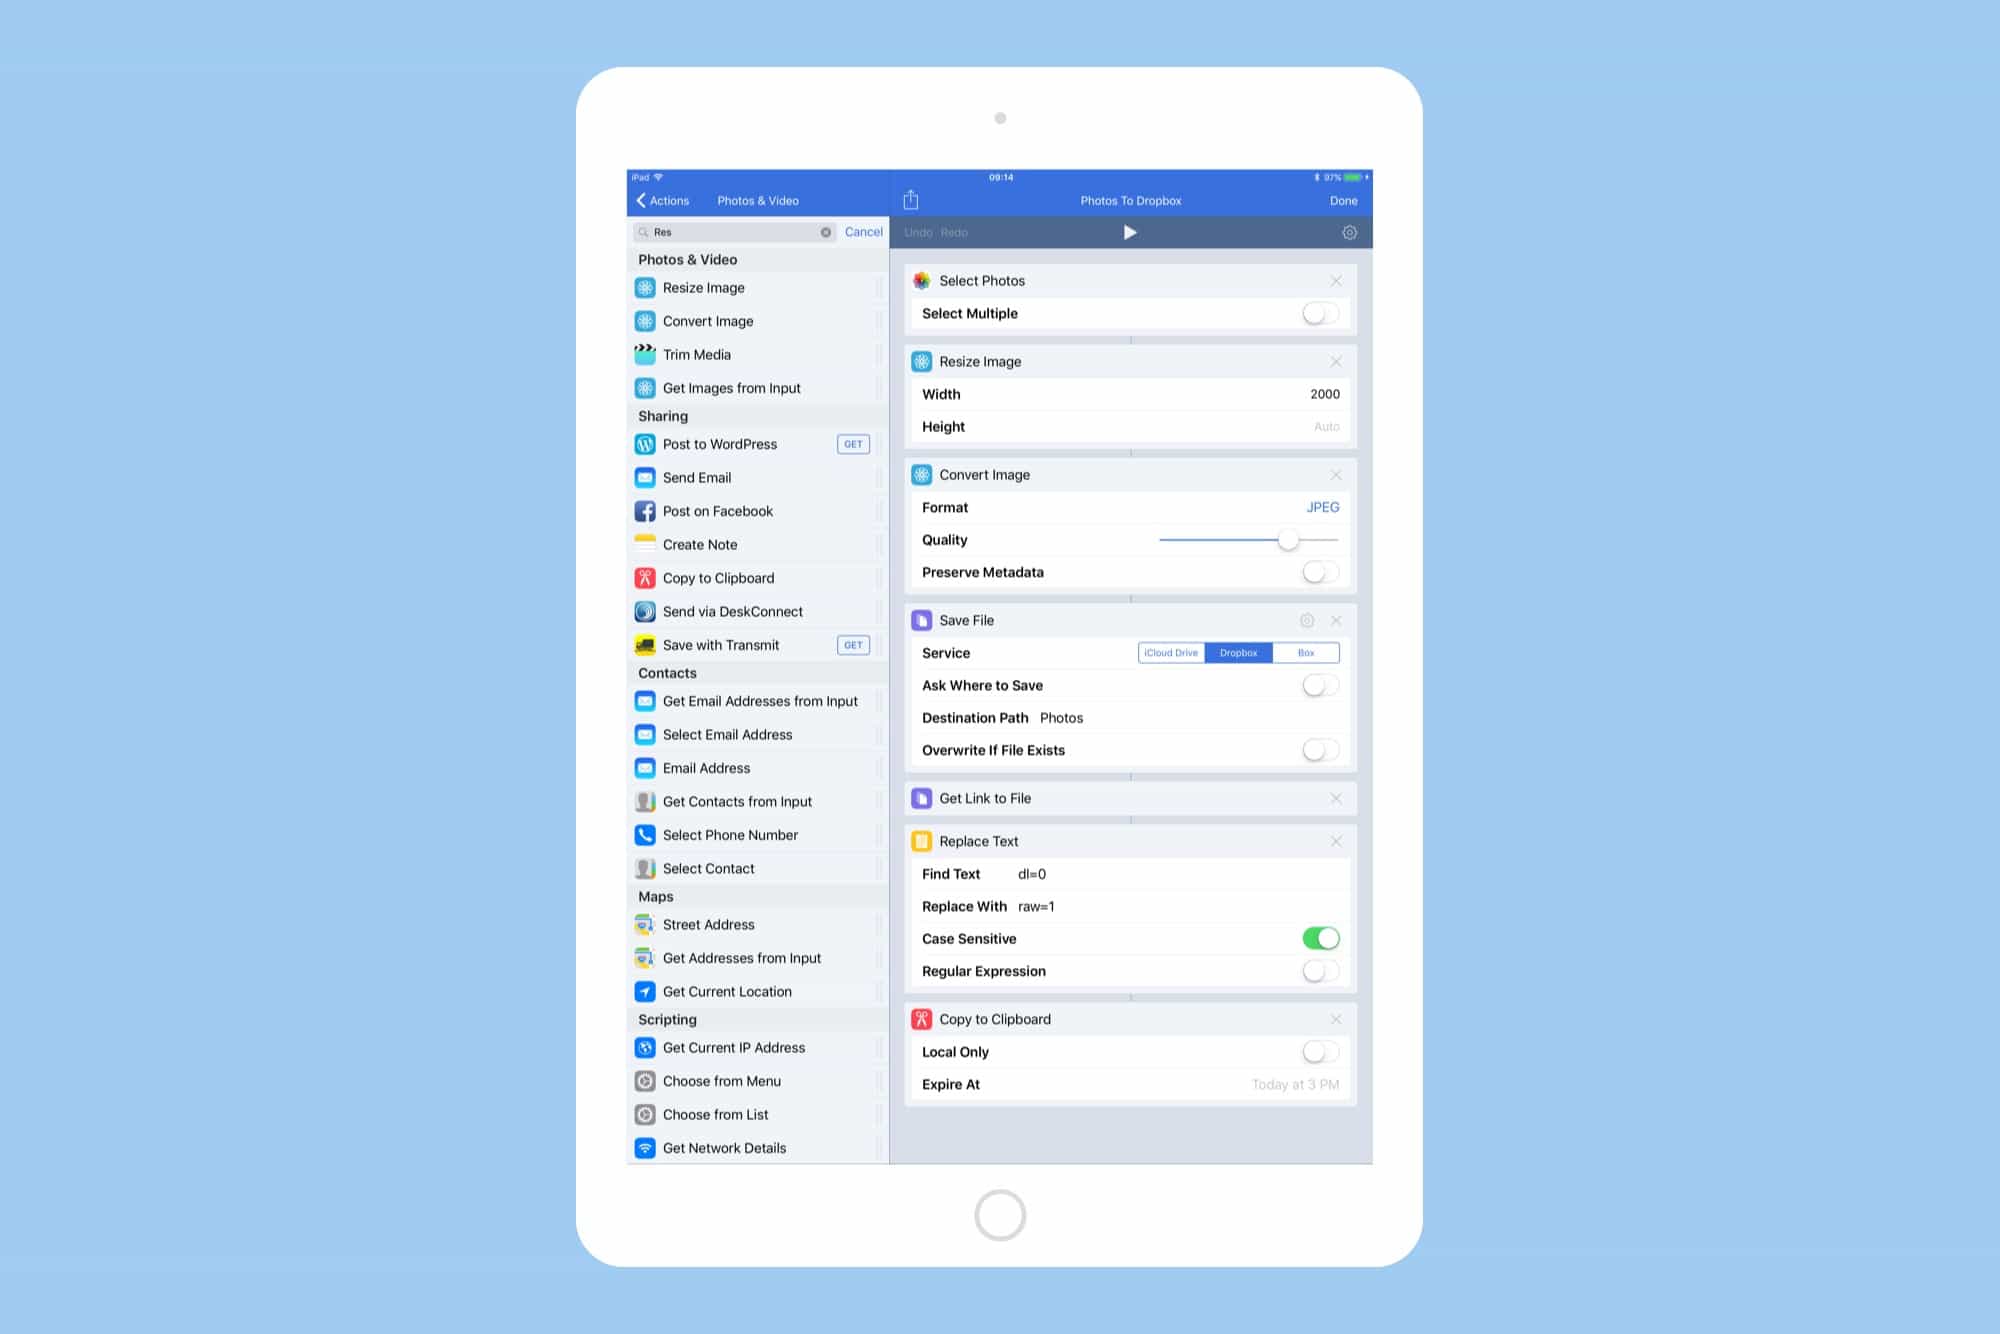
Then, from the sidebar, drag in the following actions:
- Select Photos
- Resize Image (optional)
- Convert Image
- Save File
- Get Link to File
- Replace Text
- Copy to Clipboard
We’ll take a look at some of the individual steps, but the gist of the action is this: When run, you see a picker panel to select a photo. When you choose it, the action will resize it (for faster loading), convert it to JPG (for better compatibility with third-party sites), and then save the resulting photo to a folder of your choice on Dropbox.
The action will then grab the Dropbox sharing URL and then — and this is the crucial step — doctor that URL to make it usable in forums and the like.
Building the Workflow
1. Select Photos
This one does what you think it does. The familiar photo-picker panel pops up. Make sure “select multiple” is unchecked, as we’re doing one photo at a time.
2. Resize Image (optional)
This one isn’t necessary, but making the photo smaller means it takes up less Dropbox space, and loads faster on the target site.
3. Convert Image
Convert to JPG, because not all sites accept PNGs or other formats. iOS screenshots, for example, are PNGs.
4. Save File
Pick the Dropbox option, and choose a name for the folder you want to use. If the folder doesn’t already exist, then Workflow will create it the first time you run the action. Make sure to include the / before the folder name.
5. Get Link to File
This grabs the Dropbox sharing link.
6. Replace Text
This action take that link, removes the “dl=0” form the end, and replaces it with “raw=1” (without the quotes). The result is a link which goes directly to the image, and not to the Dropbox page where the image lives. Try pasting the two URLs into Safari to see the difference.
7. Copy to Clipboard
The final step. You are now ready to paste.
Using the Workflow action
To use your new action, you just have to tap the its icon in the Widget view after entering the Today View on your iPhone or iPad. Or you can open up the action in the Workflow app and tap the play button at the top. If you don’t like either of those, explore the other options from triggering a Workflow action — the Action Extension is a good one.
And that’s it. Any time you need a link to one of your pictures, run this Workflow, wait a second, and then paste the URL into wherever you want to show the image. And keep your fingers crossed that Dropbox doesn’t pull a Photobucket and hold all those links to ransom at some time in the future.


