Battery life! It’s a thing!
To get the most time out of your iPhone, iPad, or iPod touch battery, you have to manage it. There’s no substitute for figuring gout how your iPhone uses power, and then optimizing your usage and the enabled services and features on your iPhone to make sure you get the most life out of your battery.
Here are five ways you can stay firmly in charge of your battery.
View Your Usage Stats To Track Your Unique Battery Needs
Look, all these great tips for saving your iPhone battery are not very useful if they don’t apply to you. Your iPhone use is uniquely your own, and you really ought to get a handle on how your battery is affected as you apply the various strategies to help conserve power when you need it.
Otherwise, why bother, right? Here’s how to check your battery usage stats right on your iPhone, as recommended by Apple.
Tap into your Settings app, and then tap the General button. Next, tap the Usage area, and scroll down to the area titled, Battery Usage. Toggle the Battery Percentage to ON, if that helps you keep track of how full it is. The battery icon at the top of your iPHone display show a percentage, rather than just a picture.
Note the section called Time since last full charge. Usage denotes the time your iPhone has been awake and in use since you last topped off the battery. Awake means when your iPhone is doing things like making a call, using email, listening to music, or engaged other background tasks like auto-checking email.
Standby is the amount of time your iPhone has been powered on since the last full charge, even if its asleep.
Keep an eye on these two numbers as you adjust your iPhone’s features, and see if they go up or down, or just stay the same. If they get larger after an adjustment, you know you’re saving battery. If they stay the same, you know your adjustment has little to no effect, based on your own actual use of the iPhone. If they go down, go ahead and change it back to the way it was.
Source: Apple Support
Save Battery Life With Brightness Settings On Your iPhone
Battery life, it’s the bane of every iPhone user’s existence, right? It’s hard to tell, really, reading the internet, which specific steps to take to make sure your battery is working at its most efficient, giving you the longest life without compromising performance.
One of the most misunderstood areas of managing battery life may just be the brightness settings. Here’s what Apple has to say about it.
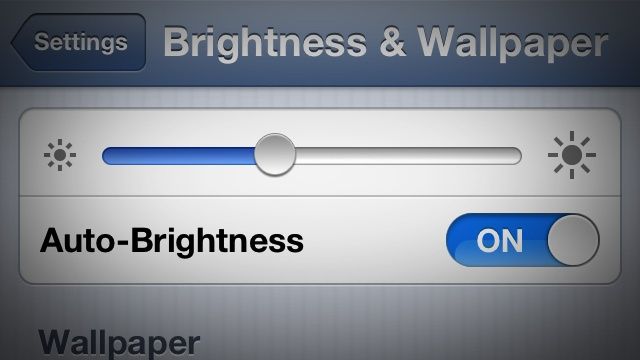
Dimming your iPhone screen is an obvious way to use less power on your iPhone. If you’re running iOS 5.0 or later, Apple recommends dimming the screen by heading into your Settings app. Tap into Brightness & Wallpaper, and drag the slider to the left until it’s as dim as possible, while still letting you see enough of what’s on the screen o do what you need to.
In addition, Apple says that turning on Auto-Brightness allows your iPhone (or iPad) screen to adjust to the ambient light, keeping the iPhone screen to the lowest brightness (as defined by where you set the slider) possible in dimmer light, saving you precious battery power.
To turn Auto-Brightness on, tap into the Settings app, then tap Brightness & Wallpaper. Tap the Auto-Brightness toggle to ON, and then hit the Home button to get back to your iOS device’s home screen.
Source: Apple Support
Image: LifeHacker
Save Your Battery: Turn Off Bluetooth, Wi-Fi, and LTE When You Aren’t Using It
Several technologies on your iPhone, including Bluetooth, Wi-Fi, and cellular data, are made to continually check for signal when you’re out and about. Continual checking requires power, which comes from your iPhone (or iPad, or iPod touch) battery.
It makes sense, then, that turning these different wireless features off when you don’t need them can help your battery last a little longer. Here’s how to do just that.
Bluetooth can be found in your Settings app. Tap it to launch, and then tap again on Bluetooth. Toggle the switch to OFF.
Tap the Settings back arrow and then tap on the Wi-Fi area. Again, tap the toggle switch to OFF. Note that if you’re using your iPhone for location-based services, like Maps and the like, the accuracy will be better with Wi-Fi set to ON.
Tap that Settings back arrow once more, then tap on General. Tap on Cellular on the next page, and go ahead and turn Cellular Data to OFF. You’ll be able to make phone calls, but not use the internet via your iPhone’s cell data connection.
You can also turn all of this off with a quick trip to the Airplane mode. Tap on Settings, then hit the toggle for Airplane Mode to OFF. Now all your send/receive transmissions will be shut OFF. If you want to use Wi-Fi on the plane, for example, you can tap Wi-Fi and turn it to ON, without enabling the other no-no services.
Via: About.com
Turn Off Push Mail And Push Notifications
This just in: your iPhone (and iPad or iPod touch) is a marvel of engineering and does some amazing things, keeping you connected to the rest of the world with its super amazing technology. All that connectivity, though, can come with a price.
Push services are there to let you know when you have stuff to do, or emails to check. It’s pretty handy. However, when you need to conserve your battery, it’s probably time to turn them off. Here’s how, straight from Apple.
If you have a push mail account, like Yahoo! or Microsoft Exchange, turn push off when you don’t need it. Tap into Settings, then tap Mail, Contacts, Calendars. Next, tap Fetch New Data, and set the Push toggle to OFF. Now, emails that you get on your phone will come in based on the global Fetch settings, instead of right when they show up. You’ll need to hop into your Mail app to check them once in a while, too.
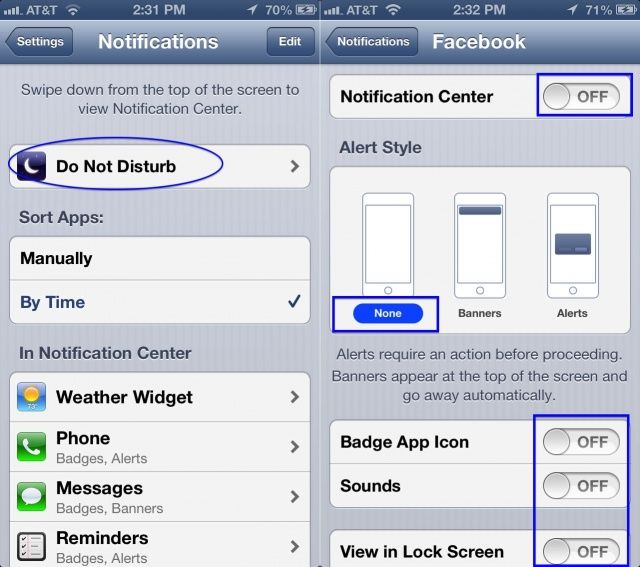
For Push Notifications, you’ll need to disable these in the Settings app as well. Tap open your Settings app, then tap Notifications. Your iPhone will list everything that has the ability to send you Push Notifications. Tap each app you want to manage the Notifications for, and then turn the Notification Center toggle to OFF. Then, set the ALert Style to None, the Badge App Icon and Sounds to OFF, and turn OFF the View in Lock Screen Option.
Another way to make this happen for all your apps is by turning Do Not Disturb ON manually.
Via: Apple Support
Turn Off Location Services
Location services are really an integral part of a ton of iOS apps, using the internal GPS system to add Instagram photos to a map, checkin with FourSquare or Facebook, or let your friends know where you are with one of many “on my way” apps, like Glympse or Twist.
If you’re battery is dying, however, the location services are the first thing you should turn off, as they suck up a lot of your iPhone, iPad, or iPod touch’s power needs, what with their background data sending and receiving and such.
Here’s how to turn them off.
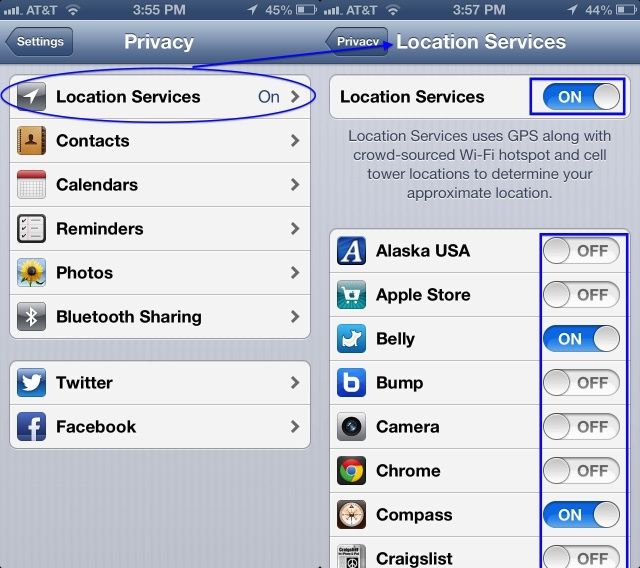
Tap your Settings app to launch it, and then tap on Privacy. You’ll be able to turn the toggles OFF for any specific app that has privileges to access your GPS location by scrolling through the list and tapping them all. I do this on a fairly regular basis for both privacy and battery savings. I figure that with less apps accessing my location, the less battery power in total is being used for that function.
If you want to turn off Location Services completely, then simply tap the main toggle at the top to OFF, and you’ll stop using them. This will keep your apps that need it, like Maps or Compass, from knowing where you are, but the battery will thank you.
Source: Apple Support
![Five Easy Ways To Master Battery Life In iOS [Feature] Battery Usage](https://www.cultofmac.com/wp-content/uploads/2013/06/Battery-Usage.jpg)


