If you’re one of the many 1Password users who are unhappy with the app’s new version 8 update on Mac, you might be considering a switch to another password manager. Luckily for you, it’s easy to move all your data.
We’ll show you how to export all your usernames and passwords out of 1Password and into another service, such as Dashlane. We will also explain how you can save your documents, which can’t be exported automatically.
1Password 8 for Mac looks like a terrific update for one of the best password management solutions at first glance. It delivers a new look and lots of big improvements. But there are under-the-hood changes fans really don’t like.
The big one is that 1Password is now an Electron app — not a truly native macOS app. Creator AgileBits has also removed the ability to sync with Dropbox and iCloud, and made 1Password a subscription-only service.
If you’re one of the many who aren’t happy with the upgrade, you’re not stuck. Switching to another password manager can be simple, as long as you now how to transfer all your data properly. We’ll walk you through it.
How to export your data from 1Password
After deciding which password manager you’re going to switch to (we recommend Dashlane), Cult of Mac’s official password manager, the first thing you’ll want to do is export all your data from 1Password so that you don’t have to start over from scratch.
You’ll need to do this using 1Password on Mac — data exporting isn’t supported on iPhone and iPad — but the process is simple. Here are the steps to follow:
- Open 1Password and unlock it using your master password or Touch ID.
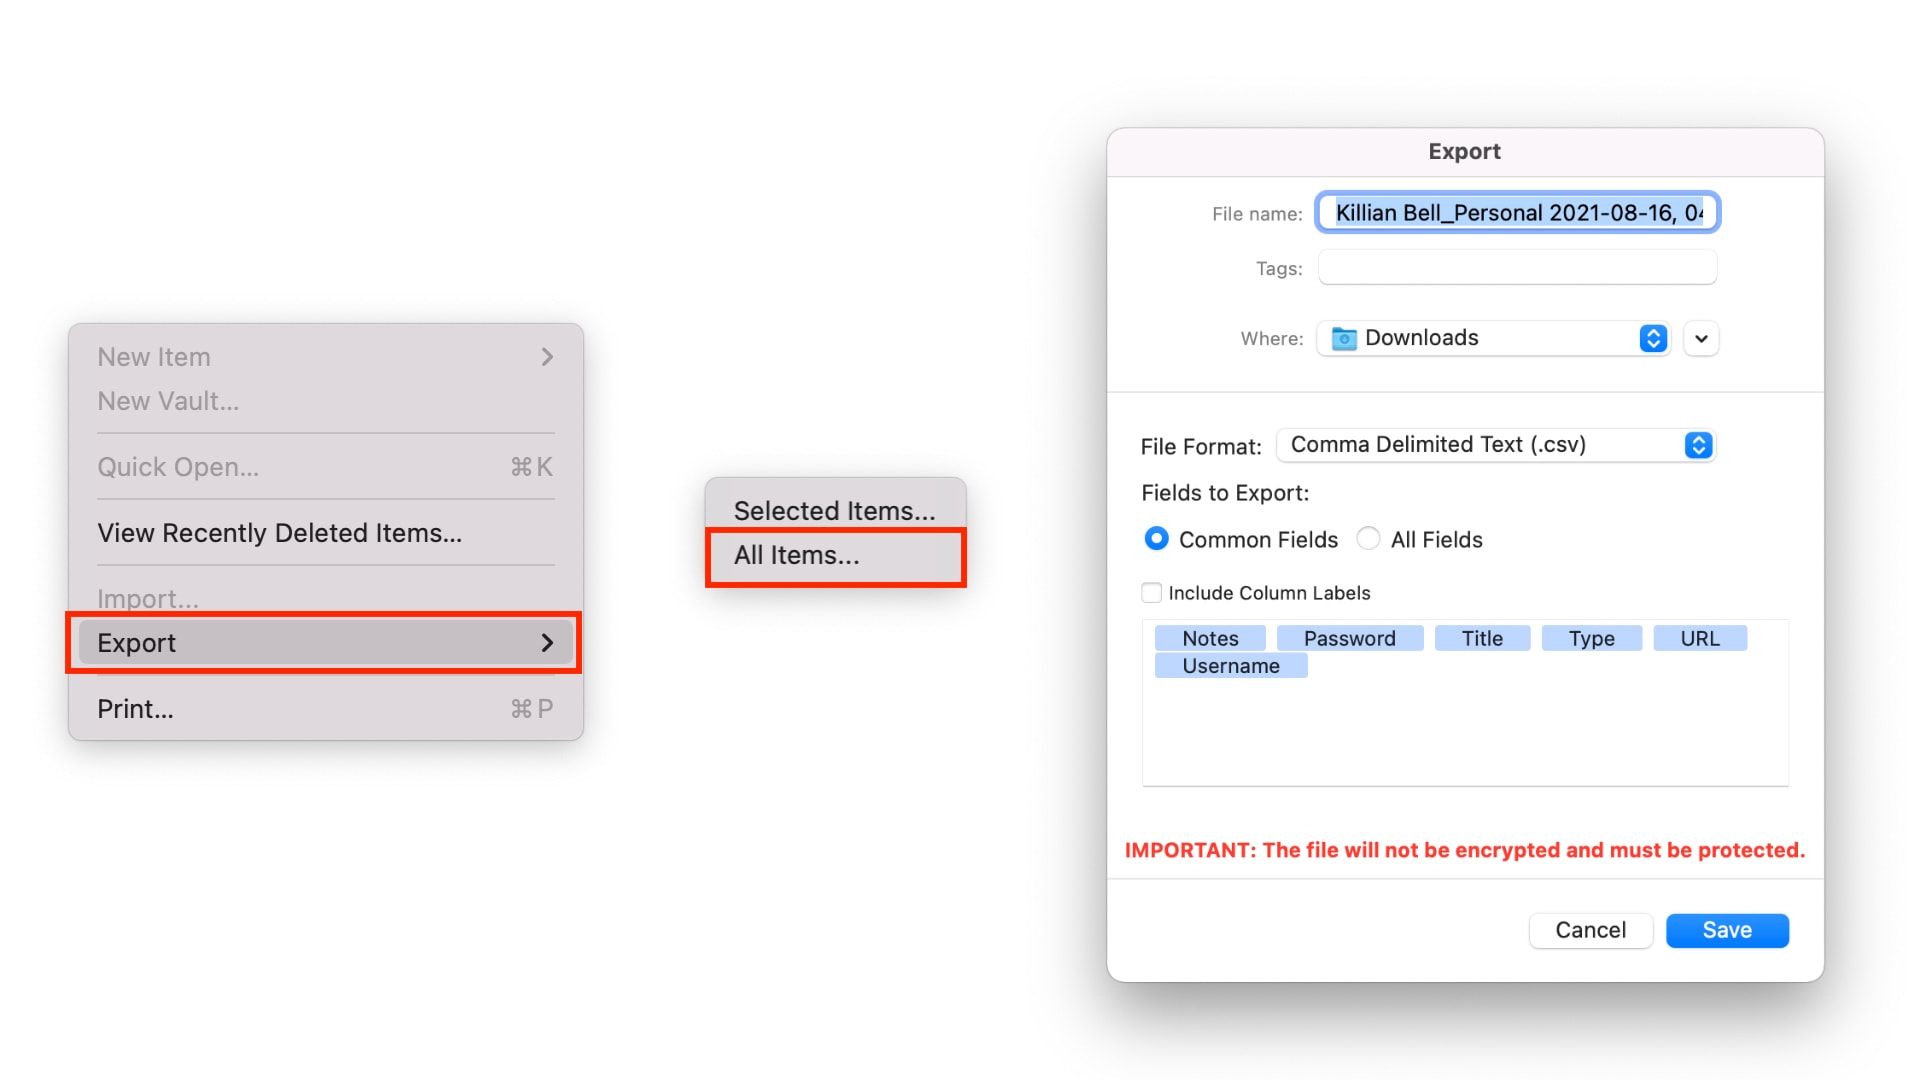
- In your Mac’s menu bar, click File, select Export, then click All Items.
- Enter your master password again, then click Continue.
- Give your export a name, choose where you want to save it, and select the format you want to save it in. By default, 1Password will use its own .1pif (1Password Interchange Format) file format, but not all third-party password managers support this. If yours doesn’t, use .csv instead.
- Click Save.

Image: Killian Bell/Cult of Mac
You should now have a file that includes all your usernames and passwords. A word of warning: This file is in plain text and isn’t protected in any way. You’ll need to guard it with your life, and make sure no else has access to it.
We recommend deleting the file after your new password manager is set up and you’ve confirmed that all your usernames and passwords are present. If you insist on keeping it as a backup, lock it and keep it somewhere safe.
How to export your documents
Another thing to note is that any documents your have saved in 1Password — such as PDF and Word files — are not included in your export. They need to be downloaded individually and saved manually before you switch.
To download your documents, follow these steps:
- In 1Password, click Documents in the side bar.
- Select the document you want to save.
- Click the Quick Look button to open the document.
- Press Command+S on your keyboard.
- Give your file a name, choose where you want to save it, then click Save.
The warning we gave about password data above also applies to documents. Once they’re outside of 1Password, they’re not password-protected, and they can be opened by anyone who has access to your Mac.
If you plan to keep these documents saved locally, then, it’s a good idea to put them in a password-protected folder somewhere safe. But we recommend moving them to your new password manager if you can.
Setting up your new password manager
With your export file and documents now saved, you’re ready to set up your new password manager. We’ve detailed the steps for a number of popular services below, but you’ll notice they’re all pretty similar.
Before you begin, you’ll need to first install your password manager of choice on your Mac if a native app is available, or sign in through your browser. Again, we recommend Dashlane, the official password manager of Cult of Mac, for its ease-of-use, utility and great Security Dashboard. Follow the onscreen steps to get up and running and create a new account.
When you’re ready to import your data, follow these steps:
Dashlane
- Visit app.dashlane.com in your browser and log into your account.
- Click the settings button in the bottom-left corner.
- Select Import passwords.
- Click browse your computer, then find and select your 1Password backup.
- Click Upload again.
- You’ll be presented with a list of your usernames and passwords. Deselect anything you don’t want to import, then click Add to Dashlane.
Note: If you have problems importing your .csv file into Dashlane, check out Dashlane’s guide on file formatting.
LastPass
- Visit lastpass.com in your browser and log into your account.
- Click Advanced Options in the side bar.
- Select Import.
- Open the drop-down menu and select 1Password, then follow the onscreen instructions to import your data.
NordPass
- Open the NordPass app on your Mac.
- Click Settings in the bottom-left corner.
- Under Import and Export, select Import Items.
- Click browser for CSV file, then find and select your 1Password backup.
- You’ll be presented with a list of your usernames and passwords. Deselect anything you don’t want to import, then click Import.
Note: If you have problems importing your .csv file into NordPass, check out the NordPass guide on file formatting.
RoboForm
- Click the RoboForm icon in your Mac’s menu bar.
- Click Preferences…
- Select Account & Data, then click Import from…
- Select 1Password, then click Import from File.
- Find and select your 1Password backup.
- Click Done.
Keeper
- Open Keeper on your Mac.
- Click your email address in the top-right corner.
- Select Settings, then click Import.
- Choose 1Password from the list.
- Drag your 1Password backup to where it says Drop a File Here.
- Click Import.
You’re all set
You should now be up and running with your new password manager. If you have any issues during the setup or import process, check out your password manager’s support websites for further help.
Once you’re happy that all your usernames and passwords are imported and safe, you should now delete your 1Password export file and ensure it is completely removed from your system.


