iOS 7 is chock full of new things to discover and explore. We’ve been spending some time with it on our iPhones and iPads, and have found a bunch of surprises hidden within–features and new ways of doing things that are new, different, and just plain interesting.
Here, then, are six of those surprising tips and tricks, ready for you to try out on your own iOS 7 beta-enabled iOS device.
Manually Update Your Apps
A promising feature of the upcoming iOS 7 is the automatic updating feature for apps. As Senator John McCain knows, manually updating ever sigle app on your iOS device–especially as you start to collect a bunch–can be a real time sink.
Fortunately, iOS 7 beta has the ability to just let all your apps update in the background, automagically, with nary a trip to the App Store UPdates tab to waste your time. HOwever, if you want to be able to pick and choose which apps to update, you’ll need to make a trip to the Settings app.
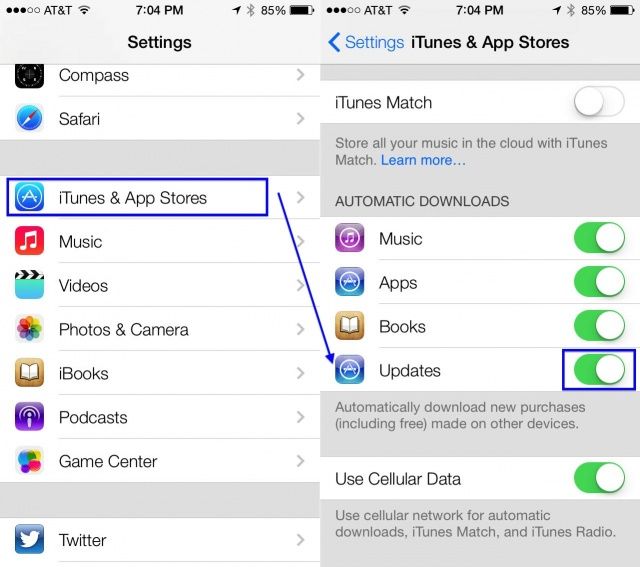
Launch Settings with a tap, and then scroll down to the iTunes & App Stores button. Tap it to go to that specifici preference screen, and then scroll down to the Automatic Downloads area. You’ll see the already in place Music, Apps, and Books auto-update toggles, and then you’ll see a new one: Updates. This is set to ON by default.
To turn off automatic updating for your apps, tap the toggle to OFF, which will change the toggle from a bright green to a pure white. There you go; no more automatic updates.
Now you’ll be able to hit the Updates tab in the App Store App to choose which apps to update, just like you do not in iOS 6.
Enable Dynamic Text Size In Apps That Support It
Let’s be honest–sometimes it gets a little tricky to see the stuff on those tiny little iPhone screens, especially as we all get a little (ahem) older. While the accessibility feature to set large text has been around for a while, there’s a new feature in iOS 7 beta that holds promise, and isn’t actually in the accessibility section.
Dynamic Type will let any application that supports the feature adjust the font size in the app to better match what works best for you.
Here’s how to access and change the settings for Dynamic Type in iOS 7 beta.
Tap into your settings app and then tap on General. A bit down the page, you’ll see Siri, Spotlight Search, and then Text Size. Tap there.
There’ll be a slider at the bottom to let you increase (or decrease, you eagle-eye) the size of your preferred text. Any apps that support Dynamic Type will “adjust to your preferred reading size below,” says the screen.
Now,when you’re using apps like Mail, iBooks, or others that support Dynamic type, the font will be large enough (or small enough) to fit your own personal preferences. Neat!
Force Quit Apps When Multitasking
iOS 7 beta brings with it a host of surprising features, one of which is the new way in which the mobile operating system handles multitasking. In iOS 6, a double click on the Home button on your iPhone, iPad, or iPod touch brings up a multitasking bar along the bottom of the screen. On iPhone and iPod touch, it only works in Portrait mode. On the iPad, it works in both Portrait and Landscape screen orientations.
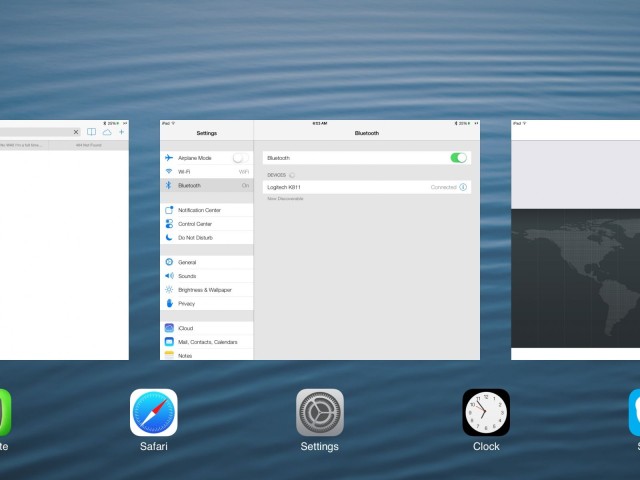
That’s the same in iOS 7, but the visual look of the multitasking system is quite different. Instead of a small bar sliding up from the bottom, you get full previews of each app in the multitasking list. You can swipe left and right to move between apps at will. Also different in iOS 7 beta is the way you force quit apps, to start them anew or prevent certain ones from running in the background.
In iOS 7 beta, double click the Home key as per usual to engage the multitasking system. You’ll see an icon for the app and an app screen preview across your iOS device.
Previously, you’d tap and hold on a multitasking bar app icon and get the app wiggle. You’d then tap the X button to remove it from the multitasking bar, letting it start from a clean state next time you started it up, or keeping it from running in the background.
In iOS 7 beta, all you need to do is swipe the app review up toward the top of your screen, and it will be taken out of the list, essentially doing the same thing: letting it start from a clean state as well as keeping it from running in the background, if the app supports that.
Set The Preferred Directions Type For Maps
In Apple’s Maps app, which debuted in iOS 6, you’ve always been able to set the volume of the voiced directions, choose whether you want to use mile or kilometer units, and set your Map Labels to Always English or not.
In iOS 7 beta, however, you’re now able to set your preferred direction type. Here’s how.
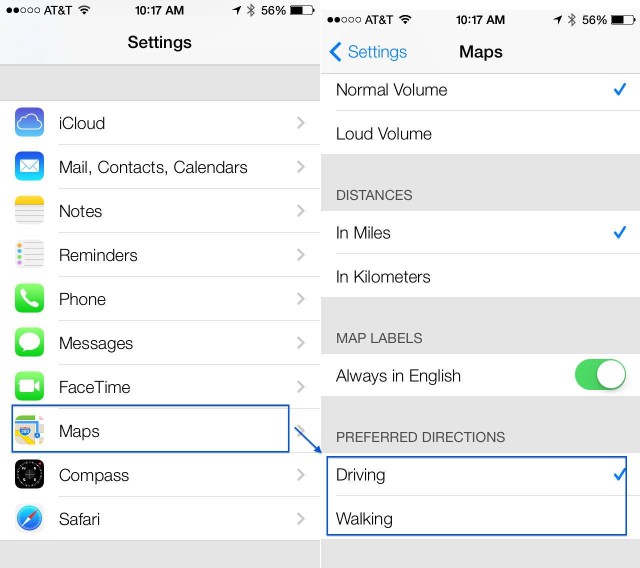
Launch your Settings app with a tap, and scroll down to the Maps icon. Tap that, and then you’ll see the preferences for the Maps app in the right hand column if you’re on an iPad, or on the preferences screen if you’re on an iPhone or iPod touch running iOS 7 beta.
Scroll to the bottom, just under the Map Labels section, and tap on your preferred directions type: Driving or Walking. Now, when you type an address into the Maps app, you’ll automatically get the type of directions you want. So, if you’re a walker by nature, you’ll always get the best walking route. If, on the other hand, you live in a place where driving is the only option, then you’ll get the best driving directions.
No options for Transit yet, so we have yet to figure out how that will work once iOS 7 is out of beta this fall. So far, the Transit button in Maps itself does the same thing it did in iOS 6: it lets you choose from apps that support transit directions from the App Store or your own iOS device.
Use A Panorama As Your Lock Screen, Wallpaper, Or Both
File this one under super cool! In previous incarnations of iOS, you’ve always been able to set a photo from your camera roll as the image that shows up on your iPhone or iPad screen. You can place one image on your lock screen, and one as your wallpaper, or the same image on both screens.
Now, however, in iOS 7 beta, you can actually set panoramas as your lock screen image, or as your wallpaper image. Or both! When you do so, the iPhone or iPad will show your panoramic image in full size, which lets you move the device around in a circle and see the whole image dynamically move across your screen.
Here’s how to make this happen.
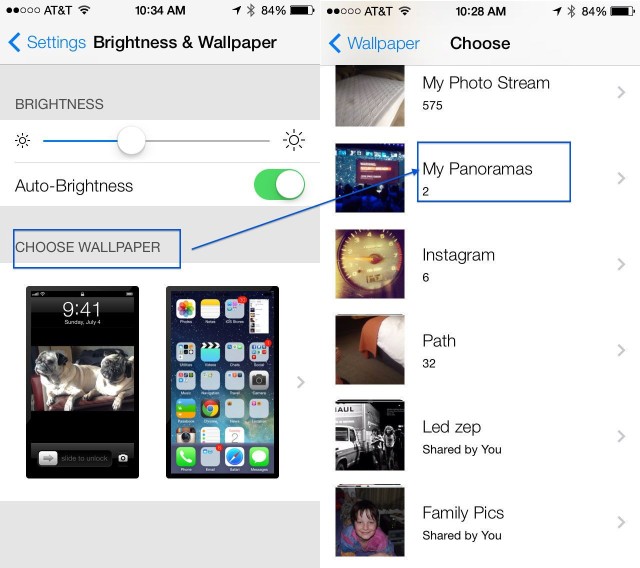
FIrst up, tap into your Settings app in iOS 7 beta, and select Brightness & Wallpaper. Tap on the Choose Wallpaper area and then scroll down to where your Photos are. Tap on My Panoramas, and select one with another tap. You’ll get a quick preview, so see how it works. Hold the iOS device up in front of you and pan around as if you were taking a panoramic shot. See how it moves? So cool!
On the iPhone, tap the Set button to get a choice to set the panorama as your Lock Screen, Home Screen, or Both. On an iPad, once in the preview mode, you will see a Set Lock Screen button, a Set Home Screen button, and a Set Both button. Tap the one you want, and your iPAd will set up with it.
Now, whenever you look at your Lock screen or home screen icons, you’ll get this slick motion effect. Even when you have Lock Screen notifications, the panorama will move around in the background, even though it’s blurred out under the notifications. Bonus tip: on an iPad, the panoramic effect will work in Landscape orientation as well.
Source: Mac Mixing
Via: Corvida on Google+
Be Handy – Use The Compass And Level Built Right In
iOS 6 gave us the Compass, which, honestly, I’ve never really used that much.
The new iOS 7 beta, however, has given me some functionality I’m much more likely to need and use. Heck, I even have a third-party app to make sure my handyman projects around the house aren’t crooked.
I’m talking about a level, and there’s a new one built right into iOS 7 beta, within the Compass app on the iPhone. I haven’t found a comparable app on my iPad running iOS 7 beta, but maybe in the future?
Either way, here’s how to find and use the compass and level app.
Launch the Compass app with a quick tap. If this is the first time, you’ll need to gyrate the iPhone around a bit to completely calibrate it. Now, just hold the iPhone out from your body, like you would reading a text message. Try to keep the iPhone parallel with the ground, and simply point in the direction you want to go. The app will figure out which way you’re facing and give you a pleasant little readout.
The level function in the Compass app is, to me, much more useful. I’d love to see the whole thing renamed as a Level app with a compass functionality. Or add the Compass into the Maps app. But I digress.
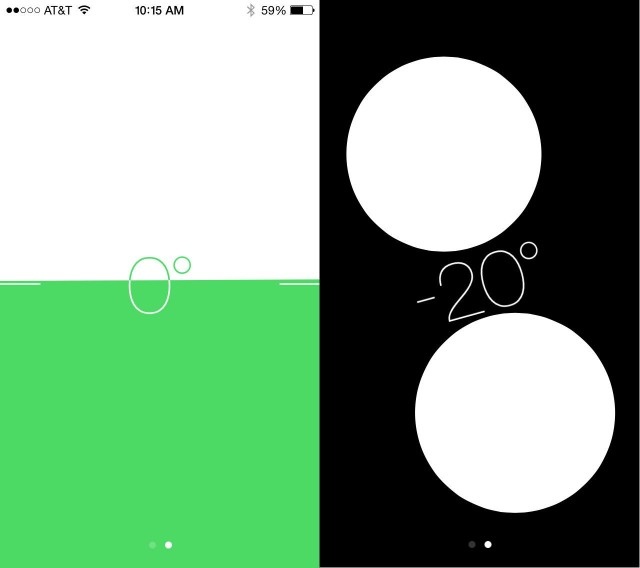
Once in the Compass app, swipe to the left to get a surprisingly art-deco styled level. To measure the level-ness of any object, place the edge of the iPhone on the surface of the object, either in portrait or landscape orientation. There will be two white circles on a field of black while the object is out of true, but the display will go green when the angle is at 0˚.
![Six Surprising Tips & Tricks For iOS 7 Beta [Feature] design_functional_gallery1](https://www.cultofmac.com/wp-content/uploads/2013/07/design_functional_gallery1.jpg)



9 responses to “Six Surprising Tips & Tricks For iOS 7 Beta [Feature]”
Man it’d be nice to actually see new iOS 7 features in these posts, but sadly I think we’ve worked through them all about ten fold already.
How are these “surprising” or “tricks” when they are all well documented and most were announced on stage at the WWDC? How is something like dismissing an app even a “tip” when it’s a base part of the OS (again, described on stage at WWDC)?
Tips and tricks are supposed to be things most don’t know about or are hard to discover.
“iOS 6 gave us the Compass, which, honestly, I’ve never really used that much.”
iOS 3 gave us the compass, not iOS 6
Rob any appearance of a landscape alarm clock?
I have never seen more typos in an article in my life.
Multitasking is landscape for iPhone as well on iOS 7
OMG, the technological landscape is forever changed by such a raft of unimaginable innovations. Apple’s lost the plot somewhere.
I HIGHLY recommend you create a backup before setting a panorama as a wallpaper. I set one up last night and it completely froze up any touch capabilities on the lock screen and forced me to restore from a backup I made earlier that day. Power cycles and soft resets did not fix the problem.
Awesome article. One thing is that the swipe up to quit an app does work in landscape and portrait mode multitasking on iPhone. This may have been an addition to the later beta’s but regardless that is now functional.