GarageBand for OS X changed the way us mere mortals create great music on their Macs. Included with all new Macs or available in the Mac App store for $15, it gives musicians from the brand new to the seasoned veteran a way to record all kinds of music, connecting real instruments, MIDI devices, and microphones to your Mac for easy music sessions. It also does some other cool things, which we’ll tell you about right now.
Feel The Magic
The latest version of this fantastic music and audio software, GarageBand ’11, makes creating a song without touching an instrument even easier – with Magic GarageBand. Essentially, this will guide you through the steps needed to create a great music track for video projects, ringtones, or just your own music to share with family and friends. Here’s how to begin your journey.
Firstly, open GarageBand ’11 and click on the Magic GarageBand icon in the left-hand pane. There will be nine icons in the area to the right, each representing a different musical genre. To listen to each track, hover over the specific icon you want to hear and click on the Preview button that appears.
Once you’ve decided on a musical style, it’s time to click the chosen icon and head onto the stage. GarageBand will lay out all the instruments that it’s chosen for that given song. It may take a couple of minutes to load all the instruments and sounds, depending on your Mac’s CPU speed and RAM.
Once it’s all loaded, click on the triangular play button at the bottom of the screen to preview the whole song. First, note that the front instrument is supposed to be the instrument you’re playing, like a keyboard or connected guitar. If you’re not playing an instrument, click on it and then click on the No Instrument button at the bottom of the window, to make it disappear.
Hover over each of the other instruments on the stage, and a spotlight will appear, plus the name of the instrument. Click on an instrument and the other options for that music track will show up at the bottom of the window. Click on the drums, for example, and the other drum kits will show up. Click on one of them while the music is playing to hear the difference it will make to the overall mix. It may take a measure or two for the new instrument to find its way into the mix, so be patient.
Once you’ve customized all the instruments, it’s time to Open in GarageBand. Click on the button that says that same thing, and GarageBand will open to the full track recording experience. In here, you can change the levels, the balance, and any other crazy thing you can think of. You can drag the sections around at the top of the window, too, by clicking on the title bar (Verse, Bridge, Ending, etc.) and dragging it to where you want it.
See what you did there? You created a song in under ten minutes, right? Hit the Share menu and choose how you want to send this masterpiece out. Choose one of the sharing options to get the song from the editable stage to a more final stage, whether you want to make a ringtone for your iPhone or burn the song to a CD.
Rock Your Own Custom Ringtones
Ringtones, right? How can you be the coolest kid on the bus without your own custom ringtone? You can’t, that’s how.
With GarageBand ’11, it’s very simple to make one, and we’re here to show you how.
All you need is the latest copy of GarageBand, iTunes 7.5 or later, a Mac that runs OS X, and some music. Oh, and an iPhone, of course. You can use music that you create with Magic GarageBand, record yourself all fancy-like, or import an MP3 track to GarageBand to make your ringtone. Here’s how.
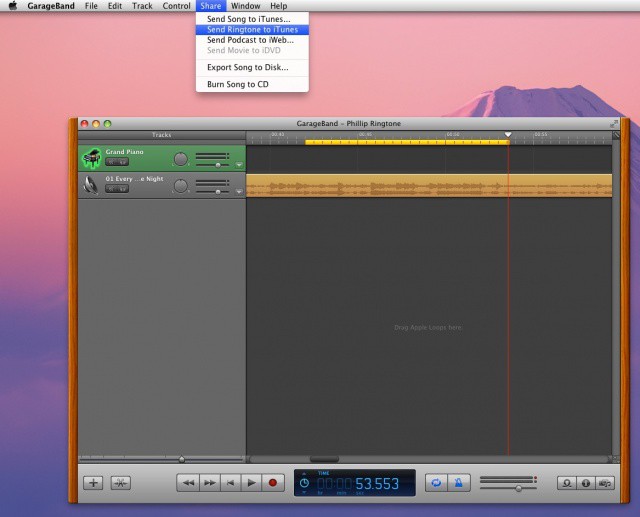
Once you’ve decided what music you want for your custom ringtone, click on the Cycle button in the Transport control area (it looks like an oval made out of arrows). Then, click on the little icon to the left of the LCD-style panel. It will have a musical note, a clock, a tuner, or a metronome icon there. Set it to Time, the little clock icon. This will make the display show minutes and seconds, rather than bars and beats.
Click in the area just above the music you’re using. Adjust the cycle (loop) area to cover the part of the song you want as your ringtone. You can change the length of the song by dragging either end left or right. Grab it from the middle to move it around. If you can’t find the bright yellow loop/cycle section, go to the very beginning of your music: it defaults to the first measure.
Adjust the cycle area to a maximum 40 seconds for ringtones, or 30 seconds for other iOS alert sounds, like for Text Tones, New Mail, and the like. Save the project and name it whatever you want to call your ringtone. I suggest Phillip, but you can choose this one.
Head up to the Share menu and choose Send to iTunes. Sync your new ringtone to your iPhone in the typical way.
Now you can rock your thrash metal band’s latest single when your Aunt Tillie calls from home to tell you that you forgot the lunch she packed for you.
Looping Beats For Fun and Profit
GarageBand for Mac OS X is a full recording studio for your Mac. It allows musicians to connect microphones, guitars, basses, and other instruments for a fully analog recording session. It has MIDI playback and recording capabilities as well, allowing anyone with a MIDI capable keyboard to record right along with those instruments.
One of the less-touted features, however, is the Loops section. GarageBand comes with pre-recorded MIDI and sampled audio that fit together in various ways. Without knowing to play a single instrument, you can create amazing sounding music with GarageBand, simply using Loops.
The first step is to bring up the GarageBand Loops browser. Start GarageBand and select New Project in the start window. If you’re already in GarageBand with another project open, select New Project from the File menu to get this window. Click on Loops, and then on the Choose button in the lower right. Name your file something you’ll remember, and file it somewhere where you can find it again. Desktop, anyone?
The familiar GarageBand window will open. This time, however, the Loop browser will show up in the right hand pane. Note the different filter buttons at the top of this browser pane. Click on a musical style, like Rock/Blues, Urban, or World from the left column of filters, or click on the type of instrumentation in the column just to the right, filtering the list to only show Loops containing specific instruments, like Guitars, Piano, Synths, Bass, etc. The next two columns to the right are filters for tone and mood, filtering for loops Apple has categorized as Relaxed, Grooving, Melodic, Dissonant, etc.
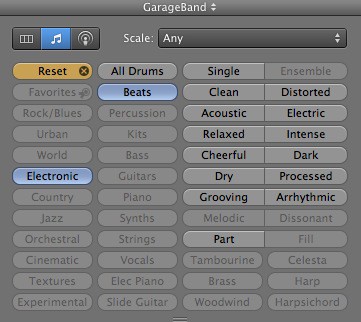 Click the buttons to filter the list of available GarageBand Loops. For our example here, click on Electronic in the filter list. If you see the Column browser, or the Jingles, Stingers, or Sound Effects browser, click on the little musical notation item in the tab buttons in the upper left of the Loops pane.
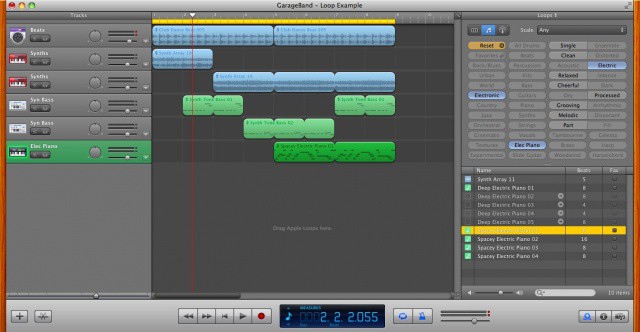
Click on Beats in the second column, and click on any of the beats to listen to them. I chose Club Dance Beat for my song. Once you find one you like, click and drag the Beat’s name over to the Tracks window. A new track will appear, and a big green Plus button will show up. Drag your beat loop over to the far left, to start on the first measure. Drop the beat there. Hover the mouse over the upper right corner of the resulting green rectangle and you’ll see the extend cursor; it looks like a round arrow. Click and drag the corner, and GarageBand will extend out the Loop, with visual cues as to the beginning and end of each loop section.
Now, in the Filter list, click on Beats to reset the buttons. Click on Synths, and repeat the above process. Mix and match as you will, but create a new track for each new sound. It will make things easier to edit later. Once you find a synth track you like, filter to Bass loops, and bring a nice grooving bassline over. I was able to create the six track loop-based snippet in the screenshot above in about 5 minutes.
If you want to hear the whole thing put together, click the Play triangle at the bottom. You can also set the Cycle/Loop button so GarageBand only plays the section you’re working on, over and over. That helps get into the groove of your masterpiece.
If nothing else, I find this sort of creative activity calming, soothing, and a great way to make a couple of hours disappear. Your mileage may vary, but give it a shot, and share links to your music with us below, if you can.
Unleash Your Podcast Potential
GarageBand is not only a full featured recording studio, a highly capable MIDI synth station, an electronica musician’s dream, or a place to record full songs without a day of music lessons. It’s also fantastic software for podcasting. GarageBand makes creating a podcast easy and fun.
Back in the heady days of the early 2000s, I recorded and distributed a podcast of my own, called The ANC Podcast. It was a short internet radio show that focused on local music in Anchorage, Ak, where I had recently relocated to. I spent some time working on the craft of creating a podcast, and let me tell you, GarageBand makes it much easier than it really has any right to be. Most of the podcasters I know use a Macintosh and GarageBand to get their internet audio show on, including the Insomnia Radio Daily Dose, The Portable Podcast, and The Touch Of Gaming Podcast, just to name (drop) a few.
To start your own GarageBand media empire, launch GarageBand ’11 on your Mac and create a new project. If you’re already in GarageBand, choose New from the File menu, then click on New Project from the project browser window. Click on Podcast from the available options, then the Choose button, and then name/save your podcast episode – GarageBand will open up it’s podcast-y goodness to you.
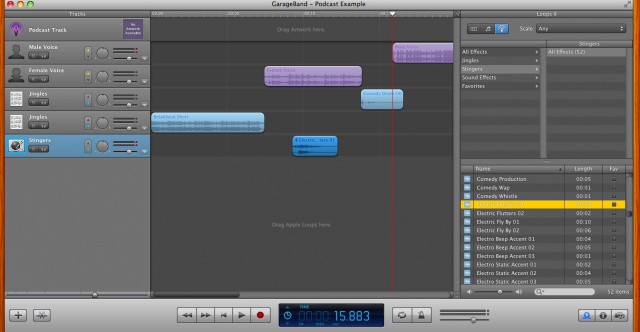
GarageBand will open with a special template just for podcasting, with a track pre-populated with sound profiles for a Male voice, a Female voice, and a track for jingles. On the right, you’ll see the media browsing pane. Click on the loop browser button (far lower right corner, looks like a loop of tape) to bring up the jingles, stingers, and sound effects browser. When inserted correctly, these will make your podcast sound more like a professional radio show than a basement recording. Not that there’s anything wrong with recording from the basement.
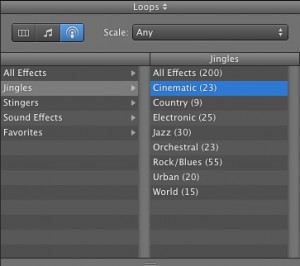 Click into the male or female voice track, depending on your voice type, and hit the red record button. Speak into your built in or external microphone naturally and normally, and record your content. Head over to the loop browser pane, and click on Jingles. Garageband has several to choose from, and categorizes them as Cinematic, Country, Electronic, Jass, Orchestral and more, so you can find just the right mood to set at the beginning of your podcast. Once you choose a Jingle, drage it to the left side of GarageBand, into the Jingles track.
Now click on Stingers. These are the little sounds that come in under audio titles, or between sections of a podcast. Find one that fits your podcast theme, and drag it over in the appropriate place underneath the tracks already containing music. A new track will be created, called Stingers.
Building your podcast with just these few components will take your podcast to the next level. Who knows, maybe you’ll be the next podcast to be featured in the new app for iOS? Either way, you’ll have a ton of fun making a podcast with GarageBand, and it will help you focus on content, not on audio engineering. Though, of course, that will help, too.
Let us know how it goes in the comments below.
![Four Super Cool Things You Can Do With GarageBand for OS X [Feature] GarageBand '11 OS X](https://www.cultofmac.com/wp-content/uploads/2012/07/Screen-Shot-2012-07-01-at-6.06.48-PM.jpg)
