True, email is boring. However, it’s something we all use everyday to communicate for work, home, and pleasure. In iOS 6, Apple made a few changes to the way the Mail app works, tossing in new ways to sort, sign, and attach things to emails. Using the iOS 6 Mail app effectively takes a little bit of practice, a few tweaks, and the following five tips for using iOS 6 Mail the right way.
Control That Flood Of Email With Mark And Flag
I use email for a ton of different reasons. I use it to communicate with family, friends, colleagues, and business partners. I use email to keep track of things I need to get done today, tomorrow, and far into the future. Chances are, you do, too.
One of the ways I use email to keep myself on track and informed is by flagging emails for later perusal. I also mark things as read and unread to signal that I am done with the email, or that I need to actually read it later.
Now you can do these things right in the iOS 6 Mail app. Here’s how.
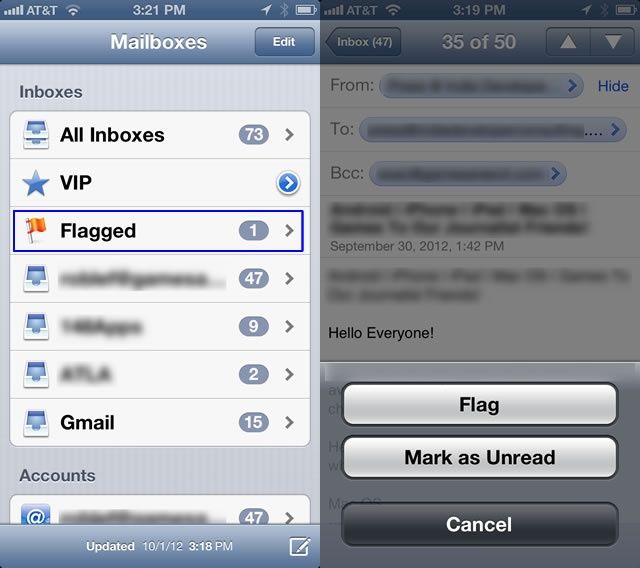
The simple way to do this is to open up Mail on your iPhone, iPad, or iPod touch, and find an email you’d like to flag. Tap the email itself and open it, just like you would if you were going to read it. Then look in the lower left corner and find the flag icon. Tap it, then choose either Flag to send it to the Flagged items list or Mark as Unread to keep it fresh and unread.
You can also flag items in the list view as well. Simply open the Inbox you want to mark items in, then tap the Edit button in the upper right corner. Tap on the email or emails you want to flag. Tap on Mark in the lower right hand corner, then choose either Flag or Mark as Read/Unread, which will depend on the initial status of the email you tapped.
To access your Flagged emails, head into the Mail app and back out to the Mailboxes screen. Notice the orange Flag icon and the Flagged email folder there. Tap it and you’ll see a list of all the emails you’ve flagged, regardless of the email address you received them in.
This is a great way to keep track of those super important emails that you Must. Never. Lose. so that you can be sure not to forget stuff. It’s a third place to keep email, too, making this the most flexible sorting system yet for the iPhone, iPad, or iPod touch.
Set Up Multiple Signatures
So, hey, guess what? You can now set up more than one signature in the new iOS 6 Mail app for your iPhone, iPad, or iPod touch. Each email account you have set up will allow you to have a specific signature attached to just that email address.
So, from now on, you can have “–Sent from my iPhone 5” for your personal email, and your professional information sent out whenever you use your email from work. You can create a signature for that secret Yahoo! email account you keep for special purposes, and your boss will ever see it.
Here’s how.
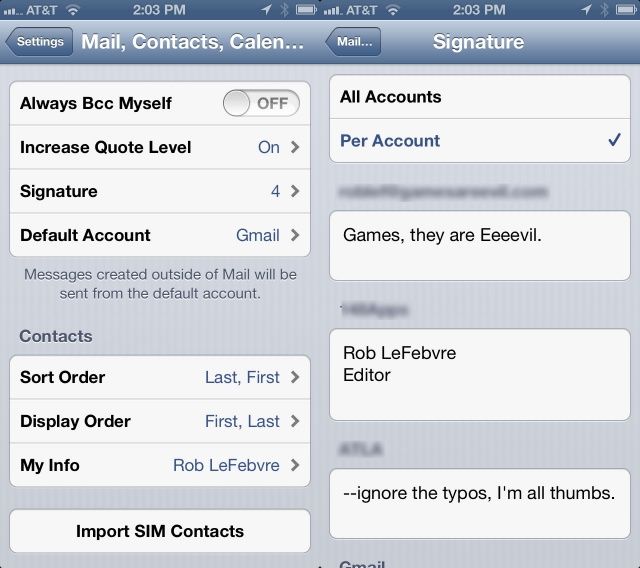
Tap your Settings app to launch it, then select Mail, Contacts, Calendars. You may have to scroll down a bit, even if you’re on the longer iPHone 5 screen. Now scroll down to where you see the Signature option and tap it.
The two options on the top are All Accounts or Per Account. If you tap to enable the former, you’ll have one signature across all your email accounts. If you tap on Per Account, you’ll get options below to create a signature for each email account on your iOS device.
Now when you create or send an email from any of these specific accounts, you’ll have the added satisfaction of knowing that the signature is appropriate to the people you’re communicating with. Unless, of course, they’re all inappropriate signatures, you sly dog, you.
Use HTML In Your Email Signature
We’ve shown you how to use Emoji in your signature, taking advantage of the rich text abilities of iOS 5 and up, but iOS 6 adds HTML support for signatures. Now you can put any rendered HTML into your signature on your iPhone, iPad or iPod touch. Here’s how.
The easy way to do this is to download an app to your iOS device: Nitro HTML. It’s a decent little HTML editor for the iPad or iPhone/iPod touch, and it’s free, so you can’t lose.
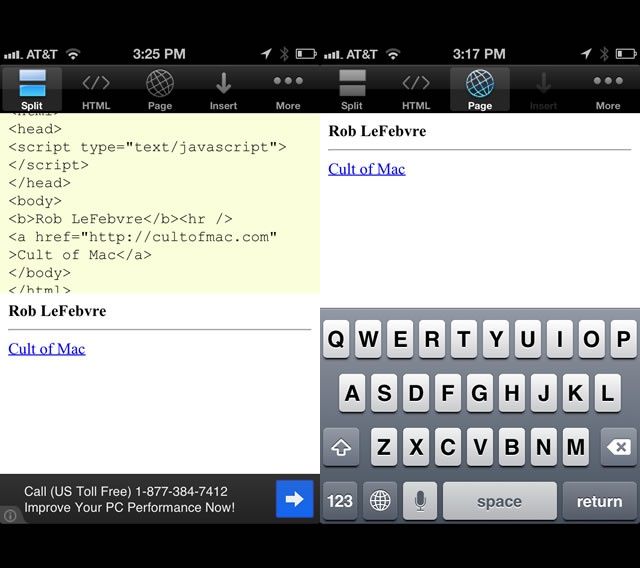
The app comes with an example HTML “page,” but you can start from scratch. First, launch the app and tap on the More button in the upper right. Tap on New Page to get a basic HTML page to start with. Give it a name, and confirm with a tap. The app will give you a basic page with “Hello World!” in it. The Split view shows the HTML code on the top, and the rendered web page on the bottom.
Now all you need to do is delete the words, “Hello World!” and type in your name there. Then move the cursor to the other side of the rightmost </b> tag. You might want to tap on the </> HTML button at the top for more easy selection and cursor movement. Once you have the cursor at the end of the line, tap the Insert button at the top of the screen, and choose Horizontal Line. Then tap Insert again and choose “Hyperlink.”
Put your URL in between the quotation marks, right after the <a href= area. So, for this website, you’d type <a href="https://cultofmac.com">. Then, delete the placeholder text that says Hyperlinked Text and replace with the name of your link (Cult of Mac). Now the code should read:
<b>Your Name</b><hr />

<a href="https://cultofmac.com"

>Cult of Mac</a>
You can use any HTML you want here, of course, so if you have fancy HTML skills, feel free to type it in. Once you’ve finished your HTML coding, tap on the Page button at the top of the screen to render it out. Tap and hold on the screen to highlight the web page. Tap on Copy at the bottom of the screen, and then launch your Settings app.
Navigate to Mail, Contacts, Calendars, then scroll down to the Signature area. Tap there to bring up the signatures for all your accounts. Tap into the field under the account you want to put the HTML signature in, and tap, hold, and paste.
Boom! You’re HTML signature-ified. For reals!
Set Up Per-Account Notification Styles
I like to be notified when email comes in, but I sure do get a lot of email. Prior to iOS 6, I was relegated to just dealing with it, and setting the type of notification–Badges, Banners, and Sounds–for eMail in general. It got a bit tedious, to say the least, with the four main accounts I check on my iPhone.
You know now that you can set up a different signature for each email account you check on your iPhone, iPad, or iPod touch running iOS 6. But did you know you could also set up a different Notification style for each account, as well?
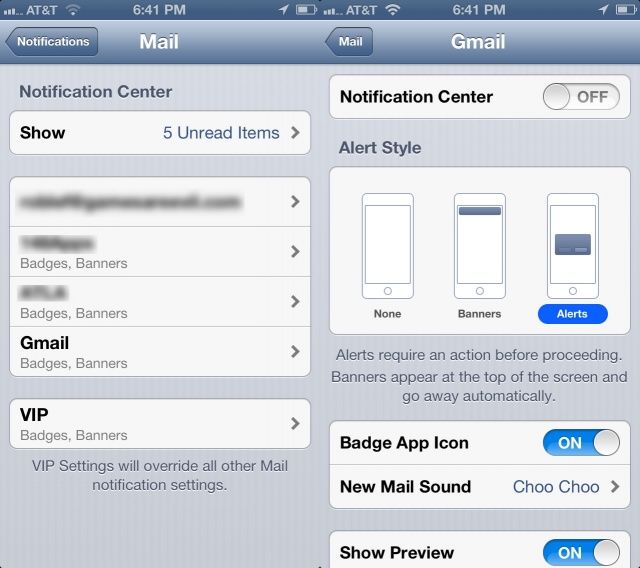
Head into your Settings app with a tap, and then navigate to the Notifications section. Tap there, and scroll down to Mail. You’ll see each of your Mail accounts there on the screen, as well as a separate VIP notification section. Tap on the email account you want to customize Notifications for, and you’ll be able to set the type of alert to None, Banners (at the top of your screen), or Alert (which is a Badge, really). You can then toggle the Badge App Icon ON or OFF, set a specific sound for that account, and decide whether to show a preview or not. You can even decide whether that email account should show up in the Lock Screen; just toggle View in Lock Screen to OFF if you don’t want that secret email address to show up when your iPhone is out on the table at the restaurant. What? It happens!
Tap the Mail arrow at the top left of the screen to back out, and set each of your Mail accounts however you like. Tap the Home button when finished, and you’ll be able to know which email account is claiming your attention, or ignore emails for accounts that you use for junk mail. The VIP notifications override the account-specific settings, so if you want to just get notified when a VIP sends you email, turn notifications off for everything except VIPs.
Email Pictures Without Launching The Photos App
So, until iOS 6, in order to email photos, you had to drop into the Photos app, open one photo at a time, and tap the Share via email button. You can still do this, or you can tap the Edit button in Photos and share multiple photos to email or other services like Facebook or Twitter.
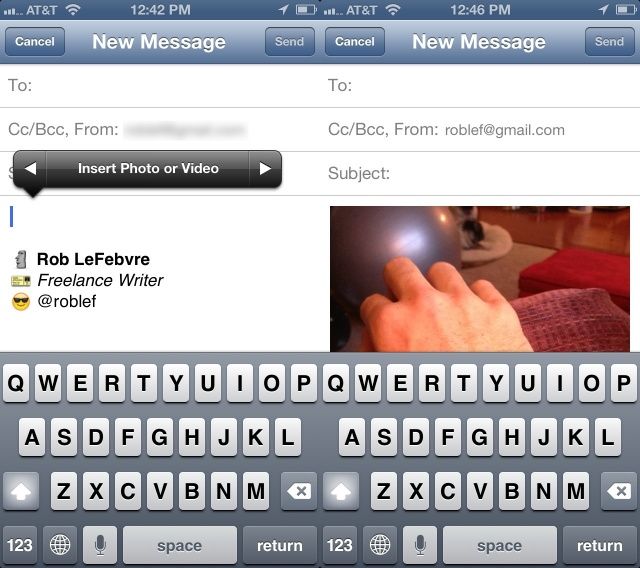
In addition, however, you can insert pictures into an email right inside of Mail app, without ever having to leave the app to get your images, which is much more Mac-like, to be honest. I mean, if you’re sending an email, you want to be able to add photos right there. Right? Right.
Here’s how to do just that.
Launch Mail on your iPhone, iPad, or iPod touch, and tap the new email button in the lower right hand corner of the screen (on the iPhone). The familiar email fields will show up and you can put in the intended recipient, any carbon copies, and a Subject.
Then, in the body of the email, double tap anywhere in the white space. When you do so, you’ll see the normal Select, Select All, and Paste pop up menu. Tap the right arrow there, and you’ll get an “Insert Photo or Video” option. Tap that button to get to the list of shareable photos, including your Camera Roll, your and others’ Shared Photo Streams, and any albums you’ve set up. Tap through to the photo you want to insert into email, and tap the blue Choose button. Your photo will pop itself into your email, inline.
You can’t yet add more than one photo at a time, so you’ll need to double tap below your first inserted picture and repeat the process for multiple images.
Now you can add photos while you’re in the Mail app without having to jump out and use the Photos app to set up your emails. Brilliant!
![Use iOS 6 Mail for Your iPhone, iPad, and iPod touch The Right Way [Feature] mail](https://www.cultofmac.com/wp-content/uploads/2012/10/mail.jpg)
