tips and tricks - page 50

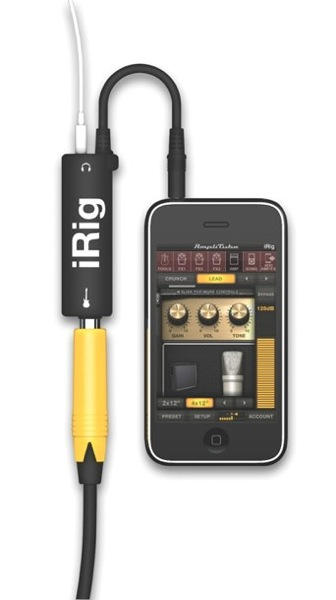
Plug Your Guitar into your iPhone and iPad with this DIY iRig

By

iRig-large.jpg

No way would I ever plug in my Gibson SG Les Paul Custom into my iPhone 3G. Just no way. Now that I have the iPhone 4 and its increased processor speed, crystal clear pictures, and hardcore stage presence, I’ll reconsider.

Seriously though, playing an instrument through an iDevice is more of just a hobby or gimmick if you’re going to try and use it for modeling amps and effect pedals. What really convinced me to hook up a quarter inch jack to my phone was the Moog Filtatron App. Synthesizers are most certainly perfect for and acceptable to use in your music even if they’re coming from you Macbook or iPad. If they have the Moog name attatched to it then you’re just that much more legit.

If you have a box full of cables tucked away somewhere, you may have all that you need to construct your very own iRig. Even if you purchased all the cables from The Shack, you’ll probably come away with a cheaper version, and you’ll feel like MacGyver.

Here’s how I put together my own audio interface:
100 Tips #32: Use The Spacebar For Page Down

By

20100929-spacebar2.JPG

When you’re viewing something like a web page, or an email message, or a PDF – anything that isn’t a text field for typing in – you can use the spacebar to scroll down in page-sized increments, just like a Page Down key that you were probably used to having on a Windows machine, and now won’t have if you’re using a Mac notebook.

It’s just as easy to go in the opposite direction. You can scroll up again by hitting Shift + spacebar.

(For the record, Page Up on a Mac notebook is officially done using Function+Up Arrow, and Page Down with Function+Down Arrow. But a lot of the time, using the spacebar is quicker and easier.)

I would never have thought to include this in the list of 100 tips, because I thought it was so universal. I’ve been using this trick for so long, it’s become second nature, and I just assumed that everyone used it.

But a post on Reddit today caused the penny to drop: it turns out that many of the readers there hadn’t discovered this little gem, so I thought it was worth passing on to you as well.

(You’re reading the 32nd post in our series, 100 Essential Mac Tips And Tricks For Windows Switchers. These posts explain to OS X beginners some of the most basic and fundamental concepts of using a Mac. Find out more.)

100 Tips #31: How To Customize The Toolbar

By

default100tips.jpg

At the top of many OS X applications you’ll see something like this:

20100924-beantoolbar.jpg

…a row of buttons, known as the Toolbar. This particular Toolbar is from word processing application Bean; different apps will have different buttons and different toolbars, but they will all look something like this.

The point is, wherever you see a Toolbar like this, you can customize it to suit your needs. You can put more buttons up there, or have just one or two. Or none at all.

Here’s how you do it.

100 Tips #30: Where’s The PrntScrn Button On A Mac?

By

20100923-prntscrn.jpg
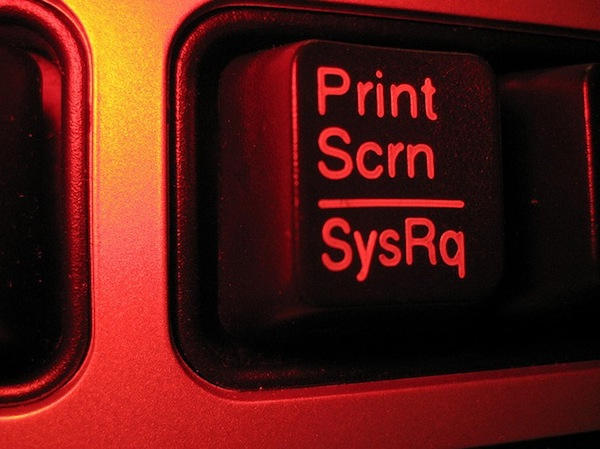
Photo by Phil Sexton, used with thanks under CC License

Windows users are accustomed to a “Print Screen” or “PrntScrn” button on their keyboard. When hit, the computer takes a picture of the current screen and saves it to the clipboard, ready for pasting into a graphics program.

So where’s the PrntScrn button on a Mac? How do you take a screenshot?

Vance L from Australia contacted us at 100tips@cultofmac.com saying that when he switched from PC to Mac, he spent 10 minutes looking for that button before realising it wasn’t there. But as he found out, there’s another way.

How To Play Random Albums From iTunes

By

20100923-randomalbum.jpg

If you’re using iTunes and you have a lot of music, it’s not that easy to browse through many hundreds of albums and select one to listen to.

For those of us who still like to listen to entire albums, there are ways to pluck one album at random from your library and get iTunes to play it.

The first is to grab this script from Doug’s AppleScripts. It will do the job perfectly well.

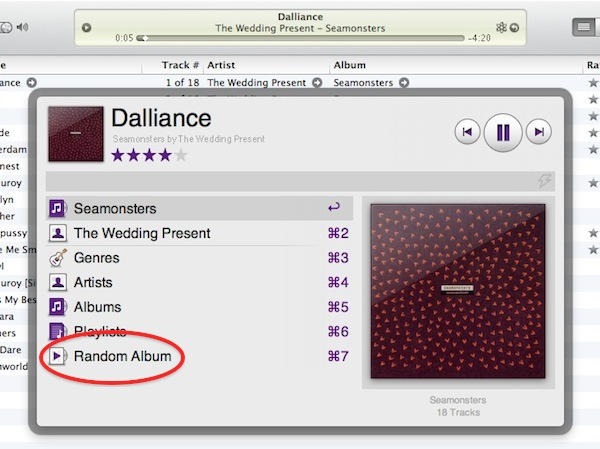
The second, and my new favorite way, is to use the optional Powerpack add-on to Alfred and the “Random Album” command you’ll find there (see screenshot above).

I’m enjoying using this because it’s very quick and simple. Alfred has to create its own iTunes playlist, which gets instantly re-populated with a new album’s worth of tracks every time you activate the command – which, since you’re using Alfred, only takes a couple of keystrokes.

Convert Any Document Into an eBook Viewable in iBooks [How To]

By

iPod
Photo: Jim Merithew/Cult of Mac

Now that Apple has made iBooks available on all iOS devices users can read their purchased eBooks on a number of different devices. But what if you have a couple large RTF, DOC, TXT, or LIT files of your own that you want to view in iBooks you’re out of luck. In this tutorial we’re going to show you how to get digital and convert your documents into eBooks so that you can enjoy reading them on your iPad, iPhone or new iPod Touch.

100 Tips #29: What Is That Button In The Top-Right Corner Of Every Window?

By

20100916-toolbarcontrol.jpg

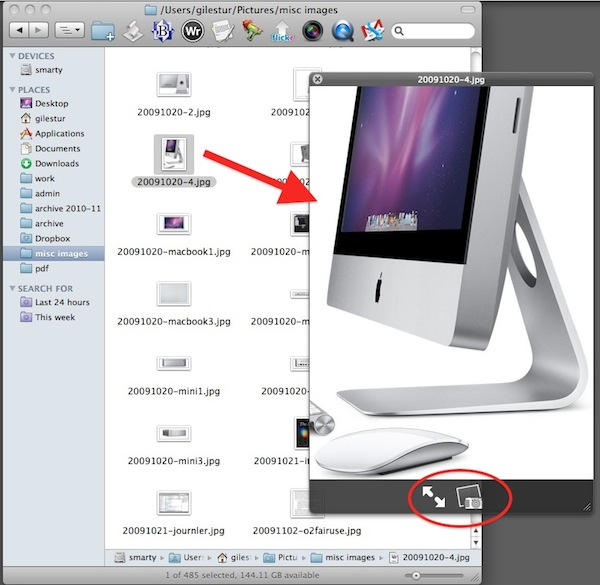
Look at this button in the top-right corner of a Finder window. Ever wondered what this is for?

It’s called the “toolbar control button” and you’ll see it all over the place in OS X. It lives in the top-right corner of an application or document window.

But what does it do? Simple: it hides the toolbar from view. The toolbar is that strip across the top of the window where buttons and controls live. You can choose to leave it there all the time, or you can reclaim that screen space by getting it out of sight. That’s what this button is for.

Let’s look at an example.

100 Tips #28: How Do I Defrag My Mac?

By

20100913-defrag.jpg
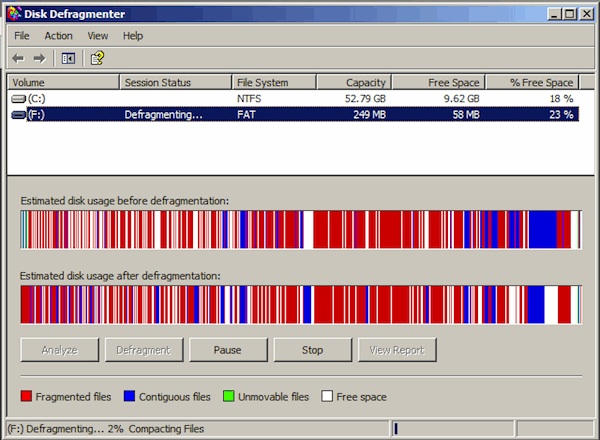
Image by mixlass, used with thanks under CC license

You don’t.

There’s no need to. The OS X filesystem is designed to look after files properly in the first place, so that’s one thing you don’t have to worry about.

Sometimes – not often, but sometimes – you might hear your computer’s hard disk whirring for no apparent reason. Among other things, that could be the system looking after itself – moving stuff around on the disk so that there’s no need for you to actually sit down and click a button marked “defrag.”

If you want to know more about the technical ins-and-outs behind this, go read this Apple support document. As it points out, there’s no need to defrag your disk, and even if you download a third party defragging application and run it, you probably won’t notice any difference.

Save yourself the trouble, and spend your not-defragging time doing something fun on your computer instead.

(You’re reading the 28th post in our series, 100 Essential Mac Tips And Tricks For Windows Switchers. These posts explain to OS X beginners some of the most basic and fundamental concepts of using a Mac. Find out more.)

Rip Songs Off Your iPod/iPhone & Back On To Your Mac [How To]

By

Screen shot 2010-09-08 at 10.42.24 PM

iPods are great nifty little devices that allow you to take music off of your computer and carry  it around town with you inside a magical Apple electronic device. But what happens when you want to transfer the music that’s on your iPod and put it back on your Mac? Despite all of its friendliness, iTunes is unwilling to pry the music of your iPod or iPhone. In this walk-through we’ll show you how to reclaim your music from your iPod and get it back on your Mac.

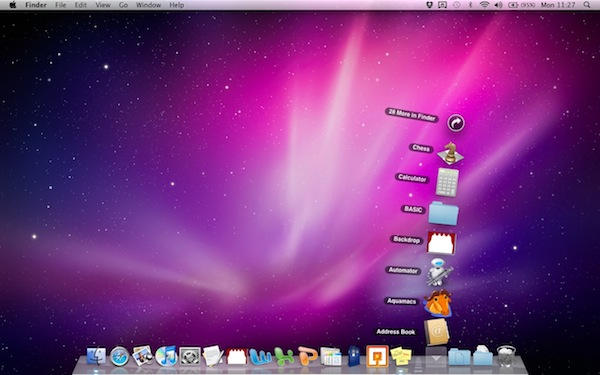
100 Tips #26: What Are Stacks?

By

20100906-stack-fan.jpg

Back in tip number 5, we had a look at how the Dock is laid out. Application shortcuts are on the left, folders on the right.

It’s pretty clear what the shortcuts do: they open an app for you. If it’s already open, they switch you to it. You can change which ones stay in the Dock all the time, so that you’ve got quick access to the applications you use most often. But what happens with the folders on the right, and how do they work differently?

The idea with folders in the Dock is to make it easier to get to what’s inside them. When they’re in the Dock, they’re known as “stacks”.

Fixing iTunes 10 Minimize, Maximize, Close Buttons [How To]

By

huh

Ever feel like Steve Jobs is messing with you just for fun? That’s what I thought when I opened up iTunes 10 and saw the minimize, maximize, & close buttons on the left hand side of the window, instead of aligned at the top.

Moving the buttons over there goes against everything OS X design is about. It’s an uncharacteristic move by Apple, unless they plan to move the buttons to the side for all of their applications, which doesn’t seem likely. Don’t worry though, there’s a super simple fix for this weird quirk if you want to bring uniformity back to OS X.

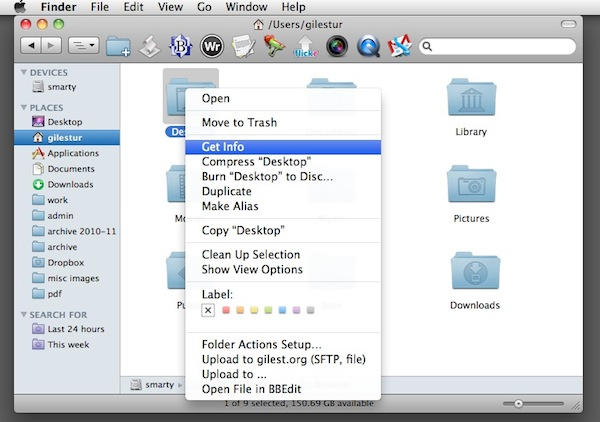
100 Tips #25: What’s The Mac Equivalent Of File Properties?

By

20100825-getinfo1.jpg

On Windows, you might have got used to right-clicking on a file and clicking “Properties” to see the meta information about the file itself – such as its size, and so on.

On Mac OS X, you can do the same thing by choosing the “Get Info” command.

You can get to it in a variety of ways:

  1. Select the file in a Finder window, and hit Command+I
  2. Select it, and click on the File menu, then Get Info
  3. Select it, then click the Action button in the Finder toolbar, and choose Get Info
  4. Control-click or right-click on it, and click Get Info from the popup list

Blogger Claims World Texting Record On iPhone 4 [Amazing Video!]

By

record_messaging

Blogger Brian Sweet of Gumball Tech claims to have beaten the world text-messaging record using the onscreen keyboard of his iPhone 4.

The record was recently set by a U.K. woman using a Samsung Galaxy S running the SWYPE keyboard. Melissa Thompson, 27, managed to swipe out the phrase: “the razor-toothed piranhas of the genera Serrasalmus and Pygocentrus are the most ferocious freshwater fish in the world. In reality they seldom attack a human,” in just under 26 seconds. (Her feat is still being verified by Guinness).

Sweet claims to have thumbed out the same phrase in less than 22 seconds, besting the record by 4 seconds. “It’s not official,” says Sweet, “but it’s definitely better than what that woman recently achieved.”

If genuine, Sweet’s feat disproves the notion that the iPhone’s onscreen keyboard is slow. Typing on the iPhone has typically been characterized as slow compared to a physical keyboards, such as those on Blackberry devices.

See for yourself. Here’s a YouTube video of Sweet typing out the phrase. Watch those thumbs fly!

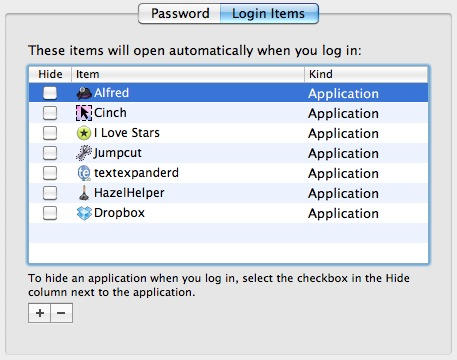
100 Tips #23: How To Control Which Apps Open Automatically When You Log In

By

20100816-loginitems.jpg

Every time you log in to your user account, you’ll have to wait while a handful of applications and background processes get themselves started.

Finder, for example, has to start running – otherwise you won’t get very far. On a brand new Mac you won’t find a lot of things running as well, but as time goes on and you add more software to the basic system, you might want to make some changes and decide exactly which apps run at log in.

There’s a place to do that in System Preferences, but it’s not immediately obvious exactly where.

100 Tips #22: Hold Down Option For More… Options

By

20100812-optionsymbol.jpg

This is the Option symbol, which you’ll see quite a lot of as you use Mac OS X.

Depending on the age of your Mac or your keyboard, the key itself might have all sorts of different things on it. It might just have the option symbol. It might have the word “Alt” on it, or the word “Option”; or both; or some combination of one of those words and the symbol.

This can make things confusing for newcomers. To make it easier, remember that Option = Alt = ⌥, and that the key you need is adjacent to the Command key.

Just as the Mac Command key is similar to the Windows Control key, so the Mac Option key is similar to the Windows Alt key, or the AltGr key. Hold it down while pressing other keys, to make them do different things. It’s a modifier.

Keeping Your White Apple Product Clean With Melamine Foam

By

omg-keyboard

Put on your deerstalker and take a gander at the patina of filth stained into my 27-inch iMac keyboard and I can’t say I’d blame you for ascribing any number of stomach-churning hygienic deficiencies to my person. Perhaps you might imagine me to be some blind, albino grub of tapioca-like consistency typing his posts from the plastic kiddy pool filled with chocolate sauce from which he bastes (you wouldn’t be far off), or as a man who habitually deep wipes with Apple products.

In actuality, I’m not nearly that filthy, but I’m also a smoker. Worse, I’m a pipe smoker, and so my aluminum keyboard’s crevices tend to fill with latakia detritus, and the ASDF keys occasionally stained with tiny spatterings of tar.

Well, okay. I guess I am pretty filthy, when it’s all put down like that. Worse: in my aluminum keyboard, I have an analogue to the yellowing and browning of my lungs. As I hammer out posts over the course of the day, chain-smoking all the while, my keyboard functions as a sort of X-RAY in QWERTY of the carcinogenic staining of the life-sustaining meat bladders inside me.

I was glad to see TUAW’s pro-tip on easily keeping your white, non-glossy Apple product squeaky clean, then: the Mr. Clean Magic Eraser, a sponge made of melamine foam that apparently works a champ, and is certainly better for my Mac’s finish than my last cleaning solution: nail polish removal wipes, which was just a stupid idea in retrospect.

Anyone else got any tips on getting their keyboards white again? I’ve tried the good old pencil eraser in the past, but I’ve found cleaning the indian rubber dust afterwards pretty irritating. Let us know your tips in the comments.

Turn Off Spotlight Search For Performance Boost on iPhone 3G Under iOS 4

By

post-53404-image-44ea894722770c7078f1edff9be38115-jpg

httpvhd://www.youtube.com/watch?v=Pdk2cJpSXLg

If you’re having issues with sluggish iOS 4 performance on your iPhone 3G, Apple’s apparently launching an investigation, but according to Boy Genius Report, there’s a stop gap solution. Just go into settings and turn off Spotlight Search.

Here’s how you do it. Go to Settings, tap on General, then Spotlight Search. Now untick everything. Apparently, turning off all the Spotlight indexing solves the sluggishness issues… although I don’t have an iPhone 3G to test myself, so corroboration from our readers would be welcome.

Although an official fix from Apple would be welcome, this seems like a pretty good band-aid to me: I barely use the Spotlight search option on my iPhone, and I’d certainly be willing to sacrifice it entirely for a performance bump.

Add Twitter, Facebook to all Your iPhone Apps with qTweeter [Jailbreak Superguide]

By

post-33508-image-dbb1058b23cc3344b08b13fe090a8799-jpg

If you’re getting around now to jailbreaking your iPhone and love social media, think about adding qTweeter to your app arsenal.

There are plenty of awesome Twitter and Facebook iPhone apps, but Cult of Mac finds qTweeter a must-have because you can broadcast social media updates just by pulling the app down from the status bar, and, say, vent about your co-worker while reading a particularly annoying email (not that we would, of course), rave about a new band you’re listening to the track or ask the peanut gallery what you should have for dinner by sending them a link to a take-out menu from a web page.

This $4.99 app has been one of our favorites since it launched in 2009.  Here’s Cult of Mac’s quick guide to getting you started with it.