It’s the future, already, right? While we may not have flying cars or jetpacks, we do have computers ad mobile devices that we can speak to and that can speak to us.
Here are a few ways to make your Mac speak to you in a variety of ways. Make it read books to you right from the Kindle app, change text documents into audio files for easy transport, and even let you know when your Terminal session is finished. If that isn’t enough, we’ll even show you how to get better voices to do all this with, even in different languages. So settle in and let us know what you think in the comments below.
Make Your Mac Read Documents To You
Sure would be great to listen to every day documents easily, say, on a long drive or airplane commute. There are a ton of ways to make this happen, including some third party apps, but this is a pretty slick, easy way to turn any text you can highlight into spoken text that can be put on an iPhone, iPad, or iPod, ready to go along with you.
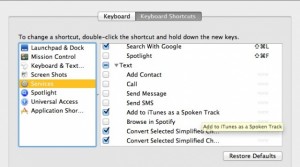
First up, it’s good to understand that this is essentially an Automator service. Introduced in Snow Leopard (and available in Lion), the service must be enabled first. To do that, launch System Preferences, which is found in the Applications folder. Once launched, click on the Keyboard preference pane icon, then the Keyboard Shortcuts tab.
 Next, click on Services in the left column, and then scroll along down to the Text section. Click the box next to the Add to iTunes As A Spoken Track service. Go ahead and quit out of System Preferences.
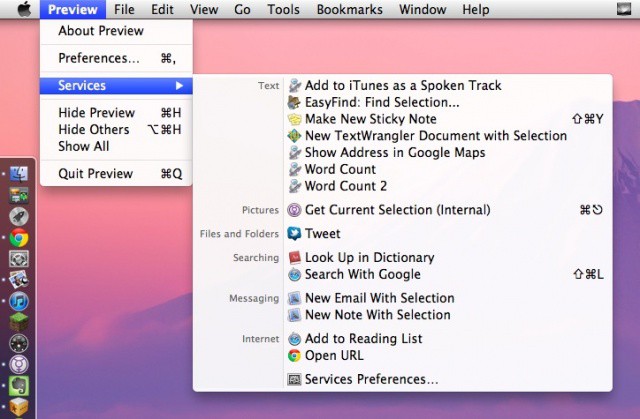
Now all you need to do is open any text document or PDF that you can select the text in, select it, then go to the application menu. For example, I used Preview to pull up a text document, I highlighted the text in it, and went to the Preview menu. Select Add to iTunes as a Spoken Track.
Once that’s done, you’ll have the option to choose a voice from your installed system voices (more on this later this week), and decide what to name the resulting file. When you hit the Continue button, iTunes will open if it isn’t already, process the file, and a chime will play when the task is completed. A larger amount of text thrown at it will take longer, of course, and is dependent on your Mac’s speed and memory.
Choosing a location different than the default didn’t seem to matter when I tried this; I found the files in my iTunes song list either way. Play the new spoken track in iTunes, or send it to your iPhone for on the go spoken document goodness.
Source: Macworld
Get Terminal To Tell You When It’s Done
Terminal has tons of great applications on the Mac. By accessing the Unix underpinnings of Mac OS X, Terminal allows power users and newbies alike to do things with their Mac that may not be enabled out of the box.
Code monkeys and script jockeys frequently use Terminal to run longer processes than typical, like compiling code (the process of making all those little lines of code into an app that will run on your Mac) or running scripts. When they finish, they finish. There’s no built in way to know that they’re done.
Luckily, there’s a neat little command that can be added to any other Terminal command that will have it speak out loud to you. While it makes little sense for a quick command, it could be pretty helpful when issuing commands that lead to longer processes.
To make this happen, simply add the command below to any other command task in terminal, at the end of the line.
&& say "text to say here"
For example, using our history Terminal command from a couple of weeks ago, you’d want to use something like this:
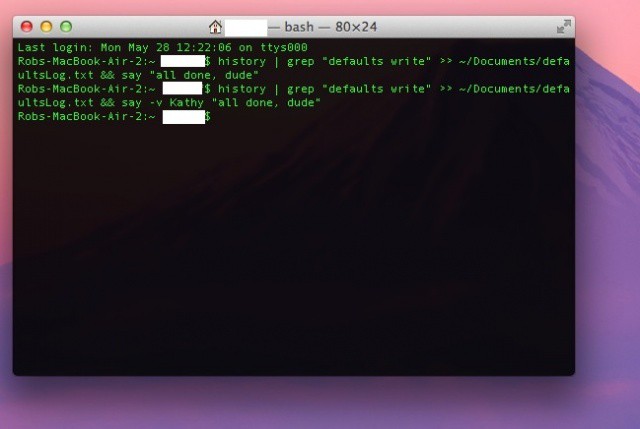
history | grep "defaults write" >> ~/Documents/defaultsLog.txt && say "all done, dude"
When the text document is created, Terminal says, “all done, dude,” notifying me that I can hop back into terminal and do anything else I need to do there. If the voice you have chosen in System Preferences isn’t to your liking, you can also use a flag on the Terminal command to change voices on the fly (you’ll have to have the voice on your system, though, to make it work). To have Kathy voice your alert, simply add the following -v flag to your command, like so:
&& say -v Kathy "all done, dude"
Fun to play with, for sure, and potentially helpful for anyone needing an audible notification that a specific task is finished in Terminal.
Source: @neils on Twitter Via: OS X Daily
Have Your Mac Read eBooks To You
Lots of us like to listen to audiobooks, and lots of us buy ebooks across a variety of services and devices. If you own an iPad, for instance, you might download audio books from iTunes or iBooks from that particular app, and then read right on your iPad. If you want to listen to iBooks, or have a visual impairment that makes it tough to see the text on the iPad screen, you can turn on VoiceOver and have the iBook read to you.
What about the Mac, you might ask? Can’t you just turn on VoiceOver on the Mac and have it read ebooks to you? Not if you use an e-Reader software like Kindle or Nook, you can’t. There is a way to get your Mac to read Kindle books to you, out loud, with its built-in text to speech software, but it’s not as intuitive as you might think. Here’s how.
First up, know right off that this trick won’t work with the Nook for Mac app, sadly. This bums me out on a personal level, since I like the Barnes and Noble e-reading devices better than Amazon’s competing products, but that’s really here nor there for this discussion.
If you have a Kindle account, then, you can download the Kindle app from the web here. Download it, mount the .dmg image file, and drag the Kindle app to your Applications folder. Double click on the Kindle app, and login with your Amazon log in credentials.
Now comes the fun part. Open up a book from your Amazon account and find a page you want your Mac to read. Click and drag across the text you want read aloud, and then hit Option-Esc. Your Mac will start to read in the voice selected in the System Preferences.
To change the voice (I prefer Alex from the built in options), open System Preferences, and then go to the Speech icon. Click it, and then click on the Text to Speech options. Choose the System Voice in the drop down there. You can speed it up or down with the slider below. Make sure “Speak selected text when the key is pressed” or none of this will work.
It’s too bad that this built-in text to speech is limited to the Kindle app, but it will also work in any web page, Preview, and the like, so you’ll likely get more mileage out of it overall. There are a couple of apps out there that apparently let you do similar things, but we haven’t had a chance to try them out, yet. Stay tuned.
Understand Your Mac Better With High Quality Voices
Mention having a computer read a book to them, and most people will give you that look. You know that look, the one that says, “I hate those goofy robot voices. I want a real person to read to me.”
While there’s no current way to make a computer voice sound like an actual human voice, many of the built in voices are much better these days. In addition, there are some high quality voices you may not even know you have built right into OS X Lion. Here’s how to enable them for use.
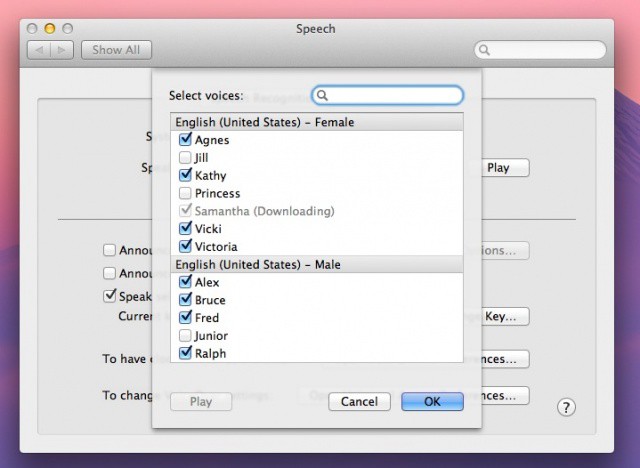
First of all, you’ll need to launch that ever-popular app, System Preferences. Click on the Speech microphone icon, and then hit the Text To Speech tab. See where it says System Voice? Click on the drop down menu and choose Customize at the bottom of the list.
Click the checkbox next to all the voices you want to add in to your system voices. Click on the voice itself and hit the Play button a the bottom of the window to preview the voice. Once you’ve chosen the voices you want, simply click the OK button, and you’ll then need to confirm the installation.
Want some accented voices, or even different languages? Scroll to the bottom, and you’ll see a ton of them, including Moira from Ireland, Karen from Australia, Sangeeta from India. There are also voices for use with other languages, like Ellen from Dutch Belgium, Mikko from Finland, and Ting-Ting from China.
Each of these high quality voices is fairly large. Samantha, an American English female voice, is around 400 mb, so if disk space is a concern, be aware before downloading.
Source: OS X Daily
![Make Your Mac Speak To You With OS X [Feature] Make Your Mac Speak To You](https://www.cultofmac.com/wp-content/uploads/2012/06/Screen-Shot-2012-06-01-at-10.10.53-PM.jpg)


