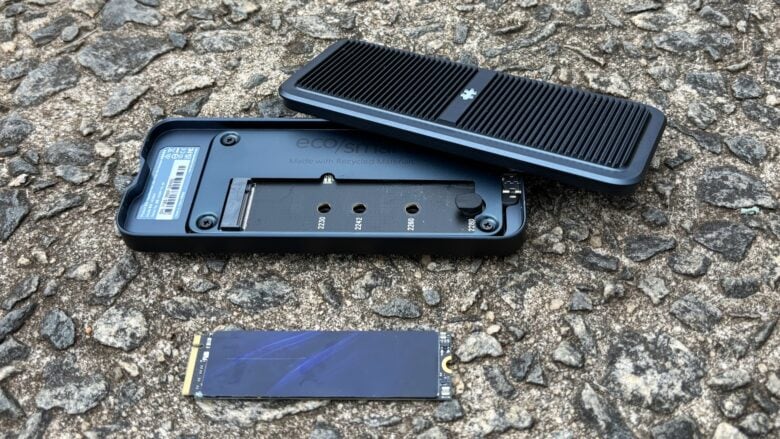
Have an M.2 NVMe drive you want to use with your MacBook or iPad? Put it in the HyperDrive Next USB4 NVMe SSD Enclosure and you can access the contents at speeds up to 40Gbps.
I plugged a solid state drive of mine into this very rugged enclosure to put it to the test.
HyperDrive Next USB4 NVMe SSD Enclosure review
Changing our computer setups sometimes results in good accessories getting orphaned. Switch from a big desktop to a svelte laptop and suddenly there’s no place for that hefty M.2 PCIe NVMe solid state drive.
Hyper has the solution. Slide the SSD into its enclosure and you can plug it into your MacBook. And then access its data at USB4 speeds.
- Crazy rugged SSD enclosure
- Simple plug-in SSD installation
- USB4 performance
- HyperDrive Next USB4 NVMe SSD Enclosure final thoughts
- Pricing
Crazy rugged SSD enclosure
When I mentioned a “hefty M.2 PCIe NVMe” I meant in capacity. These drives are actually physically somewhat small — not much bigger than a stick of gum — but add terabytes of storage.
That’s why the HyperDrive Next USB4 NVMe SSD Enclosure is itself fairly small. It’s dwarfed by a typical 2.5-inch HHD.
To get specific, the unit is 5.5 inches by 2.4 inches by 0.8 inches. That’s almost pocketable, and it goes easily into a laptop bag or backpack.
To fully understand the 0.6 pounds of weight, you need to appreciate that Hyper wasn’t fooling around when it set out to make this SSD enclosure rugged. It’s mostly made of 100% recycled aluminum. It shrugged off me standing on it and I considered running over it with my car to see if I could affect it in any way. It’s that tough.

Photo: Ed Hardy/Cult of Mac
As though to add icing to the cake, there’s a soft silicone wraparound cover for extra protection.
The exterior is mostly covered in fins to shed heat because SSDs can get hot when transferring large amounts of data. Hyper’s drive handles the job fairly well — I coped files onto it continuously for 5 minutes and the exterior temperature went up 12 degrees Fahrenheit.
On one end is a USB-C port for data and power. The protective sleeve includes a cover for this port to keep out water when not in use.
On the top is a light that shows the peripheral is getting power, and it blinks to indicate when the SSD is actively transferring data.
Simple plug-in SSD installation

Photo: Ed Hardy/Cult of Mac
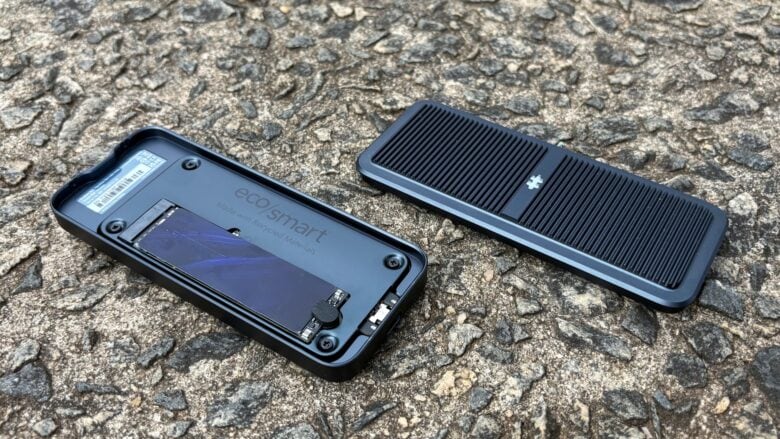
It’s understandable if you’re nervous about installing the drive in the HyperDrive Next USB4 NVMe SSD Enclosure — not everyone wants to build their own computer. But there’s no cause for concern. Inserting the drive is just slightly more complicated than making toast. No tools are necessary.
Take off the silicon cover, pop open the top (there are no screws), slide the SSD into its slot and secure the opposite end down with a silicone tab, then replace the top and cover. That’s all there is to it.
USB4 performance
Apple emphasizes that Macs support Thunderbolt, but they also support the essentially identical standard USB4. Both offer data transfers at up to 40Gbps. And the HyperDrive enclosure supports USB4, so it’s potentially just as fast.
But that’s an upper limit. The data transfer rate you experience will be set by the solid state drive you use. Hyper can’t make it run faster.
I’m doing my testing with an NVMe SSD I have left over from an old gaming rig. It tops out at 2.8 GBps. In real-world terms, I copied a 10GB test file to the drive in 27 seconds.
Obviously, that’s not straining the capabilities of Hyper’s product, but I also think this a realistic scenario. The enclosure is primarily a way to repurpose an SSD you already own for mobile use, and your performance will be set by its specs.
If you want a new external SSD for your MacBook, you’d be better off buying one designed for that. The Samsung T9 is an excellent example.
Hyper bundles a 20-inch USB4 cable with the product. Be sure to use this or one of similar quality. All USB cables are not created equal — you get poor performance out of cheap ones.
HyperDrive Next USB4 NVMe SSD Enclosure final thoughts

Photo: Ed Hardy/Cult of Mac
Don’t leave that NVMe SSD from an old desktop to gather dust. With a small investment in this enclosure from Hyper, you can make it into an external drive and use it with your Mac or iPad.
And USB4 support means those with top-quality drives can be confident they’ll get very high-speed data transfers.
★★★★★
I ran into no problems with the product. Plugging in the drive took about a minute and the product fully lives up to its claims. It’s not cheap, though.
Pricing
The HyperDrive Next USB4 NVMe SSD Enclosure costs $119.99.
Buy it from: Hyper
If you want to shop around, the Satechi USB-C Aluminum Tool-Free Enclosure provides solid competition at a considerably lower price.
Hyper provided Cult of Mac with a review unit for this article. See our reviews policy, and check out more in-depth reviews of Apple-related items.
![Keep your old NVMe SSD useful with this rugged enclosure [Review] HyperDrive Next USB4 NVMe SSD Enclosure review](https://www.cultofmac.com/wp-content/uploads/2023/11/HyperDrive-Next-USB4-NVMe-SSD-Enclosure-review-1-1536x864.jpg)

