The state of iOS photo management is a mess. In typical Apple fashion, the built-in tools work fine, but if you try to add anything else to the mix things get messy, fast. And in “anything else,” I even include iPhoto on the Mac. If you want to have be able to see all your photos on your iPad, regardless of what gear was used to take them, you’re out of luck.
If you shoot with both an iPhone and a regular camera, things get even worse. Sure, you can suck it up and use Aperture or iPhoto, but Lightroom is (for me anyway) way better.
The Problem
You take pictures with your iPhone and share them around between your various iDevices using a mixture of Dropbox, Photo Stream and other methods. These pictures are mostly in your camera roll and maybe some other folders on your iOS devices.
You also take photos with a camera that shoots RAW files, and you process these in another app (like Lightroom). These photos are trapped inside Lightroom. You could export them to iPhoto and organize them there, but what if you make an edit to the original file in Lightroom?
IPhoto is the neatest way to sync pictures between Mac and iOS if you only use one iDevice. Otherwise it’s a whole horrible mess.
The Goal
Our goal is to be able to keep an up-to-date set of photos on our iPad. These photos can come from either our actual iDevices, or our “proper” cameras, and we don’t want to deal with deleting previous versions of newly-edited pictures, nor importing versions of our camera pictures into iPhoto. If we edit a photo in Lightroom, those changes will be reflected in our iPad library on next sync. And we want to have our iPhoto library coexist on our iPads, too.
The Solution
We’re going to do two things. We will take advantage of iTunes ability to sync a folder of photos to our iPads (instead of syncing albums from iPhoto) to sync our Lightroom pictures.
And we will use Photo Stream to push our iPhoto pictures from the Mac to the iPad. This possibly little known feature is actually very useful.
Lightroom
Publishing Services

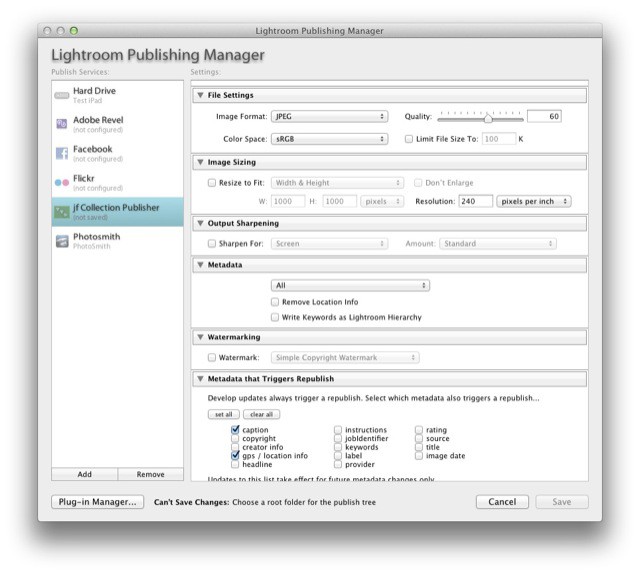
To export our pictures from Lightroom, we’re going to use a Publishing service. Publishing Services are plugins that let us export to places like Picasa and Flickr straight from Lightroom. They remember which photos have already been exported, work with nested collections and folders and – crucially – they watch for changes in the photos and can re-publish them. You can pick the criteria that trigger these updates, from simple keyword additions to full-on edits to the photos themselves.
I already detailed the process in a post named Sync Your Lightroom Collections With Your iPad, Automatically, so you should read that for the full, in-depth instructions. I’ll go over the process quickly here, though, as some things have changed.
First, download Jeffrey Friedl’s Collection Publisher plugin which “allows you to export copies of your Lightroom photos to local disk in a folder hierarchy that mimics the collection hierarchy you build within Lightroom.”
Follow the installation instructions and set the service up to publish to a folder on your hard drive. Anywhere will do, but I like to keep it inside the same folder that I use to store all my Lightroom pictures to make things easier if I move it (I use an external drive for my pictures).
Then, create your collections. These collections will be mirrored as folders within the master folder you chose above. This master folder will be synced to your iPad via iTunes, and these subfolders will show up as albums in the iOS Photos app.
Thus, one of the target collections could contain all your five-star pictures. Or you could have all portraits (keyword) taken at your studio (GPS location).
You can just drag your pictures into the folders you create, but you can also get smart, using Smart Collections. Thus, one of the target collections could contain all your five-star pictures. Or you could have all portraits (keyword) taken at your studio (GPS location). If you can make a Smart Collection in Lightroom, you can make exactly the same Smart Collection in Collection Publisher.

The best part of using smart folders is that pictures drop in and out automatically, which makes this something of a set-or-forget method. And if you decide you need another folder? Because the master folder is the one syncing via iTunes, you don’t need to visit iTunes to add it.
One note: you need to re-publish the collections manually. Every time you’re ready to sync your iPad, you just need to go through the collections and hit republish. The thumbnail view of each collection shows you which pictures will be added, update or removed, so the process is fast and easy. One thing to note: If you include the same picture in several collections, it will be exported several times, and these duplicates will also be reflected on the iPad, taking up space.
iTunes
Then head over to iTunes, plug in your iPad (or not, if you use Wi-Fi sync) and navigate to the “Photos” tab. Use the drop down to navigate to the master folder you are using for exports, and then check the “All folders” box.
That’s it! Now, every time you republish your collections in Lightroom, the new pictures will be sent to your iPad when you sync it with your Mac.
iPhoto
But what of the pictures you have snapped on your iPhone? You could certainly import them into Lightroom and keep them there (which is what my original article was about). But I prefer to keep my Lightroom for camera pictures only, and let iPhoto take care of pictures created on my iPhone and iPad. This is partly as I don’t need to use a RAW editor on the iPhone’s JPGs, and partly because I save a whole mess of screenshots to my camera roll as part of writing for Cult of Mac, and I certainly don’t want those in Lightroom.
You can pick and choose parts of my iPhoto method. I don’t use all of it myself: I “publish” albums via Photo Stream, but I haven’t yet had the courage to import and erase my iPad’s camera roll.
Publishing Via Photo Stream

This is kind of getting to the last part first, but as it underpins the rest, we’ll cover it now. We know that we can subscribe to other people’s Photo Streams, and that we can publish them for our friends and family. But you can also publish a Photo Stream to yourself. Best of all, iPhoto seems equipped to deal with this and handles it gracefully.
You can also publish a Photo Stream to yourself. Best of all, iPhoto seems equipped to deal with this and handles things gracefully.
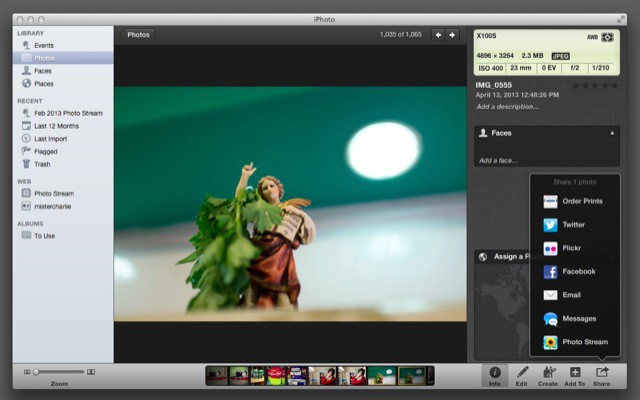
There are a few ways to publish a Photo Stream in iPhoto. The simplest is probably to select a few pictures and hit the little sharing arrow down at the bottom right, choose Photo Stream and then click the big plus sign. In the “To” field you should add the e-mail address you use with iCloud, and then give the steam a name.
If all works well, you can now head over to any of your iDevices and this stream should already have shown up. You now have an over-the-air syncing album which can be added to from any device, with changes and additions mirrored automatically. Neat, huh?
Get Organized

The first thing to do is to turn any of your existing albums into Photo Streams. The caveat is that you can’t make Smart Photo Streams, which means that if your library relies on Smart Albums you’re going to have to manually tend the copying. On the other hand, as your main Photo Stream exists on all your devices, you can do this busywork on the iPad and see the results back in iPhoto. In the future at least – the 1,000 picture limit on Photo Stream means that the initial push will have to be done on the Mac.
Next up, you might want to clean up your iPhone’s Camera Roll. This is the default place that everything gets saved, and it is also the fastest-growing folder on your iPhone, and probably the largest single item in a default iCloud backup.
Like I said, I haven’t yet organized my Camera Roll because it’s a terrifying mess. But I will.
Just plug the iPhone in and tell iPhoto to import your pictures. When it’s done, you can choose to delete the pictures from the iPhone (a smarter thing to do is to run a backup on your Mac before removing them manually from the iPhone, just in case).

Now you can choose which pictures to sync back to your iDevices. I find that this method, which forces you to throw everything out and then add it back in one thing at a time, is an easier way to get organized than chipping off a little bit of your library at a time.
Plus, in iPhoto you can use the Smart Albums to cut things up pretty swiftly. Want to make a collection of everything you edited in Snapseed? Make a Smart Album with the criteria “Any Text” “Contains” “Snapseed.” Done! You can also recreate the “Faces” section that syncs to your iPad if you do it direct from iPhoto.
Everpix, The Third Option

Everpix is a newcomer, but it’s already one of my favorite iPad apps. It a photo-browsing app that runs on the Mac and iOS, and pulls in photos from both local storage and online services (Flickr, Instagram, Facebook). You can tell it to pull from your Photo Stream, iPhoto and Aperture libraries and any local folder.
This last is the key here. Everpix’s default view is to show your photos on a timeline organized into daily events, like iPhoto’s Events tab. But if you head over to the Sources tab inside Everpix, it’ll let you browse a source at a time.
And if you add the Master Folder (where you’re keeping your Lightroom exports from part one, above) to Everpix sources, you can browse each of the subfolders as an Album. Better still, you can save those photos to your iPad’s local camera roll.
Everpix is still a little limited compared to even the built-in Photos app, but the promise of having all my photos available at any time, and with some impressive behind-the-scenes processing separating the keepers from the also-rans, it has become an essential app on my iPad.
Conclusion
Would it be better if iTunes could pull from multiple sources at once? Sure. Or if iPhoto on the iPad played nice with iPhoto on the Mac? Of course. But don’t hold your breath: Apple’s consumer software seems to get simpler and harder to use, while its pro software gets ever more complex… And harder to use.
Until something like Everpix is totally ready to replace everything else, then at least my workaround here requires almost no interaction after the initial setup. It also has the advantage of redundancy, i.e. you can scrap my method and use another without any penalties because all your pictures are still nicely organized in their respective Apple and Adobe ghettoes. Even if you choose to use Everpix, and then Google buys it and shuts it down, you lose nothing.
So, if you get a rainy day this week, why not set things up? Finally, you’ll have something better than the shoeboxes you used to keep your paper and film photos in.
![How To Make Lightroom And iPhoto Libraries Both Exist Together On Your iPad [Feature] all.jpeg](https://www.cultofmac.com/wp-content/uploads/2013/04/all.jpeg)

