Apple introduced Reminders alongside iOS 5 and Siri (for the iPhone 4S) this past October, and while the world wasn’t exactly stunned, the app made an impression. The trick with any app, of course, is finding ways to use it efficiently.
Below are five of the best tips we’ve found to help you use this simple app more effectively, all in one place for your viewing pleasure. We tried to make sure that we focused on features that all iPhone owners could use, so as not to leave out those who haven’t upgraded to the 4S just yet.
Using Reminders On Your iPhone More Efficiently
Reminders is a pretty powerful task list app. While it’s not a full project management suite, it does its job nicely with an easy to use user interface, location-based notification triggers, and iCloud syncing. Let’s start by walking you through the basics of using the Reminders app in a more efficient manner than just tapping away and hoping it all works out.
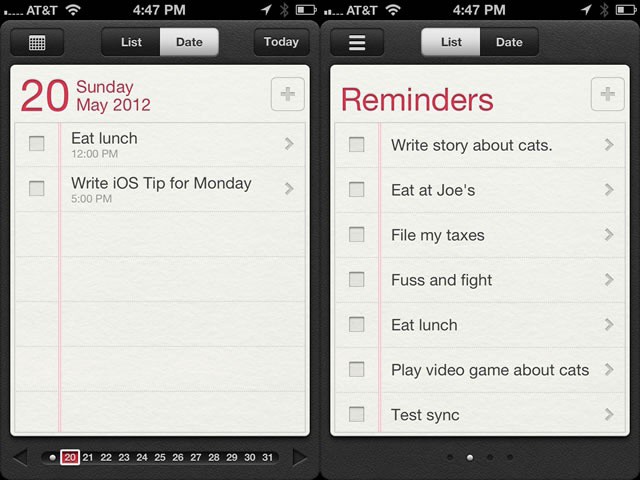
First, we need to create a new reminder. Launch Reminders from your iPhone. Tap the plus button in the upper right corner of the white area. The app will drop to the bottom of your current list and bring up the iOS keyboard. Type in your reminder. You can also just tap into the blank line below the last entry in your list.
When it’s typed in, tap on the Reminder you just created, and the keyboard will slide away. The Details screen will also pop up, where you can set a Reminder date or location trigger by tapping on the Remind Me field. Unfortunately, iPad does not have location-based Reminders. You can also set a Priority and add notes to your reminder here as well. Once finished, tap Done.
Of course, a good task management system should have a way to categorize things. Reminders has Lists, which are groups of reminders put together into categories you define. For example, to create a list of reminders for work, tap the button with the three horizontal lines on it, and then tap the Edit button in the top right corner. Tap on Create New List and type in “Work.” You’ve now created your own list. Tap Done to go back to the main Reminders screen.
Notice the top of the Reminders screen? You can change the view by tapping on the List button to see all of your reminders sorted by list, or you can tap on Date to sort your reminders by date. To switch lists, simply swipe right or left in List view.
When in Date view, a swipe left or right will move one day in the calendar, while a tap and drag along the dates on the bottom will take you to the specific date you stop on. Just like in iCal, you can tap the Today button to take you back to the Reminders for the current date. A Tap on the calendar icon (it replaces the three lines List button in the upper left corner in Date view) will take you to an actual calendar, which can be swiped through as well, though up and down is the way it works in this view.
That should have you up to speed with manually creating Reminders on your iPhone. If you have an iPhone 4S, of course, you can just tell Siri to remind you of what, where, and when you need to do something. The rest of the steps above still apply, though, for editing and scheduling of that Reminder.
Sync Reminders To Your Mac And Other Devices
Making a list of tasks is a great way to be sure you’re getting things done, right? Without being able to see those reminders across all the devices and computers you may use in a given week, though, that list is going to be fairly useless. That’s the reason services and apps like Evernote have become so ubiquitous: instant access to your notes across all the digital environments you frequent.
Apple’s Reminders system is the company’s foray into a task list, but figuring out how to sync the lists across devices is somewhat non-intuitive.
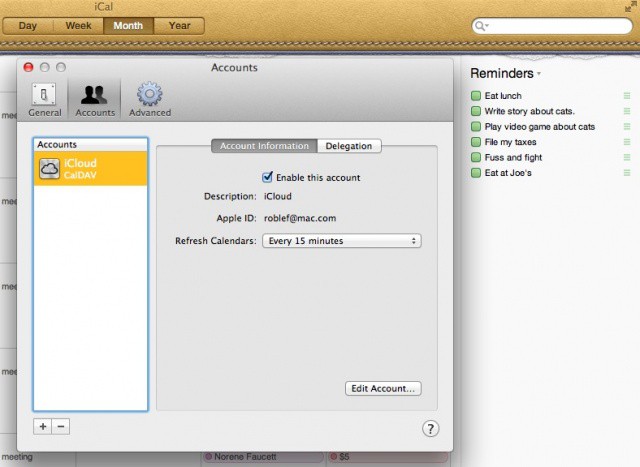
The first step here is to go to the Applications folder and open iCal, the built-in calendar app that manages your task lists. Click on the iCal menu and choose Preferences, or hit Command-Comma on your keyboard.
In the Accounts pane, you’ll want to add a new account, and then choose iCloud from the drop down lists of choices. Type in your iTunes ID and password in the fields that follow. Make sure the account is Enabled, and set the refresh rate to something that fits your activity volume, from every one minute to every hour. You can also set this interval manually.
Once enabled on your Mac, go to your iOS devices and be sure to have iCloud enabled, at least for Reminders. Launch the Settings app on your iPhone or iPad, and tap on the iCloud button. Use the same iTunes account for iCloud that you did in the previous step. Be sure that Reminders is toggled to ON. Do this on each iOS device you want to sync your reminders to.
Once these steps are done, you should be good to go.
Set Up A Location-Based Reminder With Maps
Setting up a location-based reminder on the iPhone is fairly simple. Those lucky souls with an iPhone 4S can just ask Siri to do it for them, but – like the rest of us – they still need to have an address in a Contact entry on their iPhone to make it work properly. Aside from typing in address information into the Contacts app, there’s an even easier workaround, using the Maps app.
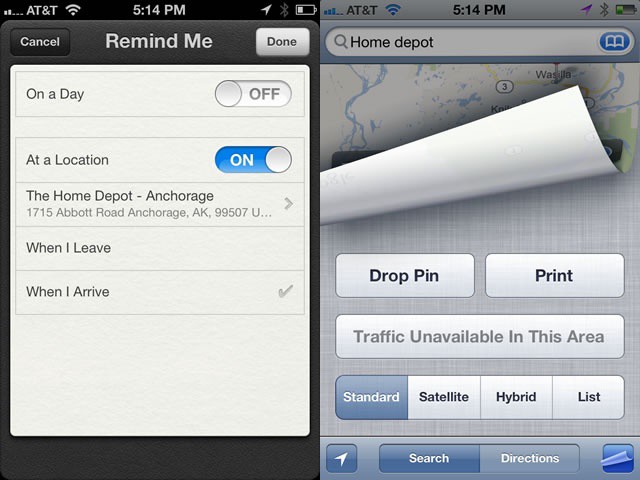
To create a location-based Reminder is simple, at first. Open Reminders and create a new task on your iPhone (iPad users don’t have location-based reminders, yet). Tap on the newly created Reminder to get to the Details screen. Tap on the Remind Me button, and then toggle the At a Location feature to ON. You’ll then have a choice to set your current location or an address from your Contacts list. You can also set the Reminder to notify you when you leave or when you arrive at the specified location.
Currently, Reminders requires an address from your Contacts list or your current location when adding a location-based Reminder. But what if you don’t have the address in your Contacts list? You’re out of luck, and you’ll need to go into Contacts to create it. Or, you can use the Maps app to find an address or drop a pin and then save that pin as a Contact.
To do that, open your Maps app. Search for a location nearby, like Home Depot. When Maps finds the store, tap on the blue circle with the right facing arrow in it. swipe down to the bottom of the screen, and tap Add to Contacts. Then tap Create New Contact, wait for the Contacts app to load, and hit the Done button.
You can now head back into the Reminders app and use the newly created Contact as your trigger location. This works the same if you just drop a pin on the map, whether there is an entry in the Maps database or not. Go to a place on your map you want to use as a trigger, and then just tap on the little curled up paper icon in the bottom right. Then tap Drop Pin. A purple map pin will show up in the center of your screen, which you can then add to your Contact list.
Collaborate On Reminder Lists With Others
Reminder lists rock, right? They let us track of all the things we need to do, access the lists on an iPhone, iPad, iPod touch or even in iCal on our Mac. Yet, wouldn’t it be slick if we could share, say, a shopping list with our husband or wife? Share a list of things to get done for a particular work project with our team members? What about set lists with the other folks in our disco band? That would be cool, right? It turns out that this is fairly simple yet not that intuitive to do.
First up, head over to iCloud.com and log in with your iTunes ID. You’ll notice that there’s no icon there for Reminders. You’ll need to click on the iCal icon, since that’s where Apple has located Reminders for now, just like on the Mac Desktop.
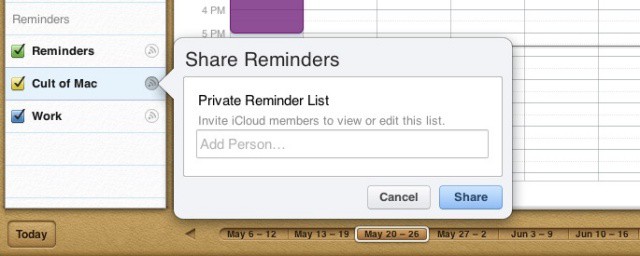
Once the web version of your calendar has loaded, look down to the left hand corner of the window. Each List you’ve created (assuming you’ve set up iCloud on the device you made the List on) will show up here, with a little gray broadcast/radio icon. Click on that round image and you’ll get a Share Reminders window to popup. Add the email addresses of the folks you’d like to share that List with and click the Share button to send them an email invite to your List.
When the person gets the invite email, they’ll be able to subscribe to the list. If you chose View & Edit for their email address on the iCloud website, they’ll be able to add things to the list as well. Perfect for sharing with those closest to us via the magic of iOS.
Try NotifyMe, An Alternative To Reminders
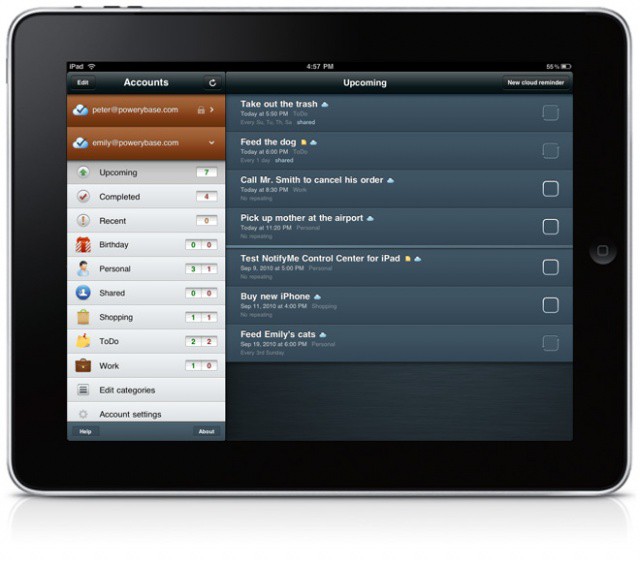
If you’re not satisfied with the Reminders app, how about an alternative? You might want to try something different, or explore features that Reminders doesn’t have. It’s ok, we still like you. One notable alternative that we’ve found is NotifyMe. We’d love to tell you a bit more about it.
While the reminders app has the advantage of being already on your iPhone and iPad with iOS 5, NotifyMe has a few extra features for your task list creating pleasure.
First of all, NotifyMe takes less time to manually input a task. Their website, with video evidence, shows that it takes 7.8 seconds and 3 taps to use NotifyMe, while Reminders takes 14.5 seconds, 8 taps to input the same task. Siri has the advantage of no tapping, but comes in at a whopping 22.3 seconds.
NotifyMe will sync across versions and it has a website for web access, but both those features require a sign up with their cloud-based service. The other thing NotifyMe has that Reminders doesn’t is auto-snooze, custom repeating patterns, pre-alerts, and the ability to customize the sound of different reminders. Plus, NotifyMe provides its API for developers who want to hook in for their own apps. Overall, pretty great features for a fairly low price.
What NotifyMe does not have is location-based reminders, which may be ok for those of among us who don’t need that particular feature. For those of us that do, however, this might be the breaking point.
NotifyMe is on sale right now, coming in at $1.99 on the iPhone and free on the iPad. It’s even on sale for $4.99 on Mac OS X. So, while it costs more on the iPhone that Reminders does, there might be enough features that you’d want to switch.
![Best Ways To Use Reminders On Your iPhone [Feature] ios5_reminders](https://www.cultofmac.com/wp-content/uploads/2012/05/ios5_reminders.jpg)
