Up next in 10


A way to use your old Mac as an secondary display.
Show More Show Less View Video Transcript
0:05
hey everyone today I'm going to show you
0:07
how you can turn your old Mac or old
0:09
computer for that matter into an
0:10
external monitor for your current MAC so
0:15
when you go to upgrade your Mac and then
0:18
you have your old one sitting around if
0:19
you didn't sell it it kind of probably
0:22
just sits there and doesn't get much use
0:24
and almost seems like it's a waste
0:26
having your old Mac there uh but there's
0:29
a thing you can do to make it useful
0:32
again so first of all before you start
0:33
anything you're going to want to have
0:35
your computers on the same network so
0:38
the Mac that you're going to be using as
0:40
your main computer and the computer
0:42
you're going to be using as your
0:43
external display they both have to be on
0:45
the same network whether that be a
0:47
wireless or a wired Network they both
0:50
have to be on the same network otherwise
0:52
you're not going to get anything in my
0:53
case since the computer I'm using isn't
0:56
equipped with a wireless card and I have
0:58
a wireless network what I did is I
1:00
strung an ethernet cord between my iMac
1:03
and the Dell I'm using and then I went
1:05
into system preferences sharing and I
1:08
clicked on internet sharing and what I
1:10
did is I turned on internet sharing so
1:12
that I can share my connection from
1:14
airport to computers using ethernet so
1:17
basically what it did is it extended the
1:18
network to that Dell computer so to turn
1:22
your old Mac into an external monitor
1:24
what you're going to need to do is first
1:26
go to screen recycler.com and download
1:30
screen recycler now you have two
1:32
different options here you can get the
1:34
free version or the paid version I have
1:36
the free version for this uh the paid
1:38
version is $29.90 but if you think about
1:41
a $29.90 is still a deal uh if you
1:43
consider what uh external monitor would
1:46
cost you now just a little word of
1:48
warning this isn't as good as an
1:50
external monitor uh but you know it
1:53
works and for $29.90 it's not really a
1:55
bad deal the only difference between the
1:57
two is with the free version you can
1:58
only use it for certain time before it
2:00
disconnects basically so you're going to
2:02
go to the download page and I'm just
2:04
going to download the free version
2:09
here and I'm going to open this up and
2:12
install it from here so here's the
2:14
screen recycler folder that I downloaded
2:17
now in it you're going to see Jolly's
2:18
fast VNC as well as the screen recycle
2:21
application now on your secondary
2:24
computer the one that you want to turn
2:25
into an external monitor you're going to
2:27
need this VNC program if you're running
2:30
on a Mac uh but if you're running on a
2:34
windows-based PC you're going you're
2:36
going to need to find a different VNC
2:39
application and if you just go to Google
2:41
and you search VNC there's tons of free
2:44
VNC applications out there on the PC
2:47
that I am demoing in this video I used
2:50
tight VNC which is just a free
2:52
application and it works well and it
2:55
might actually be better for you to find
2:58
a different VNC program rather than
3:00
Jolly's fast VNC uh because once again
3:03
this is a paid application but there are
3:05
many free VNC applications out there so
3:09
once you've downloaded screen recycler
3:10
and you open it up and everything gets
3:13
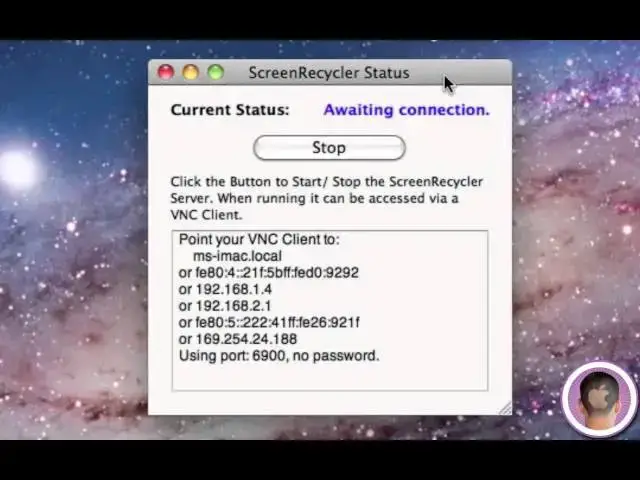
set up uh first of all here I'm going to
3:15
see the trial version reminder I'm going
3:17
to click buy later and you can see it's
3:19
running here and it's awaiting a
3:20
connection so down below that you're
3:22
going to see Point your VNC client to
3:25
and I get a couple different things and
3:27
I'll show you what that all means in a
3:28
second now if you go over to your
3:30
Windows computer you're going to want to
3:32
launch your VNC viewer at this time and
3:35
on most of these viewers if not all of
3:37
them you're going to see right away a
3:39
input box that's going to ask you for
3:41
the IP address or the name of your VNC
3:46
server and what screen recycler is doing
3:48
is it's making a VNC server on your Mac
3:51
so this is where you're going to want to
3:52
go back to screen recycler and on here
3:55
you're going to see Point your VNC
3:56
client to now I have a couple different
3:58
options MS iMac dolo I could do that or
4:02
it gives me some IP addresses that I
4:04
could try so what I'm going to do is I'm
4:06
going to use the IP address they listed
4:08
here in that case it is
4:13
192.168.1.5 and then you're going to see
4:15
right at the bottom it says using Port
4:18
6900 so then after I type in my IP
4:21
address I'm going to type in Colon
4:24
6900 and when I click connect you're
4:28
going to see your iMac screen flash for
4:30
a second and it's going to connect to
4:33
the VNC
4:35
viewer and you can see that screen
4:37
recycler is connected now and the icon
4:40
in the dock looks a little different you
4:41
can see that it's connected now on your
4:43
PC or Mac for that matter you're going
4:46
to see it it looks and acts just like an
4:48
external monitor now so for example if I
4:51
open up system
4:54
preferences and I go into the displays
4:57
tab I already have a secondary monitor
4:59
hooked up to my iMac uh so if I go into
5:02
Arrangement you're going to see the
5:03
secondary monitor to the left and above
5:06
that the third monitor that's hooked up
5:09
with screen recycler and of course from
5:11
here you can click and drag these around
5:13
to rearrange them however you choose and
5:16
you're also going to get the different
5:18
display properties uh I could change the
5:21
resolution and the color um all
5:23
different things like that now the one
5:26
downfall to this setup is that the
5:29
second AR monitor that you have
5:31
connected since it's not connected
5:33
physically to your computer uh with a
5:36
cable such as HDMI or mini display port
5:39
or something like that you're not going
5:41
to get the same bandwidth and speed as
5:45
you would with a conventional
5:48
setup so some things might be kind of
5:51
laggy on your secondary monitor uh and
5:54
this is expected with anything that's
5:57
running over a network connection uh but
5:59
but it's still it's not a monitor you're
6:01
going to want to play video on or do
6:03
anything very intensive I found it best
6:05
to run a Twitter client or just
6:08
something more stationary uh maybe throw
6:11
a finder window up there when I want
6:12
quick access to it but it's not a
6:15
monitor that I'd really recommend for
6:17
use as much as your main monitor because
6:19
you're not going to achieve the same
6:20
performance for example when I go into
6:22
the displays here and I move the window
6:24
around you can see that it's rather
6:26
laggy now I don't know if this is a
6:28
problem just with my NC client or or
6:31
with my connection itself as I have seen
6:35
other videos of this running uh for
6:37
example if we want on the screen
6:38
recycler website and other YouTube
6:41
videos of people who have set up this
6:43
same setup and it has run much faster
6:46
for them so this could be a connection
6:49
problem so basically the thing you're
6:50
going to want to know is that results
6:52
May Vary but this is all there is to it
6:54
and it's an easy way to turn your old
6:56
Mac or PC into an external monitor for
6:59
Mac and get some more use out of it so I
7:02
hope you found this video useful and
7:03
thank you for watching
#Consumer Electronics
#Software Utilities