Apple’s iMovie is an app designed to run exclusively on the iPhone 4, but it will actually run on an iPhone 3GS by applying a hack. The app puts a mobile video studio in your pocket and gives you another creative way to use your iPhone by offering you some nice video editing and enhancement features. You can turn otherwise boring videos into something more exciting with it. It won’t replace iMovie or Final Cut on your Mac, but as a portable alternative to those apps it can be pretty handy.
What’s Good
iMovie allows you to use the existing photos or videos in your Photo Library and Camera Roll, but if none of those meet your needs you can start by taking photos or making a video from right inside the app. I like the flexibility of the app to use new or existing media, since I was able to repackage a few vacation videos and the new versions brought smiles to the faces of people who viewed them.
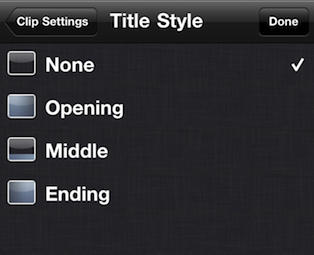
iMovie comes bundled with five themes: Modern, Bright, Travel, Playful, and News. The themes have up to three title styles an opening, middle, and ending. You won’t see the theme unless you set it up properly. So make sure to set a title, music, and transition effect for your movie. If you don’t you’ll produce a movie that defaults to cross dissolve between your clips with none of the theme you selected present. I guess you could consider this a negative, but maybe its just another theme — a simple basic one with no thrills.

You can use music that comes bundled with a theme or non-copy protected music from your iPod library. Basically any non-copy protected media can be used in your projects. I was able to use music from CDs I own that were converted to MP3 tracks by iTunes, but not music that I had purchased in the iTunes Music store.
The app can be used in landscape or portrait modes and a good portion of the screen is used for previews in landscape mode. Below the preview area is the movie time line and it has a non-moving vertical line or play head acting as a marker in the middle of that time line. The play head doesn’t move so you actually have to move the time line in order to see another portion of the movie. The portion of the movie under the play head appears in the preview area above.
Setting Up Media in iMovie
You start creating a movie project by adding your video clips or photos and you can have one or more of either of these. Unfortunately you cannot have more than one music selection in your project. This brings up an interesting problem if you want to build a project larger than one minute in length use some of your own music from your iPod library. This is due to the fact that the included theme music only runs for one minute and then it starts to loop. This might not be okay in all cases, but at least you have the option of using something else if it isn’t.

The app offers limited volume settings for the background music since it plays louder or softer. This is dependent on whether you have the video’s audio track on or not. If the audio track is off the background music is louder and if it is on then the music is softer. In my testing I did not find any issues with this and I did not miss having finer control over the volume of either track.
This outlines the basic creation of a video using one clip, but creating a video that has multiple video clips, photos, or audio is a piece of cake. You select any of these media types into your project and they appear immediately in the time line. Now the video editing we first started using on the iPhone 3GS and iOS 3 comes into play. Shrink or stretch clips and photos in the time line, rearrange them, etc. Need to add more live footage? Easy just start filming from inside the app using video from either your front or rear camera and that video clip will be inserted into your project.

Using Photos in iMovie
The ability to add photos to the movie is awesome, since this will allow you to add some transitional gaps between video clips, but it would also allow you to make some nice themed slide shows consisting entirely of photos. The Ken Burns effect is applied to all photos that are inserted which results in their being displayed with a pan and scan effect.

You have control over how long the photo appears focused on in your clip and the default is three seconds. If you tap the photo two handles appear and you can drag them left or right to lengthen or shorten the time spent on the photo in the time line. If you want to change the Ken Burns effect you can by repositioning your photo and setting the position and zoom level for the start and end of this effect. If you want to get rid of the Ken Burns effect you must make the start and end match. This doesn’t really remove the effect, but it gives you the illusion that it is gone so remember this tip.
Editing in iMovie
Once you have all your media in place you can take the time to fine tune your movie. The app will allow you to non-destructively trim your video clips. You tap on a clip and drag the handles to trim or restore footage in your video.

Video clips cannot be split from within iMovie, but you can if you want to split videos using the Photos app. That app will allow you to save a copy of the original video in its trimmed form in one or more clips. You can then use these new clips in iMovie. It would have been nice if you could split videos from inside of iMovie, but maybe we’ll see that in a future update.
You can rearrange the media in your movie by tapping and holding it while moving it into a new position in the time line. If you want to get rid of something drag it out of the time line and let go. If you make a mistake give your iPhone a good shake and you can undo the last thing that you did.
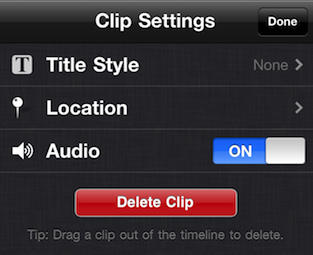
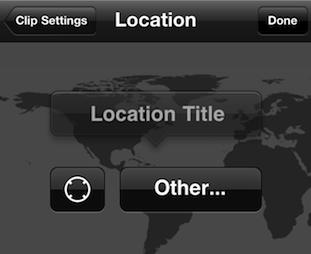
The app has the ability to use location services to add location information to specific places in your video. That information comes from your iPhone, a location you enter manually, or the information embedded in the video clip or photo you are using.

Titles can be added to clips in the three title styles I mentioned earlier: opening, middle, and ending. Titles are only available for video clips and not photos and you cannot alter the font or font size. This is one area that I’d like to see the iMovie developers work on, since titles support is pretty weak in the current release.

Generate a Final Cut of Your Movie
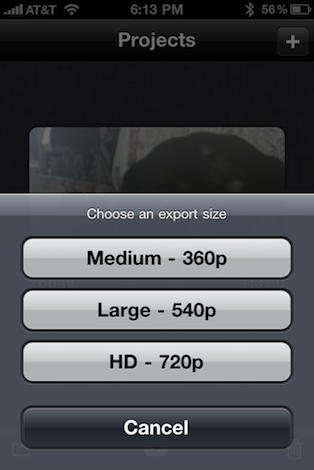
Once you’ve completed the customization of your movie it is time to move to a final cut and call it a wrap. iMovie makes this simple and painless you just have to tap the Project button to return to the projects page. Now you tap the export button and you can export your movie in Medium 360p, Large 540p, or HD 720p. The result is a movie formatted in H.264 running at 30fps in one of the following sizes 640×360, 960×540, and 1280×720. The exported video is saved to your iPhone camera roll.

You can share your finished video via e-mail, MMS, MobileMe, or YouTube. The only catch is if you share using the latter two options your video is compressed and doesn’t appear in HD. If you want the full HD version on either of these services you’ll have to import the movie onto your computer and then upload to one of these web services. My guess is this was done to reduce 3G data usage, but I wasn’t able to confirm that with Apple at press time. If this is true it would be nice if the app would remove this limit when you are on Wi-Fi.
What’s Bad
I’ll summarize what I thought was bad about iMovie here:
Minor Issues
- No access to DRM protected media in my iTunes library.
- Locked into using the Ken Burns effect on photos. It would be nice if other effects were offered or we have an easier way to turn off the effect without the tip I mentioned above.
- Limited to only one theme per video. Cannot mix different themes into your videos.
- Only one song per video.
- No generic titling. Titles are stuck on whatever the selected theme has to offer.
- No way to split clips.
- No titling for photos.
Major Issues
- You cannot share HD video directly from the phone. A big issue if you ask me. The only option here is a USB connection, since it won’t even work over Wi-Fi.
- No support for editing and producing video on the iPad.
Conclusion
You can see now that iMovie for the iPhone isn’t going to be a replacement for iMovie or either version of Final Cut on our Macs, but for on the road quick and dirty movie creation spending $5 on it is not a big deal. My only wish is that the app worked on my iPad and took advantage of it’s bigger screen and other features. The mostly minor and two major things I found issue with will probably be addressed in future updates, but in the meantime I can live with them.
iMovie is a mobile video studio app that you can carry around in your pocket it will let you enhance your otherwise boring video footage into something a bit more exciting.
![IMovie a Mobile Video Studio in Your Pocket [Review] imovieicon](https://www.cultofmac.com/wp-content/uploads/2010/06/imovieicon.jpg)

