Just got an iPad for the holidays? You lucky sod! You scored the crown jewel, the Big Tamale — the most marvelous gadget Apple has ever made. Yes, go ahead, pick up its slim aluminum frame and dive right in — Steve knew that’s what you wanted to do, and he designed the iPad so you could do just that.
We want to make sure you get everything right though, and we know there are a few key setup tricks along the way that new (and even some not-so-new) iPad users miss. So take a look at the short list of steps we’ve lined up here. They won’t take long, and they’ll make sure you get the best out of your iPad 2. Ready? Here we go.
Initial Setup
Every new iPad 2 comes with iOS 5, the new version of Apple’s iDevice operating system, which means you no longer have to plug your iPad in to a computer to activate it as with previous versions of iOS.
If this is your first Apple iDevice, just take your iPad 2 out of the box, select “set up as new iPad” and go through a few setup screens: Pick a language; select a network so you can connect to the Internet; either login to your Apple ID, or create a new one if you don’t have one already, so you can download apps and media from the App Store (and do many other cool things); and create or login to your iCloud account, which will let you sync wirelessly from anywhere (if you have an Internet connection), upload photos to your Photo Stream, wirelessly download songs and apps you’ve purchased, and more. After this step you can start playing with it, and move on to the next step when you’re ready.
If you already have an iPhone, iPod Touch or iPad, you might want to restore from a backup of your other iDevice first, which will put all your apps, media and settings from your other iDevice onto your iPad. It’s pretty easy — but it can take a while for all that stuff to download onto your iPad, so be patient. In order to restore from a backup, you’ll need to connect your iPad to a computer.
Connecting Your iPad to a Computer: Restoring From Backup or Adding Media (Music, Movies, etc.)
Once you’ve connected the iPad to a computer (via the 30-pin connector cable that came in the box), you’re ready to download media onto it or restore settings, apps and media from a previous backup.
Restoring from backup will copy everything from your other iDevice — apps, media and settings — onto your iPad. This might take a while, so be patient.
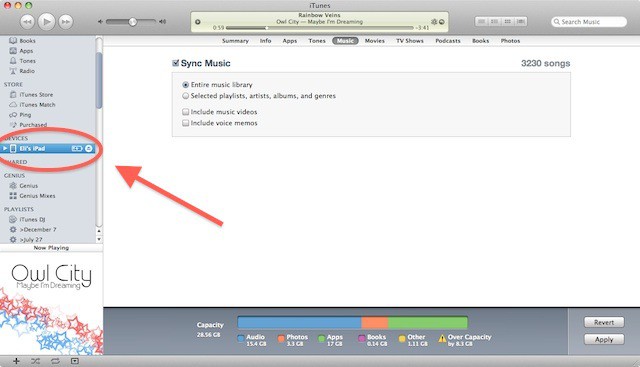
If you’re simply loading songs, movies or photos onto the iPad, there are really two paths to choose from: If you’re lucky enough to have a 64GB iPad and a fairly small media collection, you can copy everything wholesale. To do this, simply click on your iPad’s name in iTunes (you can find it in the column on the far left), click on the “Music” tab at the top, check the Sync Music box and click on the “Entire music library” button; the bar at the bottom will automatically update to show you how much space is left on your iPad. It’ll work the same way for photos and movies — though you should be aware that, in general, movies take up much more space than songs or photos.
Those of you with smaller-capacity iPads, fret not; you can manage what goes onto your iPad with finer control by selecting which playlists, artists (or projects or albums when dealing with photos), etc. you want to load onto your iPad.
keep in mind that you’ll also want to keep some space for apps, which can get pretty large on the iPad (there are, for instance, quite a few more 1GB apps on the iPad than there are on the iPhone).

Apps!
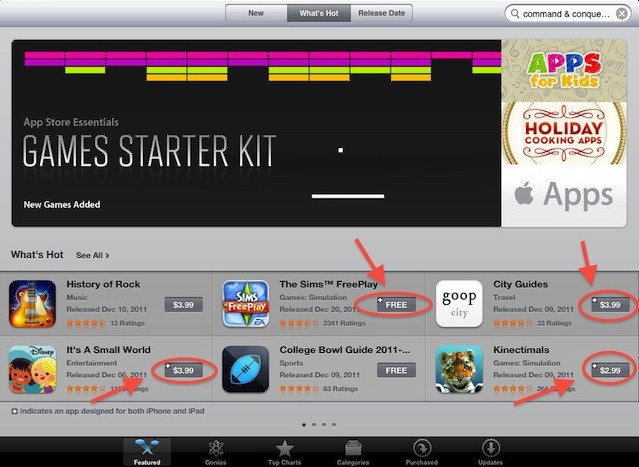
If you have an iPhone already, you’re off to a good start, because all of your iPhone apps will work with your iPad — all of them. Some of those apps will be Universal Apps; these are apps that sense which platform they’re being used on — iPhone/iPod or iPad — and adapt themselves automatically to work best on each device’s screen. So they can look completely different, depending on whether they’re being used on an iPad or iPhone. How d’you know an app is a Universal App? Easy — each Universal App has a little plus symbol in the purchase (or install, or update) button.

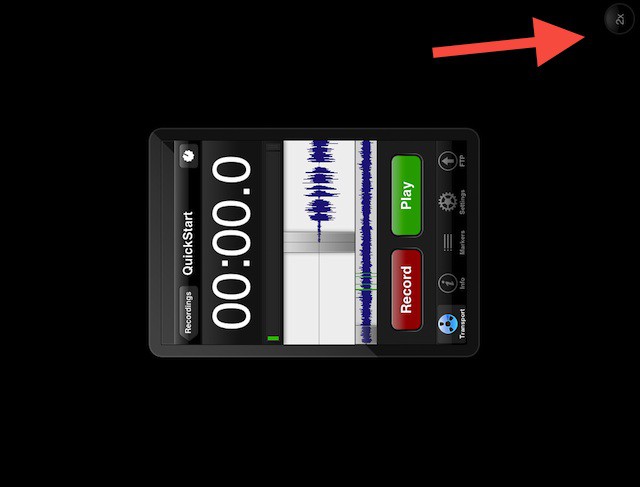
If your iPhone apps aren’t Universal Apps, that’s ok. They’ll still work on your iPad, but they’ll run in a virtual window, and look exactly the same as on the iPhone. You’ll need to tap the “2x” magnification button in the lower right corner in order to make the app fill your iPad’s screen.
(Note that the reverse isn’t true, though; iPad apps built exclusively for the iPad won’t work on the iPhone).

Rearranging App Icons
By now, your iPad should be filling up with apps, and you might want to move them around a bit — perhaps organize apps by creating different screens for different categories like games, productivity, etc. To do this, simply place your finger on an app icon (any app icon) and hold it; the apps will start shaking, and you can then move them around the screen, or drag them onto the next screen. Be careful not to hit the “x” in the corner — doing that will delete the app from your iPad (luckily, iOS asks you if you really want to do this). You can even drag apps on and off of the dock, the strip of apps at the bottom of the screen that is visible no matter which screen you’re in.
You’ll discover that app collecting can get a wee bit addictive; there are tons of great apps, many of them free. If you eventually collect so many apps they won’t all fit on the iPad’s 11 screens — or you simply want to keep things even more organized — you can create name-able folders by dragging an app on top of another app. Once the folder is created (with the two apps inside), iOS will suggest a name for the folder which you can then accept or rename.
Setting Up Automatic Downloads Via iCloud
iCloud is a great new feature for keeping things synced between your iTunes account, your computer and your iDevices (if you have more than one). For instance, once you buy a song, book or app from Apple, it’s always available on your iPad through iCloud, whether you purchased it through your computer or an iDevice — all you need is an Internet connection to download it. But you can also set media and apps to download to your iPad automatically (if you bought them on another iDevice or your computer; apps or media you buy from your iPad will, of course, immediately download to your iPad).
To set automatic downloads: Open the Settings app, then tap “Store” (it’s all the way at the bottom, just before all the app settings). You can set each of the purchase categories — Music, Apps and Books — to download automatically.
If you have an iPhone, remember that setting the “Apps” switch to ON will automatically download iPhone apps you purchase, which may not be desirable if you already have an iPad specific version of the app installed.
Keep It Secure
If you want to keep prying eyes from seeing what’s on your iPad, you’ll need to set up a passcode lock. To do this, tap on the Settings app, then tap “General,” then “Passcode Lock” neat the bottom of the screen. You can then either set a simple four-digit passcode, or a complex password (like you would on a computer) by toggling the “Simple Passcode” option. You can also set a time interval for the passcode to activate and decide whether or not to erase all data on your iPad after 10 failed attempts (beware, unless you’ve got a current backup, any data erased is gone pretty much permanently).
And that’s it, that’s the basics — you and your iPad are good to go. For those of you left wanting, we’ll have more advanced tips available soon. Got any of your own? Comment!
![Get Started With Your New iPad — The Right Way [Setup Guide] ipad](https://www.cultofmac.com/wp-content/uploads/2011/12/ipad.jpg)


