Writing Kit is one of the best text editors on the iPad (and iPhone), but it can be a little confusing at first. It’s made for people who write for a living, and specifically for those who write for the web. To this end, Writing Kit contains not only a world-class Markdown-friendly text editor, but a web browser, quick-research tools and connections to an embarrassment of other web services.
Once you get used to it, Writing Kit will quickly become your writing app of choice. With that in mind, here’s a guide to help you make the most of it.
Writing Kit is made up of three main parts: The file browser, which organizes local and Dropbox directories; the editor itself; and the browser. These cross over somewhat, and there’s also a kind of “floating” quick-research popover which can morph into the browser, but in this article I’ll split it into those three. Let’s start with the file manager.
File manager
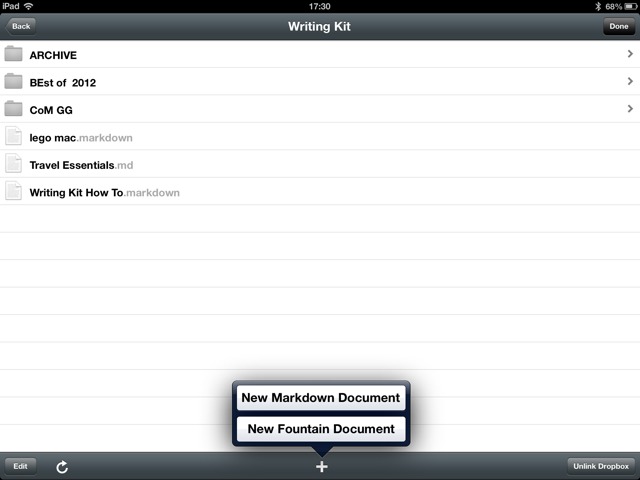
The root of the file manager is the Storage page, which gives access to local files (stored on your iPad) and your Dropbox (synced with the iPad). You can also get quick access o recent documents, but in practice I almost never use this screen, spending all my time in Dropbox. This has two advantages: One, everything is always backed up and also available on any other machine (sometimes I even write on my Mac!); and second, you can rewind your document in Dropbox’s web interface should something go wrong, using Dropbox history function.
Dropbox
How to make the source directory stick
If the file browser keeps opening in the wrong folder, then here’s how to make the setting stick:
- Tap the “drawers” icon at top left.
- Navigate to the folder you want to make the default.
- Tap “Done.”
This is the only way to do it. If you just choose a file, then when you re-open the file browser, you’ll be thrown back to another folder, and your newly-created file may well be saved in some mystery spot along the way.
You can browse to any directory in your Dropbox and access plain text and Markdown files there (use Writing Kit’s preferences in the Settings app to add extra file extensions that WK will attempt to open as plain text files). I keep all my work-related stuff in a folder called – amazingly – Writing Kit. You can also navigate subfolders, which is handy for storing larger projects.
Writing kit syncs the current folder with Dropbox often – whenever you go idle, and whenever you switch back from the editor to the file browser. It also does a good job of pulling in changes made from elsewhere (if you edit the same file on your Mac, say). You can also force it to check for updates in an open file from the sharing (box-and-arrow) menu in the editor (I told you things got a little mixed up sometimes. In practice, though, you can just browse and forget. The app takes care of things very well.
So, tap the little “plus” symbol and create a new Markdown file.
Editor
This is where you’ll spend most of your time.
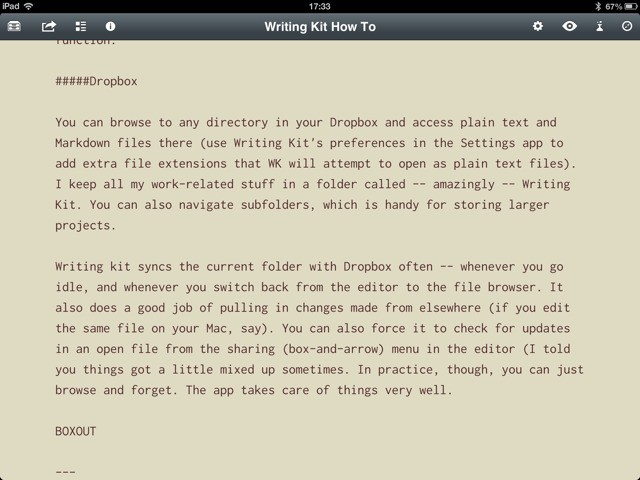
The editor consists of a toolbar and an extra keyboard row which appears even when you use a hardware keyboard. At top left are access to the file browser, the sharing menu, the help files and the incredibly handy Outline view (see below). At top right you can see the in-app settings (which come in addition to those in the Settings app), Preview, the Quick Research tool and the web browser.
Tip For Editing
- Tapping in the margins with one finger moves the cursor one character left or right, depending on which side you tap. Use two fingers to move a word at a time.
- Swipe left and right on the extra keyboard row to see even more keys.
- Highlight a word by tapping, then use the B or i keys to wrap that word in bold or italic tags.
- This also works for [], () and “”, wrapping the highlighted word without erasing it.
Outline
Settings Tips
Font, font size and document theme can all be changed from the in-app settings. You can also toggle TextExpander Touch support, Smart Return (auto-continuation of lists etc.) and spelling preferences.
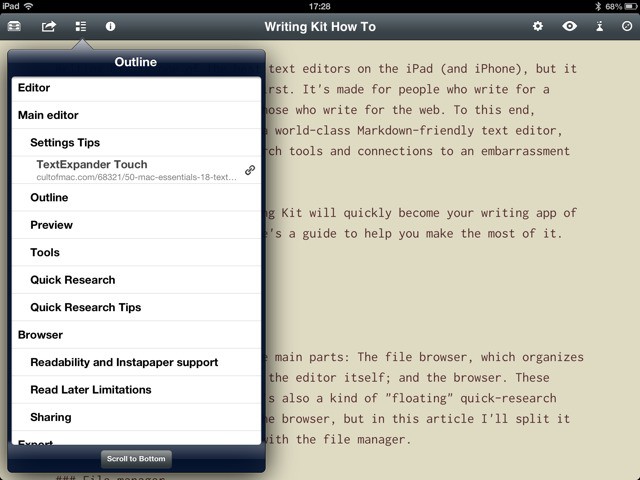
Tap this button and you get a list of sections in your article, and a list of links. These are based on Header tags, which look like ###This in Markdown, and which turn into fancy section headings in HTML.
The outline is also indented depending on the level of header tag you use (h1 is the top level, with h3 and so on becoming smaller and less important).
Tapping on any of these headers in the Outline popover will take you to that section (or link). This makes navigating large documents a breeze.
Preview
Preview is just what you think. Tap it and you see your Markdown (or HTML if you use that – you can mix and match) rendered as it would be in a web browser. There are a few glitches/annoyances (the preview scrolls back to the top every time you access it instead of showing the current edited paragraph, for example), but it is fast and does a great job.
The Preview also shows images, whether local or remote, letting you adjust positioning as so on. One thing it won’t do is support external style sheets, so you can’t preview your work exactly as it would appear on your site.
Tools

Editing in Markdown is made easy with various editing tools. You can add tables, picture, blockquotes, lists and links with the extra keyboard row, and also by highlighting a word (by tapping), which brings up a contextual menu to act on the selection.
Quick Research
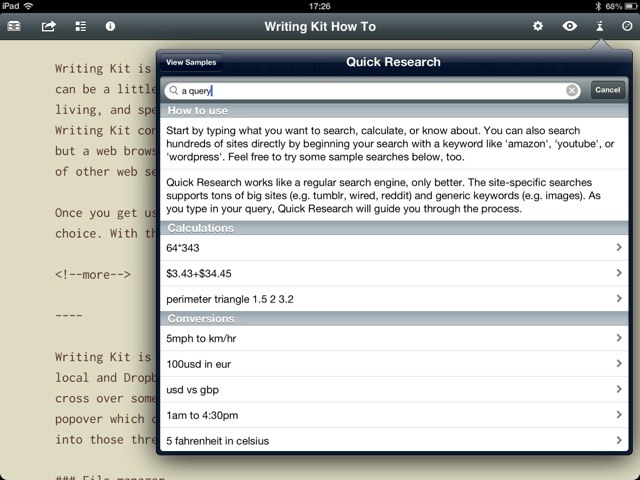
The Browser (below) doesn’t support tabbed browsing, so it can be annoying to navigate away from some source material just to look something up on Wikipedia, say. This is where the Quick Research too comes in. Tap it and you’ll get a popover with a search bar. You can just do a quick search in here, but the QR tool will also perform lots of clever tricks for you (see sidebar for some examples).
The search is powered variously by Wolfram Alpha and the Duck Duck Go search engine. It does a fair job, but thankfully you can just perform a regular old Google search from here too. This is done by typing in a query and then choosing “Google” as an option from the search-engine list. I’d prefer a setting to make Google the default, but this works fine.
Quick tip: Tapping the double-arrow button in the top right corner of the QR popover opens it as a proper page in the full browser.
Browser
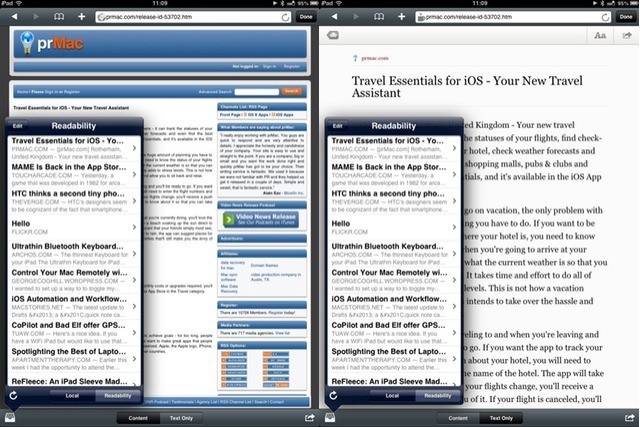
The browser is fantastic. It means that you can flip back and forth between your document and your source material without leaving the app. Tabbed browsing would be a nice addition, but the setup actually works very well anyway. This is because of some thoughtfully provided extras that make research pretty seamless.
Readability and Instapaper support
One of my favorite features is the Queue. This lets you queue up various pages to be used later (handy if you use Writing Kit’s browser for research. But the killer feature is support for Instapaper, Readability and Read It Later (aka Pocket – for some reason Writing Kit still uses Pocket’s old name).
Writing Kit’s killer feature is support for Instapaper, Readability and Read It Later (aka Pocket), letting you access all your saved articles from right within the built-in browser.
If you open the Queue (the little “inbox” icon at bottom left) and tap the name of your preferred service, then you’ll see a list of recently saved articles in the popover. Tap one to open it in the browser.
Quick Research Tips
Like a text-based Siri, the Quick Research tool can help with the following:
- Dates
- Unit (and currency) conversions
- Facts
- Calculations
- Random number (or word) generator
- Site-specific searches
Why is this so good? Here’s an example:
I use Mr. Reader to browse my Google Reader feeds every morning. When I see an article that I think might be worth writing up on Cult of Mac, I tag it. This seemingly innocuous act triggers a rather complex set of events (the tag I use is actually called “Trigger.”)
Once tagged, the article is picked up by the internet automation service IFTTT, which sends a link to the article off to my OmniFocus inbox (via the new OmniMailDrop e-mail service). It also send the article to my Readability queue.
Thus, by the time I have finished my coffee, I have a reminder in my OmniFocus inbox, and the article is there, ready to be opened in Writing kit. The beauty of using Readability is that my Instapaper account – which I use for actually Reading Later, is left well alone.
Sharing

One of the Browser’s other great features is it’s sharing setup. You can insert content from the web page right into your article, all nicely formatted in Markdown syntax. You can insert a link to the current page, or share than link (or add it to your local or online Queues) using the sharing arrow in the bottom right corner.
Read Later Limitations
Pocket, nee Read It Later, is only supported as a “write” service. That is, you can save a page to Pocket, but not use it as a source in the “Queue” popover. This appears to be a limitation with Pocket, so just pick one of the other services instead.
However, things get more powerful if you just start pressing things.
- Tap-and-hold and image in the Browser and a menu will appear offering to save it or insert it into the Editor (inserting will hot-link to the image, so beware).
- Highlighting a word or passage will let you insert the selected text as a blockquote complete with a “Via” link underneath.
- Tapping and holding a link will do the same.
So you see, an in-app browser is a lot more useful than merely obviating a trip to Safari. It really integrates as a research tool.
Export
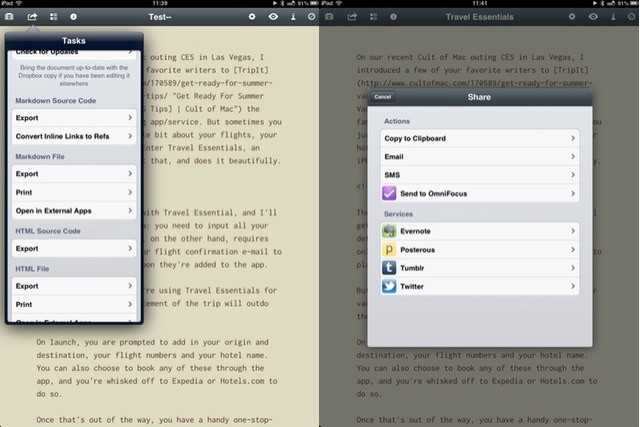
So your article is done. It’s perfectly formatted. The pictures have been saved to your Camera Roll for uploading later. You’re ready to publish. What next? The answer is “almost anything.”
Markdown Conversion
Writing Kit will produce some very clean HTML using its own Markdown conversion engine. Exporting direct to another app adds all kinds of preamble to the code, so for the cleanest output, just export the HTML to the clipboard.
You could just leave your finished masterpiece in Dropbox, but that’s just boring. You can also copy the Markdown to your clipboard and paste it elsewhere, or do the same with the converted HTML.
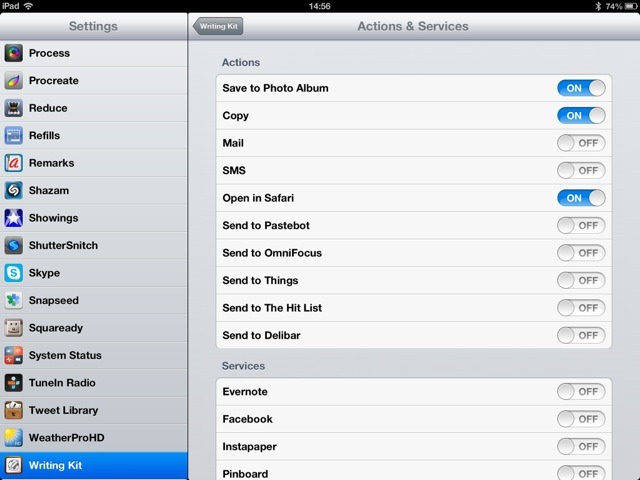
But that’s far from all there is. You can also send direct to Evernote, Tumblr (making Writing Kit a blogging app, too), OmniFocus, Things, The Hitlist, Pinboard… and a ton more. Take a look at the list in the screenshot below.
As I use Writing Kit for pretty much one thing only, I have switched off all these option to keep the in-app menus clean and simple. But this level of customization means that you could use Writing Kit for almost anything. You could even use it to write your emails, or as a kind of Universal Inbox, like the amazing Drafts.
Interested? Go grab it. The app is a paltry $5, and will work on your iPhone, too (yes, really.)
Conclusion
This is a pretty comprehensive rundown of how I use Writing Kit, but it doesn’t mention what I like best about it. What I love are the app’s rock-solid stability (I have never lost data, although Dropbox once made things go a little screwy). I also love that the app is so easy to use. I can power through my work without ever getting stuck on the interface – it really is designed to be good for writing.
So, forget about that old chestnut, the “Distraction Free writing app.” This is the “Hassle-free writing app.”
![Mastering Writing Kit, iOS’s Best Word Processor [Feature] 1359391233.jpg](https://www.cultofmac.com/wp-content/uploads/2013/01/1359391233.jpg)

