Safari 6 came out just before Mountain Lion did, and it’s bundled with Apple’s latest operating system. For many Mac users, Safari is the end of the line when it comes to web browsing, as well as a super fast modern, accessible web browser for the rest of us.
We took a look at several new features of this latest iteration of Safari, including security tips and tricks, as well as how to use Reading Lists and sync tabs from your Mac to your iOS devices, and vice versa.
Disable The Saved Website Password Feature
Safari does a great job at making your time on the web easy and simple. It will fill in frequently occurring form information, like your name, address, and email address, so that you don’t have to for every site you visit with a form requesting this information. Fill it out once, then let Safari auto-fill the info the rest of the time. It will also save website user names and passwords. Which, when you think about it, is a great idea for your own personal computer at home, but not so great for a work or shared computer.
First, launch Safari from the Applications folder, the Dock, or using some other launching app, like Alfred or Quicksilver. Then, click on the Safari menu and choose Preferences… You can bring the Preferences up with the keyboard shortcut, Command-Comma, as well.
Once the Preferences window is open, click on the Auto-Fill tab at the top of the Preferences window. Now uncheck the User names and passwords checkbox. If you want to clear out the passwords has already stored, click on the Edit button, and then click on the Remove All button at the bottom.
You’ll need to restart Safari at this point, to make sure the changes stay in effect. Now Safari won’t ask you to store passwords and user names, making your Mac just a bit more secure than it already is.
Show All Of Your Saved Website Passwords
Yesterday, we showed you how Safari 6 keeps track of the passwords you use when you visit websites that require them. They’re kept in a list in the background, so that when you connect to a secure website, you don’t have to enter in your user name or password every time. This is enabled (or disabled) in the Safari Preferences window, under the Auto-Fill tab, for some reason.
Disabling this feature makes your Mac more secure, if you are sharing the Mac or other folks have access to it. If you do use the saved password feature, however, there’s a cool little way to see what those passwords are right in Safari.
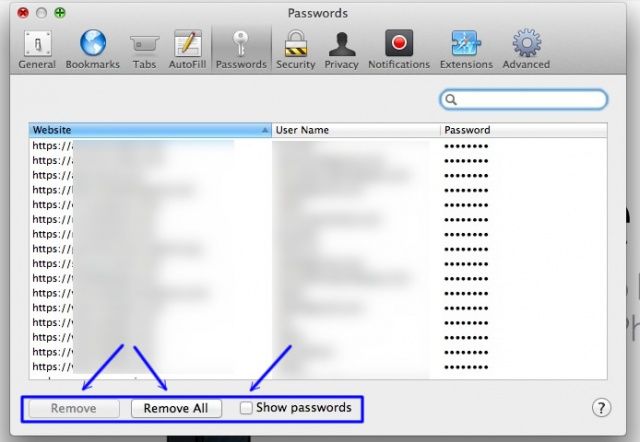
Launch Safari and then navigate to the Preferences folder, either with a Command-Comma or in the Safari menu. Now click on the Passwords tab at the top of the preferences window, and you’ll see the full list of saved website passwords that Safari has saved for you, along with the user name associated with that site. You’ll also see a password column, which is marked out as a series of dots by default.
To show the actual passwords, click on the Show Passwords checkbox at the bottom of the window. You’ll need to enter your administrator password for the Mac you’re on, and the first time you do this, you’ll have to allow several dialogs pertaining to the specific permission set for this panel, but once you do, all the dots will be replaced by the actual characters for the passwords you have saved.
Better, yet, you can delete all the saved passwords, or just some of them, with the Remove or Remove All buttons in the lower left hand side of the preference panel. There’s a search field in the upper right, as well, if you’re looking for a specific site to remove.
Disable Website Tracking And Search Engine Suggestions
There are some new privacy settings in Safari 6 that potentially prevent a couple of security issues from plaguing you as you roam about the internet.
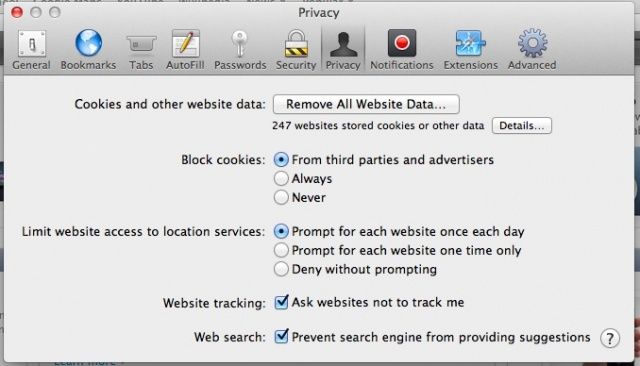
Some websites may track your browsing activity when they send you web pages to view, which allows those sites to tailor what is presented to you on a specific web page. In addition, when you type search words into the new integrated search bar in Safari 6, Safari will send those words to the search engine itself so that it can send you a list of common searches that are similar to yours. Both of these issues are potential privacy issues, and here’s how you can disable both of them.
Launch Safari, and then open up the Preferences window. You can do this with a click on the Safari menu, choosing Preferences…, or you can hit Command-Comma on your keyboard. Either way, once the preferences window opens, click on the Privacy tab at the top. At the bottom of the Privacy preferences window, you’ll see two unchecked boxes, one next to “Website tracking,” and the other next to Web search.” Click these to disable the two Safari features.
Asking websites not to track you assumes, of course, that websites will honor your request. This is not 100% privacy, but just another precaution to take. The search engine option will, in theory, keep Safari from sending your search terms along to your search engine of choice.
Open Tabs From Mobile Safari On Your Mac Via iCloud, And Vice Versa
I got really used to using Chrome on my desktop and laptop Macs before Mountain Lion came out with Safari 6 at its heels. I try to use Chrome on my iOS devices, for the history and bookmark synching, I really do, but more often than not, I end up using mobile Safari, because a) it’s the default for all clicked links in other apps and b) I really, really like Reader.
Now, if you’re using Safari on both your Mac and your iPhone, iPad, or iPod touch, you’ll be pleased to know that you can access the tabs you’ve opened on your iPhone on your Mac, and vice versa, as long as you’re using iCloud. Let’s take a look at how we do this.
First of all, make sure you’re logged into iCloud on your iOS device as well as your Mac. On your iPhone or iPad, you’ll launch the Settings app and tap into iCloud, then enter your credentials. On the Mac, launch System Preferences from the Apple Menu, the Applications folder, or your Dock, and then navigate to the iCloud preference pane with a click. Enter your iCloud email address and account password, and you’ll be logged in.
Next, launch Safari, and notice the little iCloud icon to the left of the integrated search bar. See it? Cute, right? Click on it and you’ll see a list of websites that you’ve opened in mobile versions of Safari, on your iOS devices that are logged into iCloud with the same account information as the one on your Mac. They’ll even be sorted into device-specific lists if you have more than one iOS device logged in and using mobile Safari.
Pretty slick, right? Now you can connect your iOS and Mac browsing in a fairly simple, straightforward, easy to use way.
Use Reading Lists The Right Way
Safari 6, the web browser that comes with OS X Mountain Lion, added a ton of new features when it launched a while back, and Reading List is one of the cool ones. Reading List will let you save articles without having to bookmark them, thus avoiding all the hassles of organizing and/or synchronizing bookmarks. It’s a similar system to something like Instapaper or Pocket (formerly) Read It Later, but baked right in to your Safari browser.
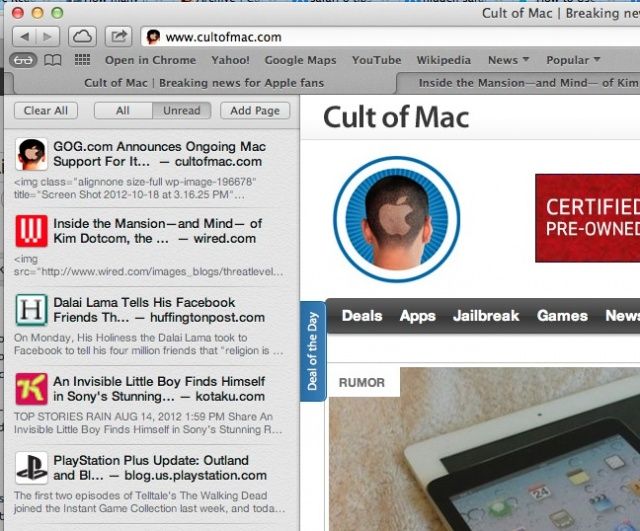
First, launch Safari and find an article you want to save for later. Once that web page or article is loaded fully in Safari, press Shift-Command-D on your keyboard. You can also click on the little eyeglasses icon, which will reveal the Reading list side panel. Then click on the Add Page button at the top of the column. The web page you’re saving will animate down to the upper left corner, and a little progress bar will show up behind the eyeglasses to show you the saving process.
To view the Reading List in Safari at a later date, you can press Shift-Command-L on the keyboard or click on the View menu and choose Show Reading List. Or, like above, you can click on the eyeglasses icon. Click on the Unread button at the top of this column to show only saved articles you’ve not read yet, or the All button to show all your Reading List content.
You can delete items in the Reading List column by hovering your mouse cursor over each item and clicking the gray X that appears, or you can right click on the item and select remove item. You can also get rid of all of the items with a click on the Clear All button at the top.
To enable the synchronization of Reading Lists, head to the iCloud preference pane. Open System Preferences and click on the iCloud icon to access that preference pane. If your iCloud credentials haven’t been entered, do so here. Then, click on the checkbox next to the Safari icon to turn on iCloud syncing for Reading Lists, which will allow you to read your saved web pages on any iCloud enabled device, like your iPad or iPhone.
![Use Safari 6 In OS X Mountain Lion The Right Way [Feature] User Names and Passwords](https://www.cultofmac.com/wp-content/uploads/2012/10/User-Names-and-Passwords.jpg)


