At the top of many OS X applications you’ll see something like this:

…a row of buttons, known as the Toolbar. This particular Toolbar is from word processing application Bean; different apps will have different buttons and different toolbars, but they will all look something like this.
The point is, wherever you see a Toolbar like this, you can customize it to suit your needs. You can put more buttons up there, or have just one or two. Or none at all.
Here’s how you do it.
Some applications will include this button on the Toolbar by default:

This means “Customize this Toolbar” and if you click it, a sheet of buttons will pop out from the bottom of the Toolbar.
If that button isn’t there, don’t worry. You can still make the sheet appear by right-clicking (or control-clicking) anywhere on the Toolbar, and selecting “Customize Toolbar…” from the menu that appears.
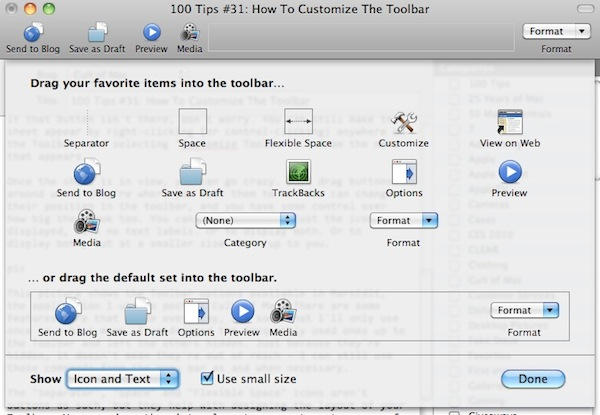
Once the sheet is in view, you can go crazy. Just drag buttons around until they’re where you want them to be. You can change their position in the toolbar, and you have some control over how big they look too. You can choose to have just the icons displayed, with no text labels. Or to display both. Or to display both, but at a smaller size. It’s up to you.

This picture shows the Toolbar options available in MarsEdit, the application I use to post to Cult of Mac. There are some features here that I use every day, and some that I’ll only use once in a blue moon. I’ve dragged the frequently used ones up to the Toolbar and left the others hidden. Just because they’re hidden, it doesn’t mean they’re out of reach – I can still use those commands from the menu bar as and when necessary.
The “Separator”, “Space” and “Flexible Space” icons aren’t buttons as such, but they help with designing the layout of your Toolbar. You can drag them into place to separate out groups of buttons.
Every Toolbar customizing sheet also has a group of default buttons at the bottom; if you want to restore everything to the way it was when you first opened the application, just drag this default set into place in the Toolbar.
This feature is built into almost every application on your Mac, and gives you a great deal of control. If, for example, you always like to have a New Document button on the far left and a search box on the far right, you can arrange all your app toolbars to work that way. If you’d rather keep things minimal, and have nothing in sight except a search box, you can do that too.
(You’re reading the 31st post in our series, 100 Essential Mac Tips And Tricks For Windows Switchers. These posts explain to OS X beginners some of the most basic and fundamental concepts of using a Mac. Find out more.)


